Quick look at early Shandon Sections

Here you can discuss sample and specimen preparation issues.
Post Reply
Message
Author
User avatar
mrsonchus
Posts: 4175
Joined: Tue Feb 03, 2015 9:42 pm
Location: Cumbria, UK

Quick look at early Shandon Sections

#1 Post by mrsonchus » Thu Aug 20, 2015 12:17 am

Hi all, I managed to get some tissue through processing today and have a few pictures of the progress of a section of leaf. The pictures show the leaf being cast into a wax mould, sectioned, stretched onto a slide and finally dewaxed and stained with a single stain (Safranin) to start the ball rolling and assess the section quality at this early stage...

Here's a piece of leaf from a shrubby sedge that's all over my garden, called Carex pendula (pendulous sedge). Its a tough and gritty tissue that can be prone to turning brittle but this specimen came through processing pretty well... Here is a piece in molten wax in the bottom of a metal mould, before the rest of the wax and cassette (ala Tissue-Tek) are added to complete the assembly of the block ready for the microtome..
Piece of leaf processed and ready to cast into wax
ws_carex_in_mould.jpg (211.84 KiB) Viewed 5799 times
Here are some sections at 10µ stretching (removes wrinkles and renders section nice and fat and even) on the surface of a de-ionised water bath (tap water will contain gasses and cause bubbles under sections when they are slipped onto a slide before drying) at about 42 deg C (anywhere between about 35 and 45 deg is fine)...
Sections stretching on water-bath before slipping onto a slide
ws_carex_water_bath_stretch.jpg (162.09 KiB) Viewed 5799 times
Next they are 'fed' onto a slide by putting the slide vertically into the water and drawing the sections up onto the slide's surface as it is lifted gently up and out of the water..
Sections on a slide, next they must be dried for a long time (about 24-hrs at least, to enable them to adhere solidly to the slide's surface
ws_carex_in_wax_on_slide.jpg (176.51 KiB) Viewed 5799 times
After drying they can be dewaxed, stained and mounted....
Here are a couple of pictures of such a section, stained singly with Safranin to allow a meaningful assessment of the sections to be made and of course to greatly enhance contrast to show tissue's structure and cell-arrangement...
Region of bottom of leaf where specialized cells facilitate the opening-out of the leaf
ws_carex_safranin_2.jpg (224.89 KiB) Viewed 5799 times
Higher power (x40) objective shows more detail of course
ws_carex_safranin_1.jpg (434.12 KiB) Viewed 5799 times
The vascular-bundle morphology (Kranz anatomy perhaps?) is very well defined, the section has very good tissue-integrity allowing good imaging of cell-arrangement, including a thick 'cap' of schlerenchyma at the the 'keel' (lowest point of the leaf which acts like a hinge when the leaf opens out flatter) of the leaf.

So, the early results are extremely promising, all cut with the same blade, the one I will soon use only as a 'roughing' blade for starting off the blocks and getting their cut-faces nice and smooth and straight before 'serious' sectioning with a pristine blade.

Sorry to be so brief, it's getting late but I wanted to get a few pictures up to show the capabilities afforded by the arrival of the mighty Shandon! :D :D

None of these hugely enjoyable and satisfying adventures would have got to this stage without the exceptionally good luck I had when buying the Shandon brand-new for such a tiny price! :D :D

Back soon with more sections and some staining adventures! :)
John B

JimT
Posts: 3247
Joined: Fri Oct 24, 2014 1:57 pm

Re: Quick look at early Shandon Sections

#2 Post by JimT » Thu Aug 20, 2015 12:50 am

Sounds like you are enjoying your travels. Look forward to more.

User avatar
mrsonchus
Posts: 4175
Joined: Tue Feb 03, 2015 9:42 pm
Location: Cumbria, UK

Re: Quick look at early Shandon Sections

#3 Post by mrsonchus » Thu Aug 20, 2015 7:26 am

JimT wrote:Sounds like you are enjoying your travels. Look forward to more.
Hi Jim, I'm having a great time!

Here are a few more pictures, staining today given a bit of time to spare..

Part of the schedule used
Part of the protocol used for these specimens
ws_sonchus_protocol.jpg (153.5 KiB) Viewed 5788 times
Wax-block (on cassette ready to put onto microtome)
Cassette ready to section
ws_cassette_ready_for_micro.jpg (157.63 KiB) Viewed 5788 times
Ready to go for dying before dewaxing etc
The rack, ready for dryer
ws_slides_on_rack.jpg (296.33 KiB) Viewed 5788 times
Next step - some staining experiments, hopefully a 2-stain counterstain using Safranin (pink) and Fast green FCF

Back soon :D
John B

billbillt
Posts: 2895
Joined: Mon Nov 10, 2014 10:01 pm

Re: Quick look at early Shandon Sections

#4 Post by billbillt » Thu Aug 20, 2015 2:44 pm

Hi John,
WOW!.. This has become a "tour de force" project!.... I am following with great interest!...
BillT

User avatar
mrsonchus
Posts: 4175
Joined: Tue Feb 03, 2015 9:42 pm
Location: Cumbria, UK

Re: Quick look at early Shandon Sections

#5 Post by mrsonchus » Fri Aug 21, 2015 12:16 am

Thanks Bill that's very generous. :) I'm very pleased you're enjoying the series.

I haven't had a lot of time today but I did manage to get a few slides through dewaxing and into alcohol, ready for staining and mounting. I did get one slide stained & mounted though, a 15µ Carex leaf section the same as in the previous photo's.

This time instead of taking the sections from dewaxing (Histoclear is the wax-solvent I use) to alcohol and staining them with an alcohol-based (in fact 'Cellosolve' as comes ready-mixed) Safranin preparation I used my own (mixed from Safranin powder) aqueous preparation.
This required the additional steps of moving the section from alcohol, via an alcohol/DIW series of decreasing concentrations (of IPA) into water, staining the slide (for 1 hour) with the aqueous (0.5%) Safranin, then moving backwards through the series to return to pure(ish) alcohol, then a series of alcohol/Histoclear mixtures until the slide was in pure Histoclear - the solvent compatible with my intended resinous mounting-medium, 'Numount' - which is a modern replacement for Canada Balsam resin, and doesn't turn yellow over time either...
Once the stained slide is in Histoclear, it is simply taken out of the Histoclear container and put on the bench ready for mounting (just as demonstrated in my video of the same procedure using an alcohol-based mountant). Excess Histoclear is wiped away with a tissue then a couple of drops of mountant (Numount resin) are dropped onto the sections, and a drop is put onto the cover-slip.
The cover-slip is then lowered onto the slide, a few tiny weights are placed onto the cover-slip (I use staples from a normal paper-stapler) and the whole thing left for about an hour before a 'first look' under the 'scope. The slide won't be at its optical best for about another 24 hours, as the solvent needs to dry and the cover-slip to 'tighten' onto the sections, but a quick set of pictures is possible and I've a few here to show you...

These sections show a far superior result to the previously-posted alcohol-based stain - the stain is Safranin in both cases, but the aqueous preparation shown below has stained with far more clarity, contrast and differentiation between cell types than the earlier attempt that has no differentiation and seemed a little 'blunt' in terms of clarity.....

The sections in these pictures are all at 15µ - a little too thick, perhaps 10-12µ would be more certain to achieve the ideal (for my intended application in this case, which is to illustrate cellular organization in the tissue) 1-2 cell thickness....
All are permanently mounted and cover-slipped, but not 100% at their optimum (dry) level yet.

Here's a 2-picture stitch at x20 to give an overview;
2-picture stitch
2-picture stitch
ws_x20_15micron_carex.jpg (241.64 KiB) Viewed 5773 times
The improved definition and differentiation is immediately apparent I think when compared to the earlier (Wednesday's) pictures.

Here's a (dry) x60 picture that shows a stomate and it's constituent cells on the underside of the leaf (which is uppermost in this picture :oops: );
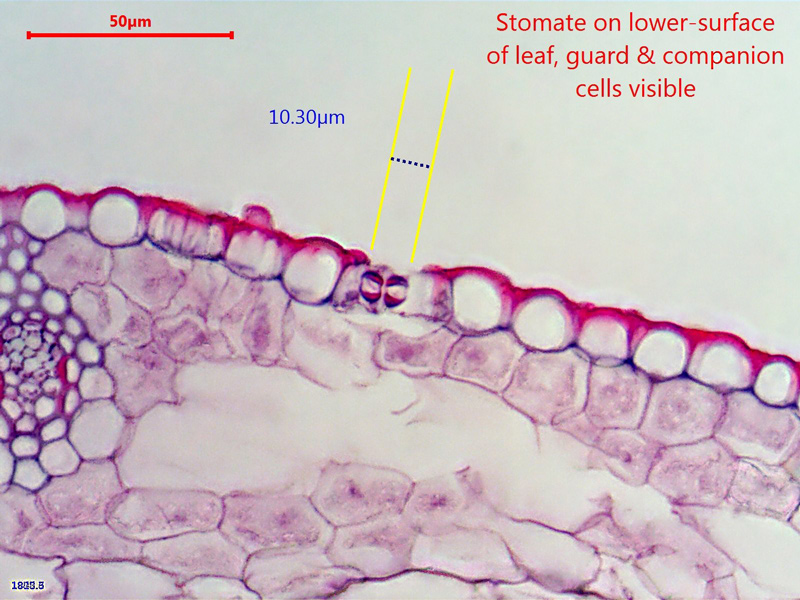
Not a very crisp picture but a reasonable start
ws_x60_15micron_carex_(2).jpg (192.21 KiB) Viewed 5773 times
This is a x40 view across the leaf and shows the major difference between the upper (on the left) epidermis and the lower, which also contains stomata, this leaf appears not to have stomata on its upper surface (cannot of course be certain of this from these sections and pictures..) but many regularly-spaced on it's lower surface. the size difference between the upper and lower epidermal cells is also very obvious. Good differentiation throughout - pretty good for a single-stain...
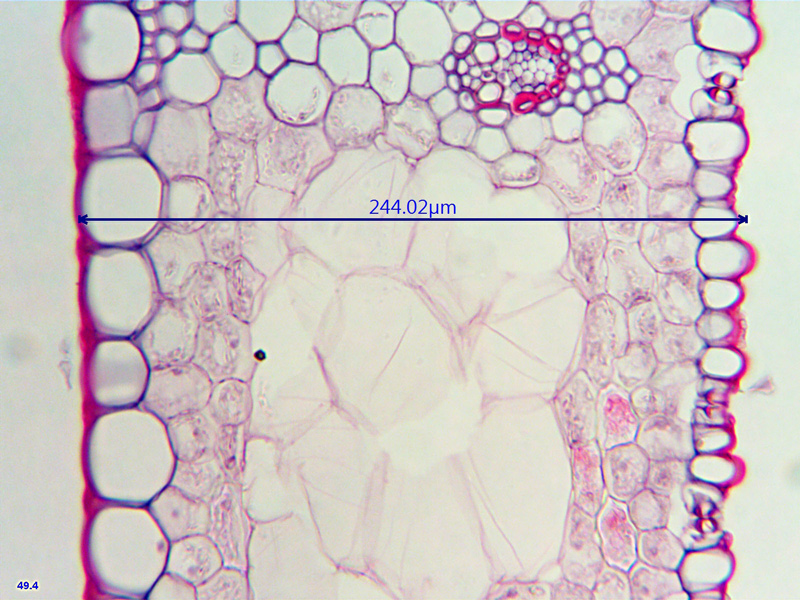
Across the leaf left = top surface
ws_x40_15micron_carex_2.jpg (265.84 KiB) Viewed 5773 times
The aqueous Safranin seems to be doing a fine job, plenty of detail & reasonable contrast helps photography.

Next up - a couple of pictures showing some really nice detail of the vascular bundles and attendant sclerenchyma cells that offer strengthening and rigidity perhaps..
This vascular bundle is seen at x40
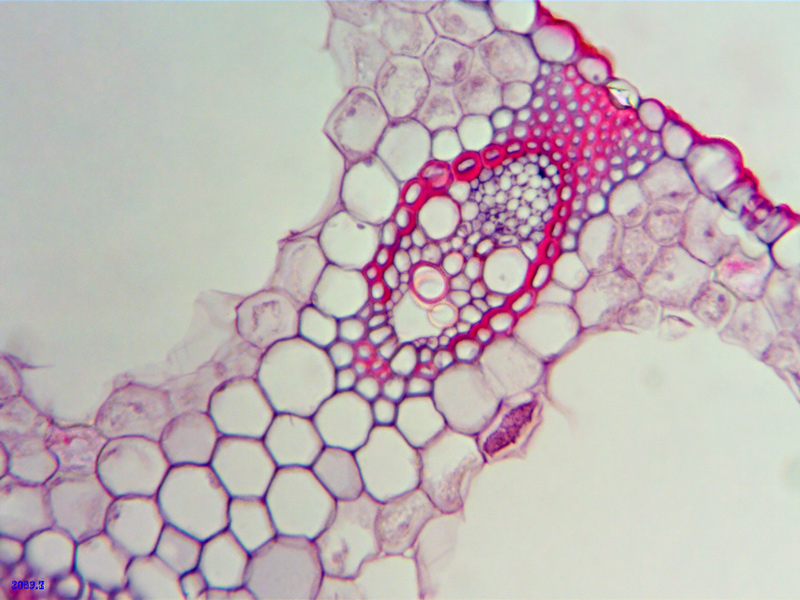
Vascular bundle midway across leaf
ws_x40_15micron_carex.jpg (202.35 KiB) Viewed 5773 times
This is a x60 view, not bad clarity of photo' but could be sharperer I think, but a good start. :)
Nice detail of bundle's structure
ws_x60_15micron_carex.jpg (281.87 KiB) Viewed 5773 times
That's about all I've time for tonight, must get some sleep. I'm very pleased with these results, things have improved a lot, tomorrow I hope to get time to stain & mount some more sections and to introduce a 2nd (counter) stain! :D

What fun, I hope you like them - I certainly love working on them! :D

The mighty Shandon has certainly given me a 'leg-up' with my sections - having fun and learning loads! :D :D
Last edited by mrsonchus on Fri Aug 21, 2015 2:56 pm, edited 1 time in total.
John B

User avatar
gekko
Posts: 4701
Joined: Sun Oct 12, 2014 7:38 am
Location: Durham, NC, USA.

Re: Quick look at early Shandon Sections

#6 Post by gekko » Fri Aug 21, 2015 10:46 am

Exceptional work! "Admirable" is far too mild a word to use here.

User avatar
vasselle
Posts: 2763
Joined: Sat Oct 25, 2014 5:32 pm
Location: France

Re: Quick look at early Shandon Sections

#7 Post by vasselle » Fri Aug 21, 2015 11:37 am

Bonjour.
Très beau travail et très bien expliqué.
Merci pour le partage.
Cordialement seb
Microscope Leitz Laborlux k
Boitier EOS 1200D + EOS 1100D

User avatar
mrsonchus
Posts: 4175
Joined: Tue Feb 03, 2015 9:42 pm
Location: Cumbria, UK

Re: Quick look at early Shandon Sections

#8 Post by mrsonchus » Fri Aug 21, 2015 2:46 pm

Many thanks gekko & vasselle, I'm pleased you like them. :)
John B

billbillt
Posts: 2895
Joined: Mon Nov 10, 2014 10:01 pm

Re: Quick look at early Shandon Sections

#9 Post by billbillt » Fri Aug 21, 2015 11:20 pm

Hi John,
You are doing a great job and providing great and interesting reading!... Can't wait for the next episode!...

BillT

User avatar
mrsonchus
Posts: 4175
Joined: Tue Feb 03, 2015 9:42 pm
Location: Cumbria, UK

Re: Quick look at early Shandon Sections

#10 Post by mrsonchus » Fri Aug 21, 2015 11:49 pm

Thanks Bill, had no real time today but did get some 5µ sections similarly stained & mounted, a comparison of the 2 thicknesses is very interesting, one is I think a little thick, the other a little thin, for varying reasons. I suspect the middle, i.e. 10µ may prove to be the optimum for this specimen. As soon as I've also stained & mounted some 10µ sections I'll post pictures and a brief comparison of the merits of the 3 thicknesses, in the context of the desired goal for these sections, as well as a purely technical perspective...

Should prove very interesting and informative, back soon with the full analysis... :D

Oh, here are a couple of quick pics of the 5µ sections, they're not dry and at their best, but all I've got right now..
A little thin I think
ws_x20_5mic_carex_3.jpg (303.36 KiB) Viewed 5739 times
and
ws_x60_5mic_carex_2.jpg
ws_x60_5mic_carex_2.jpg (376.02 KiB) Viewed 5739 times
ws_x60_5mic_carex_1.jpg
ws_x60_5mic_carex_1.jpg (367.17 KiB) Viewed 5739 times
Here's a section that 'came unstuck' and folded over itself, interesting to clearly see however that the 5µ is less (quite a lot less I suspect) than the thickness of a single-cell, a touch too thin I think, all protoplasm appears lost from many cells, leaving behind a 'skeleton' - OK (desireable in fact) for cell-outline images but I wanted much more information than that! :)
Section has left slide in places..
ws_5mic_section_folding_pan.jpg (462.93 KiB) Viewed 5739 times
Must go, sorry to be brief and hurried, full story of the three thicknesses as soon as I get the chance,,, :D
Last edited by mrsonchus on Sat Aug 22, 2015 10:50 am, edited 1 time in total.
John B

User avatar
Seb28
Posts: 230
Joined: Tue Nov 04, 2014 12:26 pm
Location: Ireland-Poland
Contact:

Re: Quick look at early Shandon Sections

#11 Post by Seb28 » Sat Aug 22, 2015 10:32 am

Well done—you've worked very hard and now the results are great ,Congratulations!
I was stuck so far,I need to get all the solvents (FAA,IPA,HC) ,hard to get in Ireland "Brunel Microscopes" sells UK only.
-Reichert Polyvar
-Olympus IX70
-Zeiss Photomicroscope
-Canon 600D

User avatar
mrsonchus
Posts: 4175
Joined: Tue Feb 03, 2015 9:42 pm
Location: Cumbria, UK

Re: Quick look at early Shandon Sections

#12 Post by mrsonchus » Sun Aug 23, 2015 12:08 am

Hi all, had a very busy and productive day today and managed to get some good work done on the sections, I've been able to stain & mount the 'middle thickness' Carex.pendula leaf sections, to complete the set of 15µ-10µ-5µ for comparisons to be attempted...
I've only got a limited time this evening (oops - it's already Sunday morning now..) to post a few quick pictures but I'll be back with a more complete look over them ASAP...

This is the 10µ section stained as before with Safranin at 0.05% for 2 hours;
ws_x20_C21_10mic_carex.jpg
ws_x20_C21_10mic_carex.jpg (203.81 KiB) Viewed 5703 times
It seems immediately apparent that this is a good thickness as the cells have retained a lot of their contents and are very nicely defined in terms of their cell-wall contrast too. It seems that the Safranin has 'more material to grab onto' (than at 5µ) and is performing very well, giving surprisingly fine detail in areas such as the stomata and protoplasm, there's even a little of what looks like nuclear-staining evident?
A promising start for the 10µ alternative! :)

A closer look reveals even more detail, both ('scope) objective and camera are working well with the fairly good contrast present in the stained sections I think, a reasonably tangible improvement? (maybe a little lower colour saturation would be better..)
x40 still has good resolution
ws_x40_C21_10mic_carex.jpg (293.96 KiB) Viewed 5717 times
Here are a couple of mid-leaf pictures, still looking pretty good;
ws_x40_C21_10mic_carex_2.jpg
ws_x40_C21_10mic_carex_2.jpg (235.06 KiB) Viewed 5717 times
ws_x40_C21_10mic_carex_3.jpg
ws_x40_C21_10mic_carex_3.jpg (166.52 KiB) Viewed 5717 times
This x60 gives quite a nice detailed image including stomata along the leaf's lower-epidermis;
Some nice stomata detail developing
ws_x60_C21_10mic_3.jpg (194.31 KiB) Viewed 5717 times
Well, I'm afraid I've got to leave it there tonight, back soon though with some side-by-side comparisons of the 'Carex-series'..
:D :D

p.s. - I also manage today to try a couple of new procedures (to me that is..);

1) I've stained several slides of the Carex using the superbly metachromatic stain 'Toluidine Blue' (TB0) with some rather good results - TB0 is said (by some at least) to be quite poor when staining paraffin sections, I suspect because of the alcohol needed to dehydrate the sections after staining as a step towards a resinous mounting medium (making it necessary to 'end-up' in Histoclear before mounting) as water & resinous-media will always simply go 'cloudy and milky' if they meet! I've used it before with live hand-sections with very good results (Chrysanthemum-pedicels) but never with paraffin-sections without making a hash of it! :oops:
I'll post a separate topic with the TB0 adventures as this one can't really get much bigger before it becomes a pain to navigate through for folk.

2) A really interesting method - pre-staining sections before dewaxing, yes - while they're still in their waxen-jackets on slides! I tried this with 2 types of tissue that I have dried, a root-section of a Sonchus.asper (a common 'weed') in an attempt to demonstrate the way a lateral-root originates from the very core of the main root - this is said to be 'endogeny', and the results are really very good! :D
This method should mean - I think - that the section never needs to be exposed to alcohol as the section can air-dry the tiny amount of water from the aqueous TB0 application (also the wax will strongly repel any water) and not therefore require dehydration on it's way to resinous-mounting - if a dewaxed section was allowed to air-dry, tissue damage would certainly occur (please don't ask me how I know this - it wasn't one of my most glorious moments! :oops: )...
Anyway, I'll probably post this method in another thread too as it could make a pretty well-defined and self-contained series itself, especially when I take the stained sections and actually dewax and mount them (I wonder what will happen..... :?: )...

Sooo loads to do and loads to write up for this fine forum! Such fun, and learning loads too! :D :D

I've many other such tests and procedural-improvements (most of the time.... :oops: ) to share - I even bought a great-big new (rather used actually :) ) desk from a charity-shop for £15! It's even got drawers both ends - what luxury - my little old dining-table for two is now living in the shed - with it's legs removed! (you never know when it may come in handy...).

Must away, back soon, loads more adventures to share! :D
John B

Post Reply