A Look at Double-Embedding

Here you can discuss sample and specimen preparation issues.
Post Reply
Message
Author
User avatar
mrsonchus
Posts: 4175
Joined: Tue Feb 03, 2015 9:42 pm
Location: Cumbria, UK

A Look at Double-Embedding

#1 Post by mrsonchus » Mon Sep 21, 2015 12:35 am

Hi all, I've been investigating the technique of 'double-embedding' as a means of improving the accuracy of the orientation of my specimens within the wax blocks from which they are destined to be sectioned with the mighty Shandon...
The purchase of the Shandon with it's ability to give me consistently good quality sections has enabled me to begin to 'target' my choices of tissue much more accurately and consequently to naturally start to use significantly smaller tissue pieces for wax embedding. In addition the use of the system I have now adopted exclusively for my processing, wax-embedding and sectioning, that of the 'Tissue-Tek' cassettes, supports beautifully this more accurate and precise approach, ensuring also consistency of positioning when mounting the wax blocks onto (into) the Shandon's specimen chuck. The cassettes fit into it perfectly and always sit in exactly the same position giving very reliable consistency with a consequently large improvement over my earlier wooden-block and rocking-microtome equipment.

Anyway, put simply, the idea as I understand it, and I could be horribly wrong - it's all new to me but seems potentially to offer huge benefits... :) , is that it's a way of making sure awkward or very fine tissue pieces that are virtually impossible to get to orientate as desired in the wax as it is poured and hardens during embedding, stay in the right position within the solidifying wax-block - for example trying to get a leaf-tissue to sit on-edge as you embed it with the intention of cutting cross-sections is frustrating enough to make you scream your head off on occasion! :oops:
So, the specimen is first encased (infiltration is not the goal here, only complete unbroken contact & support) in an agar block. Agar gel is cheap and readily available (I'm starting out with ordinary chef's agar to try out the principles of this technique at least at this very early stage), is mixed in water and solidifies into a stiff jelly that will supposedly act just like tissue as you pass it through the stages of processing that tissue goes through, right from fixing, dehydration, clearing, infiltration, embedding (in wax) and sectioning etc...
So, for example, cut some of the awkward tissue, in this case flimsy leaf pieces, and put it through a couple of days of fixation (you can set it in agar even before fixation I understand..) - I moved it to agar after it was fixed, as I already had some tissue in fixative ready to go..

Here's some tissue that I poured agar over and allowed it to simply set around and encase the tissue;
ws_DSCN2189.jpg
ws_DSCN2189.jpg (36.36 KiB) Viewed 5394 times
Next I trimmed the agar containing the tissue pieces into shapes that will stand up in the wax embedding stages and present the tissue at exactly the desired orientation... The whole block is supposed to behave exactly like tissue...
ws_DSCN2210.jpg
ws_DSCN2210.jpg (41.69 KiB) Viewed 5394 times
Here's a view through the stereo 'scope of the agar-embedded leaf tissue that should go through the rest of processing behaving exactly like one homogeneous tissue sample - hard to believe, but if it works It'll be extremely useful as a technique!
ws_100_4069.jpg
ws_100_4069.jpg (44.22 KiB) Viewed 5394 times
This 'piece of homogeneous tissue' was next placed into it's first stage of dehydration, i.e. 70% IPA to match the alcohol concentration of the FAA fixative whence it came... There's a long road ahead for this curious 'thing' to get to a stained & mounted cross-section of a leaf - but this is a first attempt and I'm expecting some sort of fatal problem, but knowledge will certainly be gained whatever happens! What an adventure with huge potential! :D
ws_DSCN2216.jpg
ws_DSCN2216.jpg (38.84 KiB) Viewed 5394 times
This is a truly exciting and fascinating technique, but I may have been naive or misunderstood it completely - I may just end up with a gloopy mess and dismal failure - but that won't put me off having another go! :)

I've one picture left in this post so here's another of this intriguing exercise;
ws_DSCN2191.jpg
ws_DSCN2191.jpg (77.88 KiB) Viewed 5394 times
This is my 'agar-stash' - the agar can be stored as jelly in the 'fridge' (refrigerator) - some I poured into tubes, some I simply cast into an ice-cube tray and made blocks, and simply melted in the microwave (carefully) when needed. The agar has a property that causes it to pass through solidification slowly between about 65 to 80-deg, it will not therefore solidify too quickly (as wax often does when like me you don't have an embedding-station to hand!) - my little coffee-warmer died last week too, and I still haven't ordered another - I've no warming-pad at all at the moment :cry: ..
This also means of course that it won't melt when infiltrating with or embedding in, molten paraffin-wax which melts at about 58 deg. Very handy!
From what I gather from reading about this, the agar simply goes through every stage as if it were just an extra part of the leaf-tissue, including the infiltration and embedding with wax! (This seems hard to believe, but we'll soon find out!) It should then be possible to simply mount the wax-block containing the agar/leaf chimera in the Shandon and start sectioning in the normal way, with a perfectly orientated leaf-part! Hmmm still seems hard to believe, but that's what the literature said essentially.... It's going to be very interesting indeed. I'll continue this adventure as I go through each stage, with of course pictures and a small report...

Back soon with an update, dividing time between this technique and my staining tests at the moment -
what a great time I'm having! :D
John B

JimT
Posts: 3247
Joined: Fri Oct 24, 2014 1:57 pm

Re: A Look at Double-Embedding

#2 Post by JimT » Mon Sep 21, 2015 12:40 am

John B, looks way above my "Pay grade" :)

I admire your industry.

JimT

User avatar
mrsonchus
Posts: 4175
Joined: Tue Feb 03, 2015 9:42 pm
Location: Cumbria, UK

Re: A Look at Double-Embedding

#3 Post by mrsonchus » Mon Sep 21, 2015 12:52 am

Here are a few extra pics of the strange proceedings...
ws_DSCN2188.jpg
ws_DSCN2188.jpg (47.62 KiB) Viewed 5391 times
This is a thin 'sliver' cast into a small watch-glass;
ws_DSCN2206.jpg
ws_DSCN2206.jpg (45.57 KiB) Viewed 5391 times
Setting in the kitchen on a cold marble slab.... (my Darling Wife didn't bat an eyelid - what a woman! :D )
ws_DSCN2181.jpg
ws_DSCN2181.jpg (63.02 KiB) Viewed 5391 times
I'm hoping it will simply stand up like this when embedding....
ws_cropped_DSCN2210.jpg
ws_cropped_DSCN2210.jpg (65.55 KiB) Viewed 5391 times
Very strange wobbly-material this agar...
ws_DSCN2207.jpg
ws_DSCN2207.jpg (44.43 KiB) Viewed 5391 times
Anyway, you get the idea, more as soon as I get to the next stage/s..

Back soon. :D
John B

User avatar
mrsonchus
Posts: 4175
Joined: Tue Feb 03, 2015 9:42 pm
Location: Cumbria, UK

Re: A Look at Double-Embedding

#4 Post by mrsonchus » Wed Sep 23, 2015 12:04 am

Hi all, I've been working with the double-embedded tissues some more and have made some pleasing progress;

In my last post the tissues were inside their agar-blocks and ready to face the perils of the rest of a complete histological cycle for the ultimate goal of being able to section the tissue and the agar whilst they were 'double-embedded' inside a normal paraffin-wax block, mounted on the mighty Shandon in the usual way as any 'normal' tissue embedded only in paraffin, as I've been doing before this, my first ever trial with the double-embedding technique with the goal of being able to precisely (accurately at least... :) ) handle and orientate very small tissue such as anthers, or tissue that as a consequence of it's 'floppiness' tends to simply fall-over when attempting to get it to for example 'stand on edge' during 'normal' wax embedding, with a view to cutting sections across perhaps a leaf-blade...

Sounds too good & powerful a technique to be true I keep thinking, but as it turns out, this first trial, using commonly available chef's agar bought from a food-store (the packet's instruction simply said 'mix as you would gravy'!), has proceeded almost without problems... The agar/tissue-combi' was from this point on treated as if it were just a usual single-piece of tissue like for example a piece of stem.

Below is a pasted excerpt from my notes, (I use the superb and free MS 'One-Note' for my notes now) saves me extra typing...
----------------------from my notes------------------------------------------------------------------------------
Double-embedding, tissue pieces that are very difficult to orientate when embedding may be 'double embedded' to make their handling and orientation when embedding into wax easier and far more precise. A very useful technique for samples that are tiny, e.g. flower anther or that are prone to falling over when attempting to get them to 'stand up' e.g. leaf blade, as they are being embedded in molten wax in order to present the correct cutting edge to the microtome knife when mounted in the wax block on a microtome.

Tissue pieces that were already fixed for more than 48hrs in FAA were available and therefore used in this (first) trial. The pieces were 4 in number, 2 pieces of Sonchus.asper leaf-blade intended for XS and 2 halves of a Sonchus.asper's stem that had been spilt lengthwise for the intention of taking LS.

These pieces were cast into agar and left in fridge at 4deg for 3 days. Whilst the tissues themselves had been thoroughly fixed, the agar itself had undergone no fixation whatsoever before the tissue pieces were embedded in it.

The agar pieces were taken from the fridge and trimmed to convenient sizes and shapes that would enable the precise and desired orientation of the tissue that they contain to be achieved when they are 'stood' in the correct position in a T-Tek mould during wax embedding.

Processing of these trimmed agar/tissue blocks was then carried out as if the whole blocks were comprised only of tissue, the agar acting and reacting to chemical and physical stresses suffered during processing in the same way as the fixed tissue that they contained…

Next the agar/tissue blocks were put into 75% IPA as a start of dehydration, the concentration being a good match for that of the FAA fixative whence the agar-embedded tissue came.

The following is the protocol used:

Saturday 8pm - into 75% IPA to start dehydration
-------overnight--------------
Sunday 11am - into 95% IPA (1)
Sunday 1:30pm - into 95% IPA (2)
-------overnight--------------
Monday 2:30pm - into 1:1 Histoclear (HC):IPA mix to start clearing of IPA from tissue
Monday 9pm into pure HC
------------overnight------------------------------
agar had turned totally transparent to the extent that it was completely invisible - this suggests complete infiltration into the agar by HC clearing agent…
Tuesday 11:30am - into molten wax at 60-62deg (1) as start of infiltration
Tuesday 2pm - into wax (2)
Tuesday 7pm - cast 4 wax-blocks, labelled T1,T2,T3 and T4
Tuesday 9pm - roughing carried out on microtome of 2 blocks
All 4 blocks in fridge
-------------------overnight-----------------------------
--------------------------notes end-------------------------------

Here are a few pictures;
Here's the start of dehydration - tissue is sinking after the application of vacuum (using a rubber-bung, a fish-tank airline and valve and a syringe to draw-off air from glass container..) to OH,
ws_sinking_agar.jpg
ws_sinking_agar.jpg (113.43 KiB) Viewed 5383 times
This is a wax-block cast with agar/tissue embedded,
ws_double_embedded_block.jpg
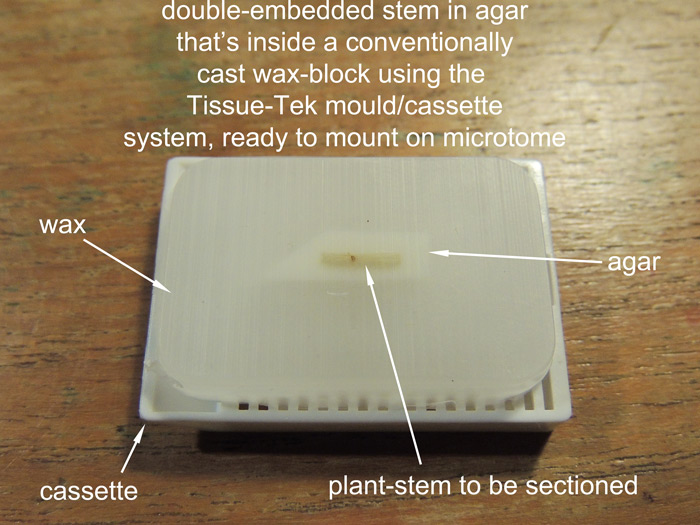
ws_double_embedded_block.jpg (116.58 KiB) Viewed 5383 times
Here's a view back-lit to show block's contents better,
ws_backlit_double_embedded_.jpg
ws_backlit_double_embedded_.jpg (70.3 KiB) Viewed 5383 times
The following pictures are not of the above pictured stem-pieces but of another block containing a leaf-blade piece... It seemed an inferior block to the one pictured above so I risked my first-go using it instead of the superior (stem LS) block just in case I cause complete chaos with my first attempt! :oops:
Sections from 'roughing' - not final quality, just quick tests to see if the principle is sound - please excuse poor quality :oops:
Here a couple of (appallingly rough :oops: ) sections are stretching on water (de-gassed) at 44deg;
ws_agar_stretching_1.jpg
ws_agar_stretching_1.jpg (105.37 KiB) Viewed 5383 times
Here they are (sorry again - they're not the finished article...), floated onto a slide..
ws_agar_on_slide_1.jpg
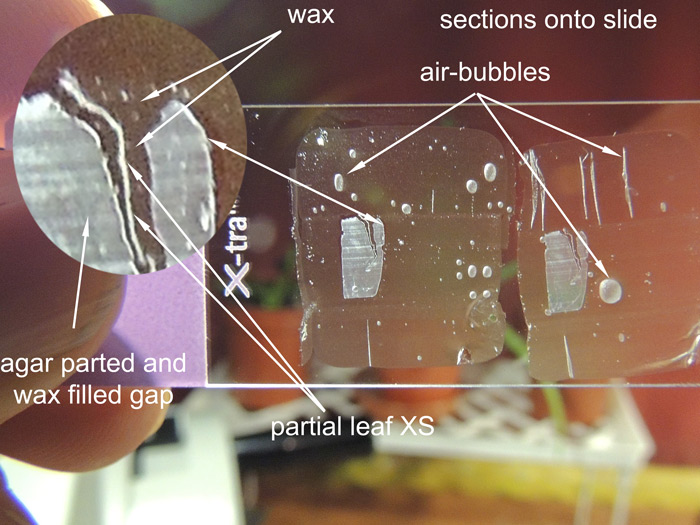
ws_agar_on_slide_1.jpg (120.42 KiB) Viewed 5383 times
The division seen in the agar is an artifact from my earlier (i.e. just after initial agar-cooling) meddling in order to release a pesky air-bubble that had crept into the agar - during agar-embedding, though the wax has 'taken up the slack' and filled in the split, thus completing the encasement and embedding of the tissue/agar - this didn't occur in the other blocks, it's a consequence of my clumsiness rather than a failure of the procedure of double-embedding, my own stupid mistake I'm afraid, however it was not sufficient reason to abandon the block so I used it as intended! (that's my excuse anyway :) :oops: ).

These trials so far are making the technique look to have enormous potential, carried out properly (after I've had a lot of practice! :D ) it offers a hugely effective, useful, efficient and above all relatively easy technique for the orientation of all manner of tiny or just plain awkward tissue-types and shapes.... I'm looking forward to taking some better sections, maybe tomorrow if I get time, and 'finishing off' the process by drying, dewaxing, staining and mounting these examples - a hugely interesting and enjoyable trial, I've already learned a lot from this attempt so far - can't wait to see it to it's conclusion.....

Musing - If the clearing-agent (in this case Histoclear) didn't destroy the agar during clearing of the OH, will it be able to dewax the slide and remove the agar also, or is there another step needed to do this - hmmmm I wonder what's going to happen in a few days when the slides are dried and ready for dewaxing! :D Perhaps because (in these sections) the thickness is onnly 8µ the agar will be removed in the same manner and at the same time as the wax... I certainly hope so - onward-ho! There's only one way to find out! :D
Having a great time, back soon with hopefully some rather better sections, these were a rush-job and only taken with my 'roughing' blade - nowhere near as good as my current 'best cut' blade! (honest! :oops: ).
Back with more soon, and some more staining adventures are to come probably tomorrow on my other topic thread! See you there!
John B

billbillt
Posts: 2895
Joined: Mon Nov 10, 2014 10:01 pm

Re: A Look at Double-Embedding

#5 Post by billbillt » Wed Sep 23, 2015 1:35 pm

Hi John,

I just love your very complete and precise postings... They are a joy and interesting read....

BillT

User avatar
mrsonchus
Posts: 4175
Joined: Tue Feb 03, 2015 9:42 pm
Location: Cumbria, UK

Re: A Look at Double-Embedding

#6 Post by mrsonchus » Wed Sep 23, 2015 3:26 pm

Hi Bill and thanks, glad you like them. I've dewaxed and stained a couple of slides (the rather rough ones of earlier post) - haven't cut any 'proper' sections, haven't had a chance yet, later today probably...
Anyway, the answer to my musing is simply that the agar stays as part of the slide, is virtually invisible and doesn't effect imaging or mounting at all - it really does behave exactly like a piece of tissue that doesn't stain (fortunately) and so remains virtually undetectable as these pictures will show;

Here's a slide mounted in resin, at x4 - stained briefly with TBO - remember these slides are of 'roughing' sections and are purely for testing the technique, the quality in no way reflects the validity of the double-embedding technique, they are only to see what happens when the sections are passed through the complete process right up to and including permanently staining and mounting them...
Looks good and just like a regular wax-only embedded section - a very encouraging start! This one's stained with 1% (aq) TBO for 10s.
ws_700x525_x4_db100_1.jpg
ws_700x525_x4_db100_1.jpg (84.78 KiB) Viewed 5377 times
A closer look;
ws_700x525_x20_db100_1.jpg
ws_700x525_x20_db100_1.jpg (78.81 KiB) Viewed 5377 times
Stained with Methylene blue (aq) 1% 10s
ws_700x525_slide_SB101-0034.jpg
ws_700x525_slide_SB101-0034.jpg (78.78 KiB) Viewed 5377 times
Closer in starts to reveal structures;
ws_700x525_x60_db100_1.jpg
ws_700x525_x60_db100_1.jpg (107.75 KiB) Viewed 5377 times
At 100x a fine image of a stomate has been captured even in this roughing-section, very pleasing...
ws_700x525_x100_db100_1.jpg
ws_700x525_x100_db100_1.jpg (115.44 KiB) Viewed 5377 times
Sorry these are so rushed, my next stage is to try to produce some quality sections from the 4 blocks that I now have available of the double-stained tissues - The above are a very early, rough look at how they progressed in general. The edge of a leaf has obviously been caught during roughing and has given a few nice images (glimpses anyway) of what promises to follow (I hope! :) ) - the overall clarity and apparently high resolution of the sections, seen here still wet in their 'Numount' resinous-mountant is pleasing even at this early stage. Things are looking pretty good, and if this technique turns out to be as easy and powerful as it has been up to now, it will be a huge leap-forward for the production of accurately orientated and therefore sectioned slides! What an exciting adventure this double-embedding is! :D

Back soon with some rather more polished results! :D
John B

User avatar
mrsonchus
Posts: 4175
Joined: Tue Feb 03, 2015 9:42 pm
Location: Cumbria, UK

Re: A Look at Double-Embedding

#7 Post by mrsonchus » Wed Sep 23, 2015 11:49 pm

Here's a closer look at that nucleus;
ws_700x525_x100_db100_2.jpg
ws_700x525_x100_db100_2.jpg (75.09 KiB) Viewed 5371 times
The TBO has picked it out quite subtly.
John B

User avatar
billben74
Posts: 1020
Joined: Sat Dec 26, 2015 10:33 pm
Location: Cambridge, UK

Re: A Look at Double-Embedding

#8 Post by billben74 » Thu Jan 14, 2016 10:23 pm

:) Fantastic work.
I'm just starting out in microscopy (2months since I got my scope). I've got a cambridge rocking microtome all from Brunel microscopes.
I've just making (nearly made) my first whole mount fly/fresh water crustacian, spider vaguely using Walter's guidance.
I fixed in IPA then cleared using NaOH then going through 0, 20, 50 70 Fructose and mounted in fructose.
The fly isn't bad the others have a lot of bubbles. But I'm happy with my start. They are still drying but getting there.
Looking forward to your progress (and mine). Will try to next to practice with the microtome, but (I think like you) I have grab a few hours here and there.
Wonderful to see you where you are at. Looking forward to using some of your work as my skill develops.
:)

User avatar
mrsonchus
Posts: 4175
Joined: Tue Feb 03, 2015 9:42 pm
Location: Cumbria, UK

Re: A Look at Double-Embedding

#9 Post by mrsonchus » Thu Jan 14, 2016 11:08 pm

billben74 wrote::) Fantastic work.
I'm just starting out in microscopy (2months since I got my scope). I've got a cambridge rocking microtome all from Brunel microscopes.
I've just making (nearly made) my first whole mount fly/fresh water crustacian, spider vaguely using Walter's guidance.
I fixed in IPA then cleared using NaOH then going through 0, 20, 50 70 Fructose and mounted in fructose.
The fly isn't bad the others have a lot of bubbles. But I'm happy with my start. They are still drying but getting there.
Looking forward to your progress (and mine). Will try to next to practice with the microtome, but (I think like you) I have grab a few hours here and there.
Wonderful to see you where you are at. Looking forward to using some of your work as my skill develops.
:)
Hi Bill, great to have you aboard! Walter taught me so much and his work is especially suited to mounts such as yours that may quite perfectly be mounted in aqueous or alcohol-based mountants. Bubbles I've found are nearly always a syptom of a mountant that's too viscous and tends to flow 'in curls' as the cover-slip lowers, catching pockets of air as it does this. I find a little thinner mix will 'flow in a more singular direction' rather than 'turning back upon itself' in places..

Why not use an alcohol-compatible mountant such as the superb one sold by Brunel Microscopes - I use it often for whole-mounts. Straight from dehydration (i.e. alcohol) to mountant!

If bubbles are a severe problem as with air/gases remaining within the cavities necessarily within the bodies of tiny creatures try the simple technique I use successfully...

Small screw-top jar with a top the right size to take a rubber-bung with a hole in it (such as are used by home-brewers say). Plastic fish-tank airline through the hole to just below the bottom of the bung, attach a plastic syringe (I use one of 100ml) and draw-out some air from the jar containing your specimen and filled about 1/2 to 3/4 with alcohol. This gives quite a good vacuum within the jar and significantly improves the flow of alcohol into the spaces thus driving out the air therein. Use a little valve (again fish-tank airline valves are perfect) and you can draw-off several syringes of air, much in the manner of the way a blood sample is taken and several phials are filled, the valve being close between extractions... This simple device works perfectly. Somewhere in my posts I've detailed this with pictures and a short video of the actual bubbles rising out of the vacuum-packed tissue!

Good luck on your adventures!
John B

Post Reply