A new batch begins

Here you can discuss sample and specimen preparation issues.
Post Reply
Message
Author
User avatar
mrsonchus
Posts: 4175
Joined: Tue Feb 03, 2015 9:42 pm
Location: Cumbria, UK

A new batch begins

#1 Post by mrsonchus » Sun Nov 29, 2015 12:02 am

Hi all, finally received the replacement chemicals I've been waiting for after a mix-up with (by) my supplier left me with the wrong clearing agent and 2-dozen ruined mounts!
So, I've taken some sample tissue (leaf lengths) from my long-suffering Aloe plant.
Here's the start of the entire procedure right from the plant in it's pot - as the tissue progresses through the many stages on it's way to final mounting as a stained and permanently mounted slide I'll post updates with of course pictures and details of any protocols and techniques used.

The subject - an unsuspecting Aloe plant, be afraid, be very afraid....
ws_700x525_DSCN2590.jpg
ws_700x525_DSCN2590.jpg (92.5 KiB) Viewed 10904 times
Cut into suitable lengths for fixation and processing.. (about 3-5mm long is about right).
The centers of these leaf XS aren't empty as they may appear, they're full of the storage-cells that contain the 'sticky stuff' that presumably is used for Aloe preparations etc.
ws_700x525_DSCN2596.jpg
ws_700x525_DSCN2596.jpg (102.58 KiB) Viewed 10904 times
and
ws_700x525_DSCN2593.jpg
ws_700x525_DSCN2593.jpg (143.89 KiB) Viewed 10904 times
Into FAA fixative for >= 48 hours will do it,
ws_700x525_DSCN2594.jpg
ws_700x525_DSCN2594.jpg (72.14 KiB) Viewed 10904 times
Labelled, protocol notes started, dehydration is the next stage in a couple of days time...
ws_700x525_DSCN2597.jpg
ws_700x525_DSCN2597.jpg (125.26 KiB) Viewed 10904 times
Sooo, they're off - I've been meaning to revisit Aloe for some time. It was used in some of my earliest attempts with results that varied from a 'mushy rotting mound that fell straight out of the wax' to a not too bad section with some rather poor staining and quite a bit of tissue-degradation & tearing... I hope to get some results and mounts that I can add to my collection this time, I've learned an awful lot since the early attempts and have acquired some superb equipment with which to have another try. Aloe has been a very difficult tissue for me, although hand-sections were very easy and good.

Back soon with the continuation of this Aloe adventure! :D I'll hopefully be able to take these tissues all the way to permanent stained and mounted slides...
Anyway, I'll document every step of the Aloe-adventure in this topic for anyone interested to follow along - join me - it's fun and fascinating! :D
John B

User avatar
Crater Eddie
Posts: 1858
Joined: Wed Nov 12, 2014 4:39 pm
Location: Illinois USA

Re: A new batch begins

#2 Post by Crater Eddie » Sun Nov 29, 2015 12:10 am

I will be following along, you can be sure!
CE
Olympus BH-2 / BHTU
LOMO BIOLAM L-2-2
LOMO POLAM L-213 / BIOLAM L-211 hybrid
LOMO Multiscope (Biolam)
Cameras: Canon T3i, Olympus E-P1 MFT, Amscope 3mp USB

User avatar
mrsonchus
Posts: 4175
Joined: Tue Feb 03, 2015 9:42 pm
Location: Cumbria, UK

Re: A new batch begins

#3 Post by mrsonchus » Sun Nov 29, 2015 1:13 am

Great to have you on board Eddie - we need botanists hereabouts! :D
Having said that, I've just posted an aphid-adventure! :D
John B

User avatar
mrsonchus
Posts: 4175
Joined: Tue Feb 03, 2015 9:42 pm
Location: Cumbria, UK

Re: A new batch begins

#4 Post by mrsonchus » Mon Nov 30, 2015 9:14 pm

Here we are for the next stage - after 48 hrs in FAA fixative, the Aloe is ready to begin the removal of all water - the dehydration phase during which the tissue is passed through a series of 95% OH jars (the purest -that is to say driest, available to the home enthusiast is 95% Isopropanol AKA 'IPA' - pure Ethanol is simply not available or legal to acquire without license here in the UK).

There is documented evidence available that supports the conclusion that the efficiency of dehydration in this context of tissue-dehydration is most influenced by number of changes of OH rather than total time in OH, that is to say passage through a series of 2 changes each of say 5hrs giving a total of 10hrs will be less efficient in terms of dehydration-level (water removal) than a series of say 5 changes each of 2hrs, giving the same 10hr total duration. Anyway, the point is not to cut corners when dehydrating as this will (please believe me when I say will, not may - bitter experience and stupidity has taught me this! :oops: ) compromise subsequent processing, namely clearing and infiltration and ultimately sectioning quality or even possibility!

I ramble somewhat - Onward-Hi! :D

Here's the latest entry in my lab-journal for the move from fixative into the first OH stage, that of 70% rather than the full-blown 95%, this is used to match the usual OH concentration of fixative (FAA) to try to avoid any 'shock' to the tissue suddenly moving into 95%..
The 70% step only needs to be between about 2 - 4hrs, no trouble to include.
ws_aloe_protocol_entry_30_11_2015.jpg
ws_aloe_protocol_entry_30_11_2015.jpg (81.49 KiB) Viewed 10883 times
As the last line says, 'into 70% OH at 15:30 on Monday 30/11'...
The next step was into the first (of 4) 95% OH stages at 18:30 - 3hrs in the 70% is enough for the transition I think..

So, for dehydration following 48hrs fixation we have so far,
into OH 70% at 15:30 for 3hrs on Mon 30/11
into OH 95% at 18:30 for......

note, from here-on you'll sometimes see (in pictures of course) another set of tissue that I'm processing (some Sonchus root that has been in FAA since September - FAA is able to be used for the virtually permanent 'wet storage' of plant tissue) - I'm not following that tissue in these posts as I want to demonstrate (or try to anyway :D ) the Aloe (I've an old score to settle with Aloe!) right from the cutting of the tissue from the living plant...

Onward-Ho! :D
I transferred the loose aloe pieces into 2 tissue-cassettes for the rest of processing - they make the transfers through subsequent and numerous stages quick and easy and most significantly avoid handling and usually damaging the pieces with forceps - avoids huge 'dents' appearing in your sections (another hard-learned lesson for me! :oops: )..

Here they are before going into their shiny-new tissue cassettes..
ws_aloe_end_of_fixation.jpg
ws_aloe_end_of_fixation.jpg (71.74 KiB) Viewed 10883 times
They're a shadow of what they were fresh-cut (this difference is one of those that make hand-cut living sections so aesthetically pleasing I think when compared to the highly-processed slide-mounted versions) and it can be seen that the tissue is starting to clarify and shrink significantly - no problem and perfectly normal.
Here's one of the (2) cassettes with it's lid off,
ws_700x525_DSCN2674.jpg
ws_700x525_DSCN2674.jpg (66.57 KiB) Viewed 10883 times
The cassettes containing the tissue go into the 70% OH jar for 3hrs in this protocol,
ws_tissue_cassettes_in_reagent_jars.jpg
ws_tissue_cassettes_in_reagent_jars.jpg (83.1 KiB) Viewed 10883 times
The aloe is in the RH jar, the 'square' & 'slotted' references are referring to the pieces of cassette-lid that will accompany the 2 tissue types to enable me to tell them quickly apart - no use trying to write on the cassettes now! The aloe simply has a chunk of cassette-lid in with it that has square holes, whilst the other (those roots I mentioned earlier) has a 'slotted' lid piece in with it - an easy way to avoid hideous mistakes if two tissue 'runs' are carried out simultaneously as here, but not with each at the same stage... get this mixed up and you'll scream until you faint! :D

Here are the jars, labelled, closed and on their way!
ws_tissue_reagent_jar_labels.jpg
ws_tissue_reagent_jar_labels.jpg (83.44 KiB) Viewed 10883 times
Must go now, need to eat my supper and I've used-up my 5 pictures! Next post and stages of the adventure soon! :D
John B

User avatar
mrsonchus
Posts: 4175
Joined: Tue Feb 03, 2015 9:42 pm
Location: Cumbria, UK

Re: A new batch begins

#5 Post by mrsonchus » Tue Dec 01, 2015 12:54 am

I'm back, at 9:30pm the tissues went to their overnight stage, the 2nd 95% OH, the roots were started in molten-wax infiltration....
Here's the aloe-board,
ws_700x525_aloe_protocol_1.jpg
ws_700x525_aloe_protocol_1.jpg (74.27 KiB) Viewed 10879 times
and here's the root board,
ws_700x525_sonchus_root_protocol_1.jpg
ws_700x525_sonchus_root_protocol_1.jpg (80.65 KiB) Viewed 10879 times
Root cassettes going into molten wax...
ws_700x525_into_first_wax.jpg
ws_700x525_into_first_wax.jpg (77.02 KiB) Viewed 10879 times
and into the oven for a night at about 60-62 deg C (wax melts at about 58 deg C so this is a 'gentle' infiltration (I hope :) )..
ws_700x525_into_oven_1.jpg
ws_700x525_into_oven_1.jpg (92.67 KiB) Viewed 10879 times
ws_700x525_into_oven_2.jpg
ws_700x525_into_oven_2.jpg (76.86 KiB) Viewed 10879 times
That's it until tomorrow - back soon. :)
John B

shawngibson
Posts: 497
Joined: Sat Sep 26, 2015 1:39 am
Location: Toronto

Re: A new batch begins

#6 Post by shawngibson » Tue Dec 01, 2015 1:40 pm

This should be a sticky:) Subscribed.

User avatar
mrsonchus
Posts: 4175
Joined: Tue Feb 03, 2015 9:42 pm
Location: Cumbria, UK

Re: A new batch begins

#7 Post by mrsonchus » Tue Dec 01, 2015 2:55 pm

shawngibson wrote:This should be a sticky:) Subscribed.
A 'sticky'? What's a 'sticky'? :)
Belay that question, I've just found out. :)
John B

User avatar
mrsonchus
Posts: 4175
Joined: Tue Feb 03, 2015 9:42 pm
Location: Cumbria, UK

Re: A new batch begins

#8 Post by mrsonchus » Wed Dec 02, 2015 12:34 am

Aha! an quick update, not much to report, the aloe finished it's dehydration this evening and moved into the first stage of clearing, namely into 'Histoclear' overnight to begin the process of driving away the alcohol and replacing it with Histoclear as this is compatible with the wax used in the up-coming infiltration stages... (in this role the clearing-agent is often referred to as a 'wax ante-medium' which is of course what it is).

Now, I'm not really covering the progress of the roots in these posts but can't resist mentioning them! :D
Sooo... meanwhile, across the bench to the world of Sonchus roots - the roots finished their infiltration today, meaning they were (hopefully! :) ) totally infiltrated by wax, and water is now completely absent from the tissues. The wax is right into the tissue and supporting it at the intra-cellular level - ready, after 'blocking-out', for the ravenous jaws of the 'Mighty Shandon'!

I cast a total of nine blocks this evening of the now ready root tissue - this went very well and the blocks look very promising indeed! The only problem may be that root tissue can be very hard/tough and has a tendency to become very brittle and problematic to section, but all factors being satisfactory there probably won't be any serious trouble....gulp! :)

Here are a few pictures you may find interesting of the casting of the root tissue into wax blocks that will hold the tissue while they are sectioned!

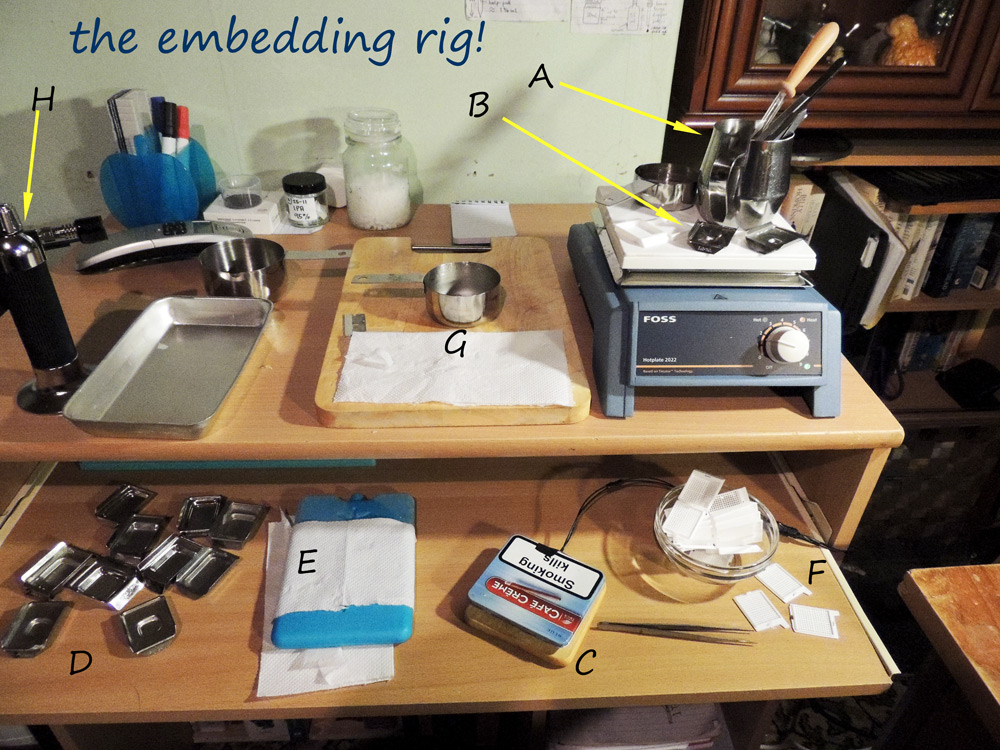
This is my new small desk (£6.99 from a charity-shop!) set up for embedding (casting tissue into wax moulds/blocks)..
ws_embedding_rig_1.jpg
ws_embedding_rig_1.jpg (273.15 KiB) Viewed 10852 times
The labelled parts are:
A = tools (forceps and a mounted needle) in the 'big' (stainless-steel milk jug) jug of molten wax ready for pouring and manipulation of tissues during orientation in mould - tools must be warm else the wax will simply stick to them as you pick up tissue - it can get ugly! :) I use the long glass pipette that's standing in the wax to put the wax into the moulds - far more accurate and controllable than pouring the jug, and far cleaner - you need never spill a drop of wax using this..
B = moulds also warming on hotplate ready to receive wax and tissue..
C = my home-made 12V small hotplate (the making of this is covered in an earlier post) that if needed can fit under the stereo 'scope for manipulation of tiny tissues when orientating them in a mould.. Made after my little white coffee-cup warmer died.
D = various tissue-moulds ready to choose from..
E = cold-plate (an ice-block from the freezer - the tissue stops moulds slipping straight off!) to allow controlled cooling of mould from the bottom, aids tissue orientation as stiffening wax will start to 'grip' tissue and help to keep it in place if you're very careful!..
F = tissue cassettes (same as the ones that the tissue stays in whilst going through processing), these sit on top of the mould and as wax is added the cassette is 'set into' the wax and becomes the base of the wax-block when it's removed from the mould - this cassette-base fits nicely into the microtome's clamp and holds wax blocks securely, truly and reproducibly for sectioning - A superb system as made by 'Tissue-Tek' and used in labs all over the World..
G = a stainless-steel pot (actually a measuring-pot for cooking ingredients these come in sets of 5 for £3.50 and are perfect for wax and cassettes undergoing infiltration)..
H = gas-torch (used to burn the tops of food to make it look nice when cooking) that is great for lots of things, instant heat if things start to get sticky, tools that are too cold are heated in about 3 seconds! Wax-pots cam be re-heated if they get too cold etc - worth it's weight in gold - piezo-electric ignition can easily be used one-handed..

Anyway, moving on with the embedding, the tissue is still in the oven in molten wax, fully infiltrated and ready to embed into wax blocks - here's a pot taken out, with an opened cassette containing tissue in molten wax, sitting on the small hotplate seen above, ready for tissue pieces to be selected and placed into a wax-containing mould..
ws_700x525_DSCN2740.jpg
ws_700x525_DSCN2740.jpg (77.88 KiB) Viewed 10850 times
Into a mould containg molten wax, onto the cold-plate as mentioned above to begin solidification..
ws_700x525_DSCN2746.jpg
ws_700x525_DSCN2746.jpg (74.68 KiB) Viewed 10850 times
Behind this also on the cold-plate is a mould with the cassette placed on top and filled with wax as it will become the base of the block..

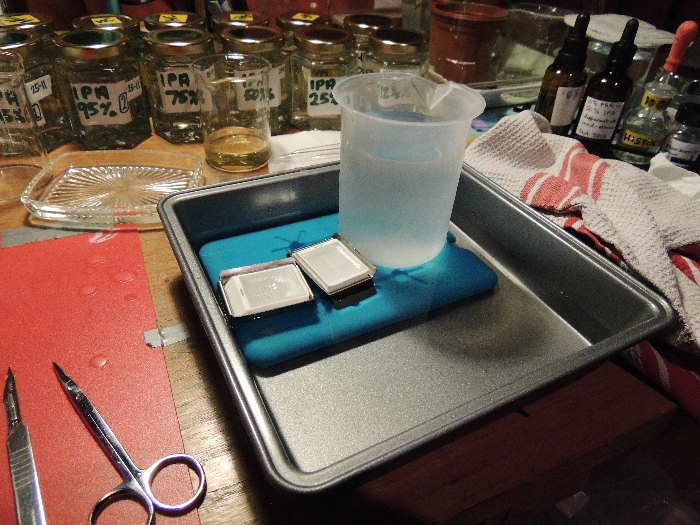
As soon as it's started to set and can be moved safely the mould/cassette combo goes onto another ice-pack sitting in water (held under by a beaker of water else the ice-pack will float!) that comes up the sides of the mould but not over the surface of the cooling and solidifying wax. Once the wax has formed a solid top it's moved from the ice-pack down into and under the surface of the chilled water to continue solidification..
ws_700x525_DSCN2739.jpg
ws_700x525_DSCN2739.jpg (106.29 KiB) Viewed 10850 times
I made 9 blocks from the root tissue, here they are solidified, dried and ready to spend the night in the fridge before removal from the moulds tomorrow - they'll 'pop' nicely out of the moulds once solidified and cooled. Then I check them over and select a few for the initial stages of 'polishing the block' with the microtome before serious sectioning begins! Great fun, what an adventure each new set is!
ws_700x525_DSCN2747.jpg
ws_700x525_DSCN2747.jpg (103.98 KiB) Viewed 10850 times
I seem to have included a lot about roots that I hadn't intended to - but as they're further along the processing protocol than the aloe they can serve as a sort of 'here's one I made earlier' example and I can show the stages without waiting for the aloe....

Hope you're enjoying this adventure as much as I am - eventually this story will reach the stage of staining, mounting and perusing a set of (hopefully nice) permanently-mounted slides ready to add to my as yet tiny collection - fingers crossed! :D :D

Back soon with more on the aloe and maybe some pictures of the root blocks and even some sections! Can't wait! :D
John B

User avatar
mrsonchus
Posts: 4175
Joined: Tue Feb 03, 2015 9:42 pm
Location: Cumbria, UK

Re: A new batch begins

#9 Post by mrsonchus » Wed Dec 02, 2015 11:46 pm

Hi all, it's Wednesday evening here in the UK and the aloe has just entered it's penultimate wax-bath during infiltration, this one's an over-nighter and the change in the morning will be the third and last stage of infiltration (this will be about 3 hours or so), after which it's time to cast the blocks! Always an exciting time! :D

Meanwhile, the roots last seen solidifying in chilled water having been 'blocked out' have had all night in the fridge to cool and stabilize and are now ready to section. Before attempting 'serious' sections, the blocks need to be 'roughed', which is the taking down of the surface of the wax block, using an older blade for the task, to a point where the tissue within is reached and presenting in a complete plane to the blade.
Also at this time the shape & size of the block is carefully set using a std razor-blade or something similar such as an old microtome blade (which are also very good for hand-section cutting). This involves trimming the surrounding wax to within about 5mm of the tissue's anticipated maximum size as it's sectioned and to establish clean and parallel sides especially to the top & bottom edges of the block, if these aren't parallel the sections will cut in a curved ribbon, as the vertical sides of the block face and cut sections will consequently be of unequal lengths.
Incidentally this 'rough' sectioning is best carried out with a thickness of about 5µ for the first half-dozen or so cuts, moving then to 10 or even 15µ so that the tissue plane desired may be reached before the end of time! :D

Once this is done, and despite my rather long-winded description above this doesn't take very long at all, the next step is to 'polish' the block's cutting-face with a good blade used at about 3 to 5µ which should give the block's face a glassy-smooth surface, sometimes a few lines or scores appear but usually recede quite quickly with a well-processed block.
A small piece of advice, don't be tempted to touch the shiny-new face as you'll need to polish it a bit more if you put a smear on it from your finger that looked so perfectly clean!

So, here are a few pictures of these processes carried out with the 'root' blocks that are now ready to go..

This is a piece of root in molten wax in a mould, the orientation is for a mid-LS as may be seen in the 'face-down' position of the tissue -
another tip, for such a LS don't even think about placing the tissue so that it presents to the microtome's blade with it's long-axis at 90 deg to the blade's edge - it simply will not section like this (again, my heuristic tendencies have taught me this lesson the hard way! :oops: ). It absolutely must be parallel to the cutting-edge for the section to happen...
-
ws_700x525_DSCN2746.jpg
ws_700x525_DSCN2746.jpg (74.68 KiB) Viewed 10841 times
As may be seen, the block goes into the microtome's clamp in the 'landscape-mode' position, and the tissue's (root's) long-axis is parallel to the blade (i.e. horizontally presented).. The tissue is in molten wax in the picture but it's invisibly clear when the wax is totally molten.

Here's a picture of this block after it's set and been removed from the mould, and has undergone roughing & polishing. It is now ready for some 'serious' sectioning - time to use the best blade!
ws_700x525_DSCN2755.jpg
ws_700x525_DSCN2755.jpg (49.81 KiB) Viewed 10841 times
a somewhat-blurry (apologies, my camera became obsessed with the bubbles on the bottom of the water-bath whilst I tried to get it to focus on the sections on the water's surface.. :oops: ) picture of a few sections from roughing (not the 'serious' sectioning)..
ws_700x525_DSCN2751.jpg
ws_700x525_DSCN2751.jpg (63.37 KiB) Viewed 10841 times
The sections are cutting as smooth-as silk and have stretched perfectly to full-size in the water-bath (flotation stage) and will move very nicely onto a slide presented to them at an angle..

This is a similarly prepared block presenting a root's cross-section to the blade..
ws_700x525_DSCN2752.jpg
ws_700x525_DSCN2752.jpg (45.24 KiB) Viewed 10841 times
and a few sections again from roughing which also looking very promising..
sorry - even more blurry.. :oops:
ws_700x525_DSCN2753.jpg
ws_700x525_DSCN2753.jpg (95.83 KiB) Viewed 10841 times
That's where I'm up to tonight, tomorrow it's back to the aloe with blocking-out in the evening, I'll post if I get the time. Also I've a trial of the agar/wax 'double-embedding' technique (in one of my other threads) coming on - that promises to be an extremely powerful technique if I can master it...

Back soon. :D
Last edited by mrsonchus on Thu Dec 10, 2015 11:13 pm, edited 1 time in total.
John B

billbillt
Posts: 2895
Joined: Mon Nov 10, 2014 10:01 pm

Re: A new batch begins

#10 Post by billbillt » Thu Dec 03, 2015 6:21 am

Hi John,
You make this so interesting because of the incredible detail in your reports... Keep up the great work!...

BillT

User avatar
mrsonchus
Posts: 4175
Joined: Tue Feb 03, 2015 9:42 pm
Location: Cumbria, UK

Re: A new batch begins

#11 Post by mrsonchus » Thu Dec 03, 2015 3:58 pm

Thanks Bill, always nice to know! :D
John B

User avatar
mrsonchus
Posts: 4175
Joined: Tue Feb 03, 2015 9:42 pm
Location: Cumbria, UK

Re: A new batch begins

#12 Post by mrsonchus » Fri Dec 04, 2015 12:51 am

Now then, both protocols are now complete (that of the Sonchus-root tissue and that of the Aloe-leaf tissue).. :D
Both have been cast into wax blocks and are ready for roughing and block preparation prior to 'serious' sectioning for permanent slide making... Exciting time! :D

Here are my 2 process-boards, one board for each tissue batch, both have as can be seen reached their conclusion with the casting of wax-blocks containing the now fully processed (fingers-crossed :oops: ) tissues.
ws_root_and_aloe_boards.jpg
ws_root_and_aloe_boards.jpg (254.01 KiB) Viewed 10819 times
The 2 protocols are slightly different, the Aloe spent longer in wax and as a result was very soft & delicate when handled during orientation for wax-block casting, I consequently 'crimped' a couple of pieces with the forceps, and this unfortunately may be seen in the early sections taken straight after roughing & polishing the Aloe blocks today.. Easy done, but I really must reduce the wax-infiltration time for a delicate and of course succulent tissue (when living that is) as is the Aloe. A lesson learned I think!

Provisional rough sections taken of both root (seen last post) and aloe-leaf look quite outstandingly good when compared to previous attempts, the details that are able to be seen even with the sections still in wax and simply stretched onto sildes for a 'quick look' are far, far better I think than anything I've managed to produce before - it seems the recent acquisition of a very good hotplate (for an unbelievable £30 online!) has really 'sorted out' the weak-point in my processing that was embedding!
I'm now able to keep everything hot and liquid, all tools are now kept hot etc and this has really enhanced my embedding and orientation results significantly. This has clearly manifested as very nicely cut sections with no tissue compromise at the wax/tissue-edge boundary/join, a location that very often used to cause me trouble as a result of wax and tissue cooling during embedding and not therefore setting as a 'homogenous' material to be encountered ideally by the sectioning-blade for a truly clean cut and preservation of tissue integrity! (i.e. no damaged tissue, rips, tears, holes etc - I've been through them all I'm afraid! :oops: ).
Picture time! :D

Here's an Aloe block cast & set, but not yet trimmed to size and shape before roughing..
ws_block_before_trimming.jpg
ws_block_before_trimming.jpg (44.5 KiB) Viewed 10819 times
and after trimming, it's just right and no unnecessary wax-cutting will occur as the tissue has the required 3-5mm or so minimum of wax all around it, this block should now be just right for the Mighty-Shandon's attentions..
ws_block_after_trimming.jpg
ws_block_after_trimming.jpg (43.98 KiB) Viewed 10819 times
Note the parallel top & bottom edges of the block - very important that this is the case...

This block and the root-containg block (seen in the post before this one) were then used for some exploratory sectioning, just to 'see how they behave'..... tense time this, all could go horribly wrong or sublimely well - I cross my fingers until they almost snap-off at this stage! :D

The Mighty-Shandon starts to feed!
ws_700x525_DSCN2757.jpg
ws_700x525_DSCN2757.jpg (69.86 KiB) Viewed 10819 times
Here's the live action, this is the block seen in the trimming pictures, the MS moves easily from 10µ to 5µ with only the expected slight increase in section-compression, normal and will disappear during water-bath stretching/flotation..


That's my 5 - pictures of the sections on slides as soon as I post the next post, back very soon!
Last edited by mrsonchus on Fri Dec 04, 2015 2:10 am, edited 1 time in total.
John B

User avatar
mrsonchus
Posts: 4175
Joined: Tue Feb 03, 2015 9:42 pm
Location: Cumbria, UK

Re: A new batch begins

#13 Post by mrsonchus » Fri Dec 04, 2015 2:09 am

Aha - had a quick brew, ready to finish-up the post..
Here are the sections, these were cut during block-preparation and not with my 'best blade' but they've cut beautifully and with great detail, I'm very pleased indeed with these... Still in the wax remember, yet to be de-waxed etc...

This is a stitched image of an aloe-leaf XS, a score or two is evident but of no real consequence, this was cut with my No3 blade used for roughing usually..
ws_700x525_aloe_stitched_1.jpg
ws_700x525_aloe_stitched_1.jpg (135.96 KiB) Viewed 10817 times
The detail and cell-integrity is far better than any previous results that I've had with Aloe. I started out with an attempt at aloe as one of my first tissues and not surprisingly the results were a little 'sub-optimal'! :oops: Then I had a few more tries with this awkward tissue with slightly better results along the way, but the details in these latest sections are so well-defined even when seen encased still in wax as they are here, that my mouth dropped open when I saw these through the 'scope tonight!

What I'd always thought, given what was shown by my previous efforts, to be first an empty center, then a center with simple empty-looking cells showing no structure at all, turns out to be packed with all manner of what now definitely look like storage structures. Given the succulent nature of the aloe this makes sense, also from what I was able to see with some rather nice hand-cut sections that showed a sort of 'stringy-mass'. Now I can see many different details and will have enormous pleasure deciphering the structure/s and learning what everything is!
The epidermis, ground-tissues and of course the relatively small vasculature is also clearly visible even through the wax- I can't wait to take some 'proper' sections and process, stain and mount them, what a set they will make for my collection! :D

Here's another,
ws_700x525_aloe_stitched_2.jpg
ws_700x525_aloe_stitched_2.jpg (118.19 KiB) Viewed 10817 times
Interesting (and rather embarrassing.. :oops: ) to see the flattened part of the epidermis where I damaged the tissue when trying to be ever-so careful moving the pieces into the mould with forceps - I then changed to a pair with flat ends that are supposed to be used to pick up cover-slips, but not until after I'd damaged several pieces of tissue!
Yet another lesson learned. The tissue came out of infiltration in a very soft and delicate condition unfortunately - too long in wax I think - but easily avoided in the future. Not all sections will have this 'squashed' part (I hope! :) ).

Here's a closer stitch where the edge of the forceps took a bite.. Great cellular integrity and detail though!
ws_700x525_x20_aloe_stitched3.jpg
ws_700x525_x20_aloe_stitched3.jpg (71.27 KiB) Viewed 10817 times
Picking a section up from the flotation (stretching) water-bath, straight onto the slide..

The aloe plant that 'donated' this tissue is seen in the background - minus a couple of leaves! :D

For the 5th and last picture, here's a section of the root from the earlier posts that also sectioned beautifully and again shows a huge amount of detail with superb integrity! Amazing what the Mighty Shandon can do with a sharp blade and a turn of the handle!
ws_700x525_sonchus_root_LS_stitched.jpg
ws_700x525_sonchus_root_LS_stitched.jpg (153.49 KiB) Viewed 10817 times
Again such detail in the tissue, still in the wax too! I really am looking forward to sectioning these tissues properly and getting them mounted as permanent slides! :D I'm having a fantastic time! :D Such fun and so fascinating! :D

Back tomorrow, I'm going to divide and shape the tissue that I have waiting in agar (in the fridge!) for the ongoing double-embedding procedure trials of my other thread tomorrow - all going well it should be possible to stand a tiny Sonchus 'seed' on end for cross-sectioning, tricky orientation for sure, but what a great technique if it can be perfected! Fantastic! :D

Check out my 'double-embedding' thread for a look at a very (potentially at this stage) powerful technique to aid the orientation of really tiny tissue during embedding in wax...

See you soon! :D
John B

User avatar
Crater Eddie
Posts: 1858
Joined: Wed Nov 12, 2014 4:39 pm
Location: Illinois USA

Re: A new batch begins

#14 Post by Crater Eddie » Fri Dec 04, 2015 1:44 pm

Fantastic series, John, very interesting. Who would have thought there would be such structure inside an aloe leaf? I guess I had always assumed it was more or less one big storage cell, if I even thought about it at all.
By the way, the link to your video says it is "private" and won't play.
CE
Olympus BH-2 / BHTU
LOMO BIOLAM L-2-2
LOMO POLAM L-213 / BIOLAM L-211 hybrid
LOMO Multiscope (Biolam)
Cameras: Canon T3i, Olympus E-P1 MFT, Amscope 3mp USB

User avatar
mrsonchus
Posts: 4175
Joined: Tue Feb 03, 2015 9:42 pm
Location: Cumbria, UK

Re: A new batch begins

#15 Post by mrsonchus » Fri Dec 04, 2015 4:43 pm

Crater Eddie wrote:Fantastic series, John, very interesting. Who would have thought there would be such structure inside an aloe leaf? I guess I had always assumed it was more or less one big storage cell, if I even thought about it at all.
By the way, the link to your video says it is "private" and won't play.
CE
Thanks Eddie, I've fixed the privacy issue, the whole playlist should now be public... hope you enjoy them.
John B

User avatar
mrsonchus
Posts: 4175
Joined: Tue Feb 03, 2015 9:42 pm
Location: Cumbria, UK

Re: A new batch begins

#16 Post by mrsonchus » Mon Dec 07, 2015 5:39 am

A quick update, sections have been cut and are drying and adhering to slides at this time, soon I'll be able to de-wax, stain and mount them! I've tried a couple of 'testers' using some new 'Fast Green FCF' stain but the results have been rather ghastly - the stain is a bit of a disaster at the moment, clumpy and shall we say, 'lacking subtlety' to put it kindly... :oops:
I need to filter the stain (again) and give the sections a couple more days to settle-down, I set-about them far too early - got a bit over-excited I think! :D

Here are a couple more 'in the wax' pictures taken with a better blade and further into the wax-blocks...
Aloe-leaf TS,
ws_aloe_wax_section (5).jpg
ws_aloe_wax_section (5).jpg (148.08 KiB) Viewed 10791 times
and the intriguing root LS that seems to have so much very fine (i.e. tiny) detail,
ws_root_wax_section (1).jpg
ws_root_wax_section (1).jpg (138.33 KiB) Viewed 10791 times
This (root LS) section intrigues me, the dark round-ish areas are the end-on (i.e. TS) view/s of lateral roots that, as seen a while back with my first look at endogenous lateral-root origins, originate deep within the 'core' of the main root, but there is clearly a division or a 'branching' of the main root developing as may be seen by the internal cell patterns. This branching (if indeed that's what it is) is not yet externally visible when perusing the root with the naked eye.. Very interesting to try to get some good images of these cell-routes - not easy though I suspect, some lucky staining will be needed with these! Can't wait to 'set my stains on the sections'.. :D

Back soon..
John B

User avatar
mrsonchus
Posts: 4175
Joined: Tue Feb 03, 2015 9:42 pm
Location: Cumbria, UK

Re: A new batch begins

#17 Post by mrsonchus » Thu Dec 10, 2015 11:57 pm

Hi all, I've stained & mounted some root sections, with a version stained with Safranin and the same section stained with Toluidine blue (TBO) for a quick comparison..

Here are two as on the slides,
ws_tbo_safranin_stained_com.jpg
ws_tbo_safranin_stained_com.jpg (115.93 KiB) Viewed 10744 times
Under the 'scope,
TBO in it's metachromatic glory!
Here the endogenous lateral-root is seen 'bursting from the interior' of the main root in a LS view..
ws_700x525_stitched_3.jpg
ws_700x525_stitched_3.jpg (448.55 KiB) Viewed 10744 times
the splendid and also metachromatic Safranin for comparison.
These similar (less developed I think) endogenouse lateral-roots are seen 'head-on' in TS. Interesting because the vasculature of the main root can clearly be seen to 'swerve around' (actually they've probably been displaced by the lateral-root's progress) the emerging laterals as they force there way through intervening tissue to reach the outside world!
ws_root_safranin_1.jpg
ws_root_safranin_1.jpg (454.21 KiB) Viewed 10744 times
Here's a colourful TBO stain of two such emerging lateral-roots as seen in the pictures in an earlier post, of sections still in the wax..
ws_endogenous_lateral_roots.jpg
ws_endogenous_lateral_roots.jpg (429.89 KiB) Viewed 10744 times
These sections are very pleasing and absolutely packed with morphological detail - can't wait to section some more for a closer look, and of course to apply the tricky (for me at least! :D ) Safranin+Fast green double stain/counter-stain combination - a lovely combination but I've still not perfected my technique for this, the Fast-green always seems to give me trouble! Ha! We'll see! :D

Back soon with a good look-over the available blocks for a few different views. The aloe isn't ready yet - I've still not got a fully stained and mounted result that I think is any good yet - soon as I have we'll take a look at the notorious aloe...
John B

User avatar
gekko
Posts: 4701
Joined: Sun Oct 12, 2014 7:38 am
Location: Durham, NC, USA.

Re: A new batch begins

#18 Post by gekko » Fri Dec 11, 2015 12:06 am

The "root stained with Safranin" image is a work of art! I love the design and colors: a perfect image in my view.

User avatar
mrsonchus
Posts: 4175
Joined: Tue Feb 03, 2015 9:42 pm
Location: Cumbria, UK

Re: A new batch begins

#19 Post by mrsonchus » Fri Dec 11, 2015 12:35 am

Thanks Gekko, pleased you like them. I am a great fan of Safranin, not only metachromatic but stains nuclei beautifully too, also particularly fine (in terms of it's clarity) when staining vascular bundles. I think when you start to try for increased strength of staining it maintains it's clarity and finesse more than TBO, although TBO is a superb stain and brilliant for live hand-sections too!
Sooo many stains with so many options for their application.

Staining-environment pH is a significant factor that I've just started to explore and am getting some very good enhancement of both brightness and differentiation with the use of FAA as an acid-source mixed with OH as a step before dehydration of the stained section in 'normal' OH before the big step into the clearing-agent (Histoclear I) which of course is compatible with the 'Numount' synthetic Canada-Balsam substitute that I use - although I'm going to switch to 'Histoclear III' and 'Histomount' next year I think, a purpose-made combination with the advantage that Histoclear III is not only compatible with all resinous mountants but has a vastly reduced odour (Histoclear smells very strongly of citrus - it's made from orange-oils - 'terpenes')..

I'll try a few more stains too, Crystal-violet with Safranin (ala Gram staining), Fast-green-FCF, Orange-G - if I can 'get it to work', basic-Fuchsin (a beautiful stain for colour), 'Methylene-blue' (superb fine metachromatic stain), old-fashioned 'Bismark-brown' - also metachromatic (as dabbled with when I stained my Daffodil ovaries a while earlier this year), Aniline-blue - lovely stain for vascular bundles.... the list goes on!

Loads to do, great fun! :D :D apologies for the colours - got a bit carried away! :oops:
John B

User avatar
mrsonchus
Posts: 4175
Joined: Tue Feb 03, 2015 9:42 pm
Location: Cumbria, UK

Re: A new batch begins

#20 Post by mrsonchus » Fri Dec 11, 2015 12:37 am

gekko wrote:The "root stained with Safranin" image is a work of art! I love the design and colors: a perfect image in my view.
Many thanks Gekko - man-made stains and Nature's always fabulous design! Truly delightful! :D
John B

JimT
Posts: 3247
Joined: Fri Oct 24, 2014 1:57 pm

Re: A new batch begins

#21 Post by JimT » Fri Dec 11, 2015 2:21 am

Wow! Beautiful results. I don't have the patience but wish I did after seeing your results.

I like the aloe leaf from Dec 4'th for the cell structure and, like Geko, the root stained with safranin.

Well done!

JimT

User avatar
mrsonchus
Posts: 4175
Joined: Tue Feb 03, 2015 9:42 pm
Location: Cumbria, UK

Re: A new batch begins

#22 Post by mrsonchus » Fri Dec 11, 2015 2:33 am

Thanks Jim, yes the Safranin's a beautiful stain when it works well - definitely seems to be becoming my 'go-to' stain, I just find it nicer to look at than the TBO most of the time. Great to know you like them. :D
John B

User avatar
vasselle
Posts: 2763
Joined: Sat Oct 25, 2014 5:32 pm
Location: France

Re: A new batch begins

#23 Post by vasselle » Fri Dec 11, 2015 9:01 am

Bonjour.
Très belle démonstration et très bien expliqué.
Merci pour le partage.
Cordialement seb
Microscope Leitz Laborlux k
Boitier EOS 1200D + EOS 1100D

User avatar
Crater Eddie
Posts: 1858
Joined: Wed Nov 12, 2014 4:39 pm
Location: Illinois USA

Re: A new batch begins

#24 Post by Crater Eddie » Fri Dec 11, 2015 1:16 pm

Excellent images, both! I would say that you are getting the hang of this.
CE
Olympus BH-2 / BHTU
LOMO BIOLAM L-2-2
LOMO POLAM L-213 / BIOLAM L-211 hybrid
LOMO Multiscope (Biolam)
Cameras: Canon T3i, Olympus E-P1 MFT, Amscope 3mp USB

User avatar
mrsonchus
Posts: 4175
Joined: Tue Feb 03, 2015 9:42 pm
Location: Cumbria, UK

Re: A new batch begins

#25 Post by mrsonchus » Fri Dec 11, 2015 2:21 pm

Thanks Eddie, I've just stained & mounted a slide with the cypsela TS in TBO - they've come up beautifully. :D I've no time now to photograph them but I'll put them up later, I'm really pleased with them. :)
John B

Post Reply