Page 1 of 3
My New Microtome
Posted: Sun Aug 02, 2015 3:58 am
by mrsonchus
Hi all, just taken delivery of this beautiful
microtome, one of 2 ex-University machines bought for a course that they never ran in the end, that as far as I know was never used! It takes replaceable blades (even came with 10 unused blades!) and is an absolute beauty - also cost me
a third of the amount I was just about to pay for the 60-yr old Reichert
microtome of
my earlier post.
Fired it up and was producing perfect ribbons of sections across a range of
15-->3µ within 5 minutes. It's a monstrously-heavy piece of kit at 40Kg - won't be moving it anytime soon...

Perfect sections resulted - no scratches, holes, tearing, tissue loss etc
at all - in fact very clean to use too as so little waste is produced - this machine doesn't produce a cloud of fine wax bits - just smooth-as-silk sections!
I had an extremely good piece of good luck as this came up just the night before I was going to commit to the Reichert model. This beauty cost me just £100 more than
my rocker, complete with blades & ready to use. Luck like that doesn't come along very often...
I'm also going to be able to use the replaceable-blades for the adapter I'm working on for the Rocking
microtome - great stuff!
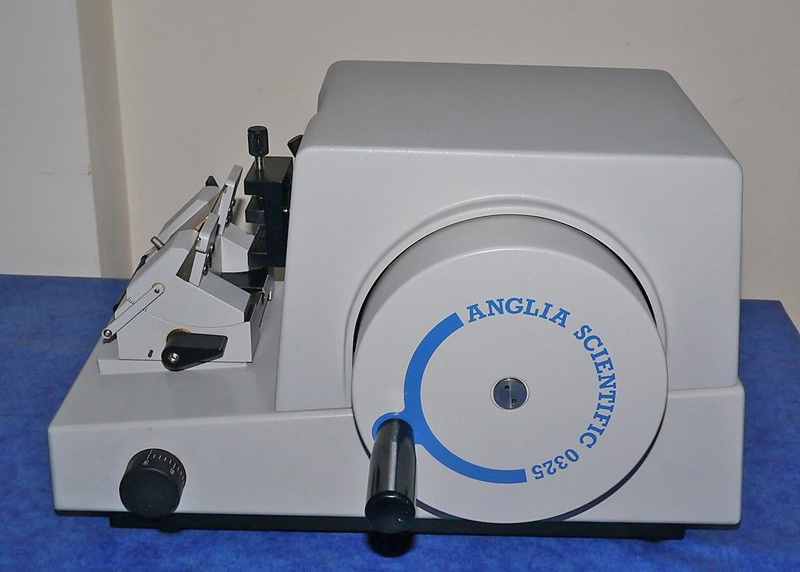
It's a (AS) Shandon 'Finesse' 0325 model capable of 1-->30µ sections in 1µ steps - I also found a full user-manual online for it free to download.
More pictures info & video of it in action soon.
This is the actual machine - even came with a Shandon cover.

- I'm beautiful...
- ws_shandon_microtome-(6).jpg (206.78 KiB) Viewed 15995 times

- ws_shandon_microtome-(2).jpg (114.86 KiB) Viewed 15995 times
- ws_shandon_microtome-(5).jpg (121.91 KiB) Viewed 15995 times

- ws_shandon_microtome-(4).jpg (149.98 KiB) Viewed 15995 times

- ws_shandon_microtome-(3).jpg (153.94 KiB) Viewed 15995 times
Can't wait to process some more tissue-blocks for this beauty to munch on!
Back soon.
Re: My New Microtome
Posted: Sun Aug 02, 2015 5:42 am
by billbillt
Hi John,
That was a lucky find.. It sure is a wonderful piece of machinery!....
BillT
Re: My New Microtome
Posted: Sun Aug 02, 2015 8:36 am
by SteveSteve
That's an outrageous bit of kit John and at a really good price!
Let's see some sections soon.
Cheers,
Steve
Re: My New Microtome
Posted: Sun Aug 02, 2015 12:09 pm
by Seb28
Hi John.
Congratulation.It is a very nice
microtome.
Now you should get a good thin sections.
I also changed
my roking
microtome to rotating one.Now I have a Leitz 1512 and I'm very hapy with it.

- IMG_3710.JPG (140.77 KiB) Viewed 15985 times

- IMG_3715.JPG (107.32 KiB) Viewed 15985 times

- IMG_3713.JPG (147.02 KiB) Viewed 15985 times
Re: My New Microtome
Posted: Sun Aug 02, 2015 12:37 pm
by mrsonchus
Ah Seb - it's a beauty! I love your gear, that 'scope looks beautiful. I suppose, with hindsight there's an almost irresistible progression from hand-microtome to rocking microtome to rotary microtome! I've been unbelievably fortunate in coming across this machine - I still can't believe it!
Sooo - Seb, this is still all your fault! You were the inspiration that led me into the world of producing my own sections and slides - and I thank you wholeheartedly for this.
Onward as they say - I now know that my processing is sound - as I discovered when my razor-blade stuck to a microtome knife, in the rocker experiments, produced my first truly intact and perfectly-cut sections. Free from the horrors (and time/expense) of the maintenance of a set of steel blades, I'm ready to roll!
Can't wait.
Pictures of the beast in action ASAP!
Now I can actually complete my story of leaf-to-permanent-slide as all the pieces of my procedure are finally stable, reproducible and of an acceptable standard to share with others!
All the best.
Re: My New Microtome
Posted: Sun Aug 02, 2015 12:42 pm
by mrsonchus
Hi Bill & Steve - thanks for your encouragement!
I feel like a very lucky man this morning! Can't wait to use this beauty in anger, must get some slides subbed today and dig out some wax-blocked specimens that I haven't been able to section up until now!
Should soon have some results to share of
my learning-phase with the mighty beast. Also, given the replaceable-blades, I should pretty soon be able to demonstrate the use of them in the rocking-
microtome, which will definitely give that fine instrument a 'turbo-boost' in performance & desirability..
Back soon.
Re: My New Microtome
Posted: Sun Aug 02, 2015 3:39 pm
by Crater Eddie
What an incredible find! Congratulations!
Re: My New Microtome
Posted: Sun Aug 02, 2015 7:29 pm
by gekko
John, congratulations! You fully deserve this.
Seb28, I say the same to you: congratulations, and you also fully deserve it.
Re: My New Microtome
Posted: Sun Aug 02, 2015 7:39 pm
by mrsonchus
gekko wrote:John, congratulations! You fully deserve this.
Seb28, I say the same to you: congratulations, and you also fully deserve it.
That's a very generous thing to say Gekko - thank you.
Re: My New Microtome
Posted: Sun Aug 02, 2015 9:33 pm
by 75RR
John, congratulations! You fully deserve this.
Seb28, I say the same to you: congratulations, and you also fully deserve it.
Agree with gekko. Merited by all that hard work and boundless enthusiasm. Congratulations to both of you.
Re: My New Microtome
Posted: Sun Aug 02, 2015 10:52 pm
by mrsonchus
A couple more pictures, showing the blades used - £95 per packet of 50, and from what I've seen that many would probably last me about, hmm, 2-5 years... I've already cut over 300 sections, many at the 'roughing' setting, for practice, and have looked at the blade's edge at x40 to see how it's going. It's as
new, apart from a 480µ - long section I ruined when I forgot to secure the block-clamp fully! Still, each blade has a usable length of about 70mm and costs about £2. I simply marked the damaged region with a marker-pen and intend to avoid it - easy.
Oh yes, the 'retraction' feature brings the specimen-block back away from the blade by 40µ on each return (upward) cycle - no more wax stuck to the back of the knife that maddeningly snags the block as it rises, pulling bits of the just-cut section off as it does so...
Here are some pictures - sorry if they're a bit dull - I'm a bit over-excited I think!

The 40Kg behemoth in it's spot.

- The beast in it's lair...
- ws_shandon_on_table_1.jpg (200.22 KiB) Viewed 15959 times
The fabulous replaceable blades...

- ws_shandon_blades_1.jpg (124.57 KiB) Viewed 15959 times

- ws_shandon_blades_2.jpg (129.86 KiB) Viewed 15959 times
Finally - an end to the tyranny and agony of maintaining steel knives and all that their use entails!
Anyway, I'm off to calm myself and get some sleep! Still can't stop smiling yet...
Re: My New Microtome
Posted: Sun Aug 02, 2015 11:19 pm
by JimT
Can't wait to see some sections
Re: My New Microtome
Posted: Sun Aug 02, 2015 11:33 pm
by einman
Awesome. Beautiful machine!
Re: My New Microtome
Posted: Sun Aug 02, 2015 11:57 pm
by mrsonchus
JimT wrote:Can't wait to see some sections
Me too Jim - ASAP, even if it's got to be from a few older blocks, soon have some cut and processed! Should be 3-4 days time!
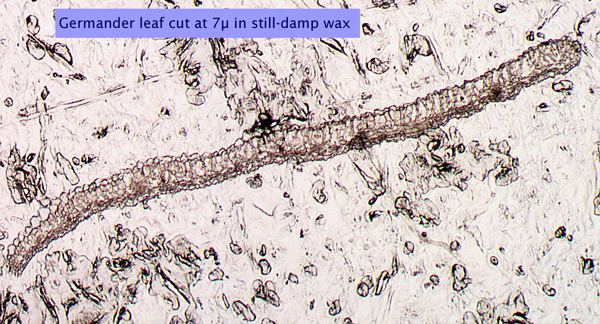
Oh - I've a few hurried pictures of the first sections I cut with it, about 1/2 hr after it arrived, these tiny leaf & stem sections are from a wildflower called 'Germander Speedwell' - they're still a bit damp and in the wax, but just look at the tissue-integrity! These stems are tiny - about 750µ across at most, the leaves probably about 100µ thick.
- ws_first_sections_1.jpg (163.42 KiB) Viewed 15953 times

- ws_first_sections_2.jpg (186.26 KiB) Viewed 15953 times

- ws_first_sections_3.jpg (304.98 KiB) Viewed 15953 times
The upper cell-layer of the leaves, just below the outer thin cuticle, vertically orientated, look clearly to be a palisade-mesophyll layer to me (chloroplasts move around the walls of these cells as the sun changes position and intensity) - good detail considering the wax is still encasing every cell, inside and out! A good clean cut at last.
They're stitched images and could be sharper - but hey, not a cell out of place or damaged! They're on un-subbed slides though. so they'll need about a week to dry and bond to the slide before I can dewax, stain & mount them. I just stretched them onto unprepared slides as I really wasn't expecting them to be usable sections after about 5 minutes practice - but that's how good and easy to use this beauty is...
Happy man - that's me!
Re: My New Microtome
Posted: Sun Aug 02, 2015 11:59 pm
by mrsonchus
Thank you einman - I'm very lucky.
Re: My New Microtome
Posted: Mon Aug 03, 2015 6:33 pm
by charlie g
Congradulations John B on you rotary microtome ...and that path of great to it which you share....bravo!
It makes me feel young to look at you setup, thanks for that. Back in 1975 I took a microtechnique course ( thats Dr. Eric Randal,bryologist who gave the course). We use an AO rotary which looked pretty much like your gem...no digital display, no disposable blades...the blade sharpener was a variation on an astronmers mirror grinding machine.
With a lot of botanical materials I was able to get down to 7-9 micron wax ribbon sections...yours does down to 3 microns right out of the box! One thing we noted was number of merristem cell mitotic figures depending upon time of day the living tissues first collected and fixed. I hope your dehydration series and transfer infiltration to wax uses more friendly chemicals than we were saddled with?
Terrific path to that equipment, thanks for shareing your microscopy...you and seb now have looking at a 2/75 box of my yellowing slides...sigh, charlie guevara
Re: My New Microtome
Posted: Mon Aug 03, 2015 6:40 pm
by charlie g
sorry for all the typos in my post...the microtome and your path to it, and your projects with it's use...they excited me too much, John B.
Re: My New Microtome
Posted: Mon Aug 03, 2015 8:30 pm
by mrsonchus
Charlie G, I'm so pleased, thank you so much for your kind encouragement!
Your slides look very, very nice - hmmm. Fancy putting a few up on this forum - I won't be the only one who'd love to see how it's really done! They look superb - I'd be
proud of that set if I were you!
Some Unsettling News!
Posted: Mon Aug 03, 2015 8:40 pm
by mrsonchus
Hi all, I've taken some video this evening of the Shandon in action - should be able to have it in the forum tomorrow hopefully.
Now for the
unsettling news of this post's subect,
I contacted the fellow that sold me this excellent piece of kit as he has all manner of microscope items, brace yourselves..
he's got another one like mine for sale, for the same price! -
my advice - if you want a once-in-a-lifetime deal on a brand spanking rotary
microtome of a relatively modern design for £100 more than a rocking
microtome - ready to go, like mine, let me know and I'll pass on his details gladly - also he'll deliver up to 200 miles (from Yorkshire) for just 20p per mile there and back!
You've seen what I got, go get one for yourself, I'm tempted to buy it myself!
I can hear you screaming.....
Re: My New Microtome
Posted: Mon Aug 03, 2015 11:57 pm
by mrsonchus
Now then here's a very quickly edited piece of video from a practice-session this afternoon with
my new Shandon ('Finesse' 0325) rotary
microtome.
These are from a couple of blocks containing specimens that I've had for quite a while now, waiting for a time when I had a good chance of sectioning them successfully rather than ripping them to shreds! That time has finally come!
My technique is very rough-and-ready, but I've only just started to explore it's capabilities and operation... Please excuse the brutality of these early attempts, but the
microtome performs beautifully!
Here are some of those sections placed onto cardboard strips for safekeeping until I stretch them onto slides via a warm-water bath. They'll keep virtually indefinitely whilst still in wax and dry - no rush, next job is to examine them and see which ones are good enough to keep and process further...

- Not bad at this stage...
- ws_section_ribbon_1.jpg (70.68 KiB) Viewed 15929 times
Into storage for a while - couldn't bear to put them in the bin even though they're practice sections!

- ws_sections_raw_1.jpg (105.57 KiB) Viewed 15929 times

- ws_sections_raw_2.jpg (93.24 KiB) Viewed 15929 times
Sorry to be so brief, so much to do - so little time - I've a busy day tomorrow and won't have a lot of spare time, but I'll do what I can... What fun!
Re: My New Microtome
Posted: Tue Aug 04, 2015 7:33 pm
by Peter
Hi Mrsonchus,
After watching your video I have a small tip; rather than using your brush dry moisten it with the tip of your tongue then you can mold the tip to a point with your lips, this will give a finer point for more accurate work also the moisture will stick to the sections holding them (but not tenaciously). It would probably be better to use a second brush instead of the forceps.
These are not my original ideas they come from Peter Gray's books.
Hope this helps.
Peter.
Re: My New Microtome
Posted: Tue Aug 04, 2015 9:50 pm
by billbillt
Hi Mrsonchus,
You make the use of a microtome look easy!.... I am glad you got it.. It seems to crank out a lot of specimens in a hurry!.....
BillT
Re: My New Microtome
Posted: Tue Aug 04, 2015 10:58 pm
by mrsonchus
Peter wrote:Hi Mrsonchus,
After watching your video I have a small tip; rather than using your brush dry moisten it with the tip of your tongue then you can mold the tip to a point with your lips, this will give a finer point for more accurate work also the moisture will stick to the sections holding them (but not tenaciously). It would probably be better to use a second brush instead of the forceps.
These are not my original ideas they come from Peter Gray's books.
Hope this helps.
Peter.
Hi Peter - sound advice, I usually use 2 brushes or a brush and an inoculation-loop (honed thin and smooth) - the moistening definitely helps as anything but a
very soft, flexible and fine-ish brush is always a risk for perforating the section, but the forceps are definitely suboptimal - usually they are very good for accurate control, but have a habit of refusing to let go of the section or ribbon when the time comes!
I went at it in
my 'practice-mode' which can sometimes be a touch heavy-handed, as here!

I've since cut quite a few more sections, more practice really, from some old blocks who's refusal to section cleanly (that's putting it mildly - I seemed only to be able to produce something akin to Christmas decorations...
) led me to firmly believe that
my histological processing was poorly executed and fundamentally flawed somewhere..
Well, every section was cut beautifully with thicknesses ranging from 15µ to 5µ (I doubt if any thinner is optimal or necessary with plant tissue) and complete cellular-integrity and ribbon-continuity was achieved - straight-off, 'practice mode' notwithstanding!
I've since prepared and dried some subbed slides and tonight have stretched (in a water-bath at about 40 deg) the above sections onto 20 slides which are now drying at room-temp overnight (they'll spend all day tomorrow in
my 'incubator' at about 42 deg) and then another day or 2 at room-temp to make sure they stick firmly to the slide before dewaxing etc...
Here are a few pictures of tonight's efforts:

- Into drying-oven next
- ws_drying_rack_2.jpg (121.95 KiB) Viewed 15907 times

- Stretched onto subbed slides
- ws_drying_rack_1.jpg (139.62 KiB) Viewed 15907 times
Given a couple of days to dry I'll post the dewaxing procedure up next to follow.
Many thanks Peter - I'm
always on the lookout for advice and input, please keep it up it's a real help!
Re: My New Microtome
Posted: Tue Aug 04, 2015 11:03 pm
by mrsonchus
billbillt wrote:Hi Mrsonchus,
You make the use of a microtome look easy!.... I am glad you got it.. It seems to crank out a lot of specimens in a hurry!.....
BillT
Thanks Bill, that's very kind.
I think the Shandon is the star of this video - all I have to do now is give it good blocks and turn it's handle! It's so easy to use it's ridiculous. Getting this machine was an amazing piece of luck - I'd never be able contemplate buying one for the usual £1500 price tag or thereabouts! What a break this has been for me - wonderful...
I'll post the progress of these slides through dewaxing and into staining and mounting as I process them - can't wait!
Re: My New Microtome
Posted: Tue Aug 04, 2015 11:26 pm
by zzffnn
Very nice work!
Re: My New Microtome
Posted: Wed Aug 05, 2015 1:31 pm
by billbillt
Hi John,
Please do keep us up to date on your progress with your wonderful new machine.. I am following with great interest!.... I also am curious about blade life here.. Be interesting to know how may slices per blade you get...
Re: My New Microtome
Posted: Wed Aug 05, 2015 5:53 pm
by charlie g
Thank you for inviting all of us to your lab, Mr.Sonchus! charlie guevara
Re: My New Microtome
Posted: Wed Aug 05, 2015 7:56 pm
by mrsonchus
billbillt wrote:Hi John,
Please do keep us up to date on your progress with your wonderful new machine.. I am following with great interest!.... I also am curious about blade life here.. Be interesting to know how may slices per blade you get...
Will do Bill, yes the first thing I would like to establish is blade-life too. This first blade has 'been through the mill' a bit I'm afraid I've clattered it several times with over-thick roughing mistakes, an unsecured sample block took a chunk out of the cutting edge also!
I've moved that blade to-and-fro during practice and must have made at least 500 - 600 cuts with it by now - obvious damage aside, the blade is still performing perfectly.
I'm going to start some other older blocks off with a
new blade, although I'm going to use this as
my 'roughing blade' for the foreseeable future, then pop in the pristine blade for the actual sections, now that I'm becoming much better at using the mighty beast.
At £2 each the blades must I would say, with competent use for cutting 'average hardness' botanical samples embedded in paraffin wax and cut between say 5 --> 15µ, last me at least 2000 - 3000 sections, or about 20 or so
complete blocks... For myself I'd imagine, with the very limited experience that I have at this time, that each blade would last me about 4 - 6 weeks. These are necessarily very rough estimates (really little more than guesses) right now, we shall see.... I'm sure the better one becomes with the technique (which seems pretty easy in truth) the longer each blade will last.
One thing's certain in
my mind - they're easily within
my limited range (rate) of expenditure and are definitely a very efficient, high quality and value-for-money alternative to the
screaming-horror that may be experienced when using steel blades requiring sharpening techniques.
Especially when a
microtome such as
my little beauty comes complete with the potentially
very expensive replaceable-blade system included as an integral part! In the UK the replaceable-blade holders (that don't sadly fit a rocking
microtome) cost between about £180 - £250!
Accidentally overheated
my sections today during drying, wax partly melted the re-set! I suspect that the whole batch has been compromised, but hey-ho they are practice sections after all....
I'm going to process them (or at least a good few of them) anyway - more practice is always valuable, and who knows, they may even be OK...
I'll post how I get on with them after their
58 deg session of today! Hussar and onward!
Back soon..
Re: My New Microtome
Posted: Wed Aug 05, 2015 8:50 pm
by billbillt
Hi John,
Looks like you have found your pace with your new microtome... Sharpening a blade by hand is a frustrating learning experience... It takes lots of practice to finally get the method down... The relatively inexpensive blades sound like just the ticket...
The Best,BillT
Re: My New Microtome
Posted: Wed Aug 05, 2015 10:18 pm
by mrsonchus
Thanks Bill, so far so good - although I managed (still not sure how..) to 'cook' 20 slides at over 60 deg today in
my drying-oven!
The wax has obviously melted then re-set, I don't fancy the chances of the tissue they contain!
Here are some that have been cooked, then they have apparently re-solidified, after I ran to the oven and yanked-open the door when I returned home to see
the oven's temperature reading was over 60 deg! After a few moments of calm-thoughts I took a few pictures to show others what can happen -
my whole batch suffered this mishap - still, It'll be useful perhaps to process some of them anyway just to see what they are now like (gulp)...
Here's the horror of an over-heated slide....

- Yuk - the tissue must be in there somewhere?
- ws_overheated_wax_stitch_1.jpg (145.79 KiB) Viewed 15880 times
Here's a 'normal' one - not yet fully dry but not overheated...

- Tissue looks very intact
- ws_first_sections_2.jpg (186.26 KiB) Viewed 15880 times
Here's are a couple more cooked ones..

- Urggghhh
- ws_overheated_wax_stitch_2.jpg (123.25 KiB) Viewed 15880 times

- Nooooo..... not my beautiful section....
- ws_overheated_wax_stitch_3.jpg (97.59 KiB) Viewed 15880 times
I'm traumatized!
Anyhow, I've trimmed another couple of blocks ready to mount & section, hopefully tomorrow...
Great fun - back soon.