New member from Pittsburgh
Re: New member from Pittsburgh
Phil- I cant say that I have!
-
apochronaut
- Posts: 6314
- Joined: Fri May 15, 2015 12:15 am
Re: New member from Pittsburgh
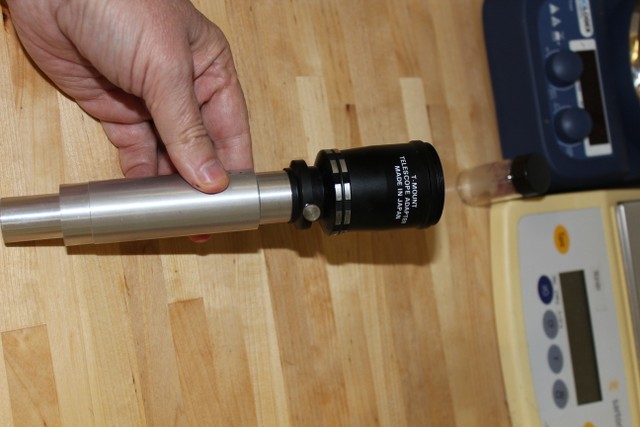
Here is a picture of the quite simple set up on the photo tube.
It's the coupler with a 42mm thread on top. Then a 42mm thread to Sony Nex bayonet converter, then whatever thickness of extension ring(s) is necessary. In my case I am using a 16mm ring. The coupler should have an internal throat diameter of 30mm in order for the eyepiece barrel to nest inside. In my case that is the maximum , so the knurled focusing ring rides on the top of the 42mm adapter . This allows easier access for focus adjustment of the eyepiece in order to get precise parfocality but if the knurled ring dropped down into a couple with more than a 31mm throat, I don't think it would matter.
It's the coupler with a 42mm thread on top. Then a 42mm thread to Sony Nex bayonet converter, then whatever thickness of extension ring(s) is necessary. In my case I am using a 16mm ring. The coupler should have an internal throat diameter of 30mm in order for the eyepiece barrel to nest inside. In my case that is the maximum , so the knurled focusing ring rides on the top of the 42mm adapter . This allows easier access for focus adjustment of the eyepiece in order to get precise parfocality but if the knurled ring dropped down into a couple with more than a 31mm throat, I don't think it would matter.
- Attachments
-
- Cat. # 1054 eyepiece removed from it's port.
- DSC02562 (558x1024).jpg (104.98 KiB) Viewed 10471 times
-
- 42mm thread to Nex converter removed, showing the location of the eyepiece which is focused out.
- DSC02561 (562x1024).jpg (96.82 KiB) Viewed 10471 times
-
- entire camera adapter set up on the photo tube.
- DSC02560 (575x1024).jpg (112.72 KiB) Viewed 10471 times
Last edited by apochronaut on Wed Jan 31, 2018 8:45 pm, edited 1 time in total.
Re: New member from Pittsburgh
This is what I have used in the past. The eyepiece goes inside. Similar set-up. The adapter is available on E-bay, although not that common. It has a t- mount on the end allowing it to mount to any DSLR with the correct adapter.
-
apochronaut
- Posts: 6314
- Joined: Fri May 15, 2015 12:15 am
Re: New member from Pittsburgh
That's even nicer. I have an old 60's Asahi microscope adapter that has various extension rings and it has that nice exterior clamp, like yours. I have never used it but I should on something.
Re: New member from Pittsburgh
These discussions and demonstrations help me a lot, since I am struggling with the same questions right now.
Last edited by Hobbyst46 on Wed Jan 31, 2018 9:49 pm, edited 1 time in total.
-
apochronaut
- Posts: 6314
- Joined: Fri May 15, 2015 12:15 am
Re: New member from Pittsburgh
Afocal is using a camera with it's lens intact to capture an image from an eyepiece, one of a binocular or a monocular.
Even though I use an eyepiece for the relay lens in the trinocular port, the nature of the relay lens is unimportant. Relay lenses can be all sorts of types. I suppose the difference is that in my set up I attach the camera body to the bayonet, without it's lens and the camera is attached to the system.
The manufacturer's incarnation of that photo tube set up also used a camera body only but it was a 35mm back.
Re: New member from Pittsburgh
Thanks a lot, understood.
Re: New member from Pittsburgh
I think I understand my confusion regarding projection eyepiece magnification. I was assuming that the 10x magnification of the visual eyepieces Apochronaut is using for projection was an integral property of the eyepiece, regardless of how it is used, but clearly that's not the case. It seems that the magnification (and distance from the front element of the EP) of the projected real image can be changed both by adjusting the focus on the eyepiece and by shimming to hold the eyepiece higher in the trinocular tube.
Question, when you adjust the focus on the #1054 EP does that move only the front element, or does it move the entire lens assembly (which would be the same as shimming)?
Apochronaut, you said that there was limited focus adjustment in the #146 EP as well. Does that work by unscrewing the whole upper collar of the EP from the metal barrel? Do you know if that works the same way as with the #1054? Does it move only the front element or does it move the entire lens assembly?
-
apochronaut
- Posts: 6314
- Joined: Fri May 15, 2015 12:15 am
Re: New member from Pittsburgh
I can't recall indicating that the # 146 was a focusing eyepiece. I intended to indicate that it would work about the same in the trino tube as the 1054 photo framing eyepiece and it is pretty good. It can capture the entire field and can be adjusted to parfocality. It represents state of the art in 1959, as a W.F. eyepiece on a moderately priced lab microscope, equipped. At a 19mm f.o.v.( I just checked it; it isn't 20) there is some lateral ca with standard achromats. The 1054 generally corrects for that, so gives pretty close to corner to corner sharpness, generally free of flare, lateral ca and reasonably flat too. On a series 10/20 or 100/120 with planachros or planapos, it is dead flat. The 146 will do in a pinch.
The 1054, focuses the entire eyepiece , basically for trimming focus on the reticle, to accommodate for normal differences in human vision. So, yes , it would be the same as shimming a fixed eyepiece. The travel is about 1/4". It's focal ability has very little to do with the performance of this system, only in that, once the desired camera to eyepiece distance has been reached with any given sensor, the focus and distance can be trimmed slightly in order to tighten up the parfocality. This set up allows a variable distance between the camera and eyepiece to be set at will, so getting full field coverage and parfocality isn't that difficult .
The 1054, focuses the entire eyepiece , basically for trimming focus on the reticle, to accommodate for normal differences in human vision. So, yes , it would be the same as shimming a fixed eyepiece. The travel is about 1/4". It's focal ability has very little to do with the performance of this system, only in that, once the desired camera to eyepiece distance has been reached with any given sensor, the focus and distance can be trimmed slightly in order to tighten up the parfocality. This set up allows a variable distance between the camera and eyepiece to be set at will, so getting full field coverage and parfocality isn't that difficult .
Re: New member from Pittsburgh
I think this cleared things up for me a little more.
https://www.microscopyu.com/tutorials/eyepiece
Adjusting the focus on the #1054 outwards is essentially changing the position of the EP optics from the "viewing" position to the "projection" position illustrated in the tutorial above, moving the eyepiece so that the intermediate image plane falls behind F'(e) instead of between F'(e) and F(e). Once in the projection mode, one has to adjust the distance a (by adjusting the focus on the #1054 or by changing the shim on a nonfocusable eyepiece) and the distance b (by adding or subtracting spacers between camera and lens) until the real image is in focus (1/a + 1/b = 1/f) and the diameter of the image at I4 is suitable for the sensor size.
-
apochronaut
- Posts: 6314
- Joined: Fri May 15, 2015 12:15 am
Re: New member from Pittsburgh
They eyepiece works irregardless of how you focus it. The focus just changes the parfocality slightly.
Re: New member from Pittsburgh
Yes. It makes sense that it would based on my current understanding. Since you've chosen a particular set of spacers to place between your photo EP and camera, your distance B is fixed. The focal length of the front lens of the EP, F, is also fixed. Your variable is distance A which is the distance between the front lens of the EP and the intermediate image plane I3. You can change distance A by shimming or adjusting the focus of the photo EP, or by moving the objective up or down. The only time the projected image on the sensor will be in focus is if distances A and B are such that 1/A + 1/B = 1/F. Since B and F are fixed, you can focus the image by adjusting the focus on the photo EP or by adjusting the focus at the objective. If you started with a focused image in your viewing EPs, you can adjust at the photo EP which will give you parfocality, or you can focus the camera image by change the focus at the objective which will also take the image at the viewing EPs out of focus.
The reason I'm digging in to this so deeply is that if I use your parameters exactly, I will be projecting an image at I4 that looks to be exactly the right diameter for your APS sensor, but that will be a good bit too big for a micro four thirds sensor with a diagonal dimension that is a little less than 80% of that of an APS sensor. I'll be seeing only about 60% of the field of view. I was trying to figure out if I could use the same EP for projection, but reduce the size of the projected image to better match my smaller sensor. I think I can by shortening the distance between the EP and the camera and by shimming the EP less, but I will have to wait until I have the equipment in hand to see how it works in practice.
I truly appreciate having a sounding board as I try to work this stuff out. My wife has no appetite for listening to me talk about my nerdy hobbies. The information you've provided and all your physical examples have been a great help.
-
apochronaut
- Posts: 6314
- Joined: Fri May 15, 2015 12:15 am
Re: New member from Pittsburgh
I still can't understand why shimming of the eyepiece needs to be brought into the mechanism. I can't see that you will find it necessary and it probably will prove to be deleterious in the end because AO clearly built the length of the tube purposefully and intentionally to take advantage of the design of their eyepieces. The measurement of 210mm from the objective shoulder didn't arrive out of a hat.
Whatever gross shimming is required , gets accomplished with the converter and extension ring(s) or as previously mentioned, a helicoid extension tube. Any refined adjustment of the image circle is accomplished by moving the camera relative to the eyepiece. That's why the camera mount is clamped to the exterior of the tube. The relay lens stays put and the camera can move. The small amount of focus that the eyepiece provides or essentially the same as 1/4" worth of variable shimming, is used to sharpen the parfocality.
Whatever gross shimming is required , gets accomplished with the converter and extension ring(s) or as previously mentioned, a helicoid extension tube. Any refined adjustment of the image circle is accomplished by moving the camera relative to the eyepiece. That's why the camera mount is clamped to the exterior of the tube. The relay lens stays put and the camera can move. The small amount of focus that the eyepiece provides or essentially the same as 1/4" worth of variable shimming, is used to sharpen the parfocality.
Re: New member from Pittsburgh
I'll be able to see all this stuff for myself pretty soon. Tom is shipping the microscope today. 
When your 1054 is seated fully in the photo tube and the focus adjustment on that EP is adjusted all the way in does the EP work as a viewing EP and is it pretty much parfocal with the bino head EPs?
When your 1054 is seated fully in the photo tube and the focus adjustment on that EP is adjusted all the way in does the EP work as a viewing EP and is it pretty much parfocal with the bino head EPs?
Re: New member from Pittsburgh
In that case, what you are doing by adjusting the focus on the EP outward by a quarter inch is moving the EP relative to the intermediate image plane (I3) so that instead of I3 falling between the two focal points within the EP (These were labeled F(e) and F(E)' in the diagram I linked to above) it is falling behind focal point F(e)'.
When I3 is between the two focal points, the EP can only form a virtual image. When I3 is behind F(e)' the EP can only form a real image. Those are the two situations depicted in the tutorial.
If I want to use a visual EP in the photo tube, and if I want the projected real image to be parfocal with the image in the bino viewer, I have to shim the EP out a short distance from the top of the photo tube or I have to have an EP like the 1054 with focus adjustment.
Distance B is the distance between the camera and the EP. As you pointed out, that distance is what governs the size of the projected image at the sensor. However, when you change distance B you also change what distance A is required to satisfy the thin lens equation 1/A + 1/B = 1/F where A is the distance between the front lens and I3, and F is the focal length. If that equation is not satisfied then the projected image won't be in focus.
So say I start out with the microscope focused on a specimen when viewed through the binoviewer. Then I choose distance B to give me a projected image that is roughly the same diameter as the diagonal of my sensor. Then I must adjust distance A to focus the projected image. I can adjust distance A by 1) Changing the height of the nosepiece, which moves the position of I3 in the phototube. But that means I lose parfocality with the binoviewer. or 2) By adjusting the height of the projecting EP in the phototube. If I can adjust it finely enough I should be able to get everything parfocal.
Now that I'm thinking about it though, distance A will be extremely difficult to fine tune. Adjustment will be on the order of a micron or less to get everything precisely parfocal if B stays fixed. However, if I get B in the ballpark for the image size I want, then get the eyepiece height in the ballpark for proper focus based on the first iteration of distance B, I can fine tune the parfocality without changing my image size too drastically by changing distance B a tiny bit. That adjustment should be less sensitive than that for distance A.
I realize that I'm not telling you anything new from a practical standpoint. I'm just trying to fit the little bits and pieces of optical theory that I'm picking up into my mental model of how all this works in practice. I wouldn't have been able to without your concrete examples.
I only started to think about it because of the existence of these purpose built projection EPs that are labeled with a specific magnification value. I was wondering how a 10x EP could possibly work for a relatively small-sensor camera if 2.5x was the proper magnification factor for a 35mm sensor.
I realize now that that magnification factor is not just a property of the lens. The magnification factor (2.5x for example) is only achieved with that projection EP when it is placed at a very specific distance from the objective and when the camera is placed at a very specific distance from the EP. Change either of these at all and all bets are off.
-
apochronaut
- Posts: 6314
- Joined: Fri May 15, 2015 12:15 am
Re: New member from Pittsburgh
Sounds like you will have many hours of fun with your new microscope.

Re: New member from Pittsburgh
Late to the party here, but I was working on the same issue with the same scope a year ago.
Here is a link to a thread where I showed what I came up with.
viewtopic.php?f=6&t=4613
Mine was for an APS sized sensor in a Canon 80D. Been working great for me since.
Here are a couple of threads showing the results
viewtopic.php?f=6&t=4634&p=42299#p42299
viewtopic.php?f=6&t=4649
viewtopic.php?f=6&t=4680
viewtopic.php?f=6&t=4672
viewtopic.php?f=6&t=5401
Good luck with your new scope. The series 4 is a great scope, very capable well made. I bought mine from the same fellow and can vouch for him as well.
Rod
-
apochronaut
- Posts: 6314
- Joined: Fri May 15, 2015 12:15 am
Re: New member from Pittsburgh
You are using a whole different set of optics, Rod. The resolution those apochromat objectives provides is excellent but that lateral chromatic aberration in your images, gets even worse with the achromat optics. The compens eyepieces you are using in the trinocular tube are undercorrected for lateral ca whereas, the requirement for the achromats is overcorrection. If, one is willing to accept pictures that heavily crop the microscope field, down to less than 50% of the center part of the field, then older non plan compens eyepieces can be used effectively with achromats for photomicrography, and produce good results but I'm pretty sure the poster here is looking for as complete a field capture as is possible, so in order to do that, correction for the natural lateral ca of those older objectives must be accounted for.
Re: New member from Pittsburgh
Whoops, Sorry guys.apochronaut wrote:You are using a whole different set of optics, Rod. The resolution those apochromat objectives provides is excellent but that lateral chromatic aberration in your images, gets even worse with the achromat optics. The compens eyepieces you are using in the trinocular tube are undercorrected for lateral ca whereas, the requirement for the achromats is overcorrection. If, one is willing to accept pictures that heavily crop the microscope field, down to less than 50% of the center part of the field, then older non plan compens eyepieces can be used effectively with achromats for photomicrography, and produce good results but I'm pretty sure the poster here is looking for as complete a field capture as is possible, so in order to do that, correction for the natural lateral ca of those older objectives must be accounted for.
Thanks for keeping me out of trouble Apo.
Clengman - I apologize if I led you down the wrong path - no harm intended, just not bright enough to know how not bright I am..... ;^)
Listen to Apo.
Re: New member from Pittsburgh
Thanks Rod and Apo. Rod those are some great diatom images. I'm really looking forward to working with this new scope.
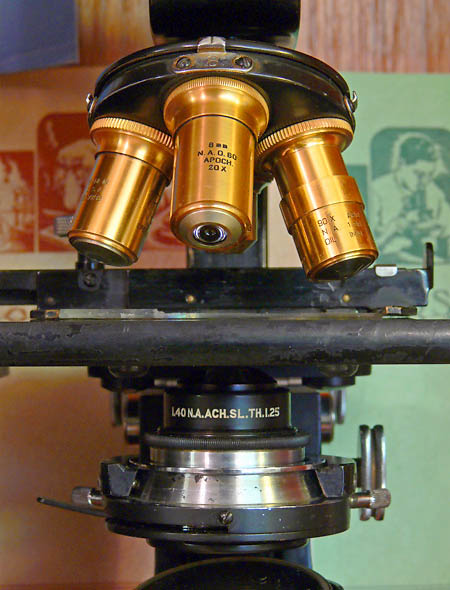
Regarding the apo objectives for the series 4: are these them? They're always brass?
I'd like to find some of the goodies that are available for the series 4 and I'm trying to figure out what I need to look for.
I'd like to get a phase condenser and objectives and a dark field condenser as well. It seems from what I've been able to read that the AO spencer condensers are not universal fit among the various stands. Does anyone have good photos they'd be willing to post of condensers and/or phase objectives that I should be looking for?
Thanks!
-
apochronaut
- Posts: 6314
- Joined: Fri May 15, 2015 12:15 am
Re: New member from Pittsburgh
Up until sometime into the production of the 2/4, they made the short 34mm parfocal apochromat objectives very similar to the way they had been since their introduction , sometime after the first w.w. The N.A. on them bounced around a little and the physical design of the barrel changed a bit but the only significant change came when they started applying coatings in the 1950's. The really early ones were brass with lacquer, similar to those made by Bausch & Lomb but around 1930 or so, probably consistent with the launch of the Spencer # 5 research stand, they changed to brass barrels with gold plating. Unless the gold is worn off from use, you won't find a Spencer apochromat that has tarnished, unless an early one.
Later into the production of the series 2/4 , probably at the time they discontinued making the # 5 research stand, the apochromats were changed to brass barrels with a brushed chrome finish, each with two heavy colour coded bands around the nose of the objective. They used stock up prior to getting into a production run of new stock. I have never seen a 20X in the brushed chrome finish. Some microscopes came out with 3 colour coded brushed chrome objectives and a gold plated 20X. The code they used at the time was green/10X, blue/20X, yellow/40X( 43X in this case) and red/100X(90X in this case). About the same time or a little after, they made a 10X .30 apo and a 43X .80 apo for the early infinity corrected microscopes, which look almost identical to the 160mm tube versions. Those are pretty rare. I have only ever see the pair that I own.
The objectives for phase were numerous. So, far I have identified 25 that were made , that will work, although they were not all available at the same time. They can be found here along with some applications on this AO chart, viewtopic.php?f=15&t=5032&hilit=chart, or on P.S. Neeley's site, http://user.xmission.com/~psneeley/Pers ... ctives.htm.
The phase contrast condenser is different for the 160mm tube microscopes than for the infinity corrected microscopes. The main body is similar but the adjustment wrenches on the series 2/4 condenser are not captive and enter at an angle facing towards the arm of the microscope rather than laterally.
I have a complete one available , if you are interested.
The 214 F DF condenser for the 2/4 will only work with up to about a 60X objective, due to restrictions of the 30 watt tungsten illuminator. For magnifications that are higher, the self illuminated model is required, the model 218F, which requires a 6 v. power supply.
I have been toying with retrofitting the instrument to a higher output halogen illuminator and also considered led. Either of those would be fairly easy, due to the rear entry illuminator socket.
Re: New member from Pittsburgh
Thanks for all that info. It'll be very helpful.
Were the apos the only objectives with gold-plating? So if I see one that is gold-plated, or one with the two heavy color bands, it is more than likely to be a 160mm apo?
From the browsing I've been doing on eBay it looks like most of the 160mm objectives were not stamped with catalog numbers. Is that the case? Are there markings that would identify the phase objectives as such? Coding for the contrast type? I'm definitely interested in the phase condenser, but I think I have to hold off on buying anything else right now. I'm lucky to have gotten the authorization to buy the microscope in the first place. Maybe when my birthday rolls around I'll look for another toy... I'll let you know if/when I'm ready to buy. If you still have it, I'll definitely take it off your hands.
On another note, the scope arrived in the mail today. I got it assembled and it's working fine. It's a little dusty inside, but I'll work on that. I use little Fisher Micromaster phase microscope at work to count cells and I can already tell that this is a better instrument. All the mechanicals are more solid and better made. I appreciate your advice steering me away from an Amscope.
I made a (not very good) blood smear at work today so I'd have something to look at when I got home. This photo was taken in eyepiece projection with my E-M1. Just as a proof of concept I grasped the trinocular tube with an open fist to make a platform for the camera. I slid my hand up and down the tube and adjusted the fine focus until I got something that looked reasonably sharp. I think I'll be able to work with it.
- OI000021small.jpg (310.66 KiB) Viewed 10351 times
-
apochronaut
- Posts: 6314
- Joined: Fri May 15, 2015 12:15 am
Re: New member from Pittsburgh
AO did not use cat. #'s on the 160mm tube objectives. The numbers you see on them are serial #'s. The gold plated apochromats are all pretty self explanatory based on the housing design, magnifications and N.A.s. Prior to about 1930, all the objectives were brass but the housings of the apochromats were different. They always looked pretty much the same as the ones in that picture supplied by E. Spell.
Apochromats were 16mm 10X .30( only very old achromats back around 1910 or earlier were .30) : 8mm 20X .60 or .65( I think .55 briefly too) (achromats were .50) : 4mm 43x or 44x .95 with a correction collar( there were some brass ones marked simply 4mm .95 without a correction collar), 3mm 60x .95 with a correction collar, 3mm 60X 1.30 oil , 3mm 60X 1.40 oil , 2mm 90X 1.30 oil, 2mm 90X 1.40 oil, 2mm 90X 1.30 oil with an iris diaphragm and 1.5mm 113X or 115X 1.30 oil.
Some of the earlier 2mm objectives were 82X or 85X( brass) and some of the 3mm were 57X.
The brushed chrome versions of the apochromats were only as 10X .30, maybe a 20X .65, a 43X .95 with correction collar and a 90X 1.30 oil. They have 2 colour coding bands.
All of the phase objectives are marked as such but the colour coding rings only appeared around 1950. The colour coding rings( 7) are identical to those used on the other objectives. Earlier phase objectives had no rings , just the smooth brushed chrome barrel of the objectives of the late 1940's.
Some phase objectives have an additional # on them , which I cannot explain. It is linked to the magnification of the objective but obviously has significance beyond that. 10X will have a 2114 on them, 20X a 2821 but not all of them will. Those are the only codes I have seen( on 4, 10X and 2, 20X) I have not seen this alternate # on a 43X or a 97X.
Very old phase objectives, do not have a bright, dark or B-Minus designation with the contrast intensity qualifier. They had performance data stamped on them, such as 0.20 A + 0.25 λ, which corresponds to Bright L.
AO also made a series of higher end , presumably research oriented achromats for the series 2/4. They look different and just have a smooth unstepped chrome barrel with a large AO shield in red on one side and the mag. and other data on the other side. The tips of the objectives have a more acute taper to them. The only ones I have seen are a 43X .85 L.W.D. strain free and a 50X .95 oil immersion. They are very nice objectives with aspects of fluorite performance, which is normal because fluorite glass was used in older high N.A. objectives in order to obtain such performance specs.
There were also 3 designated fluorite objectives made at various times and in various years. Again, AO bounced around with the specs. on those. There was a 4mm 44X .85 , a 3mm 60X .95 oil immersion and a 1.8mm 97X( sometimes 95X) 1.25 oil immersion as well as a 1.30 oil immersion. The latter two 1.8mm versions were made concurrently, so must have had different markets.
A fluorite option was only briefly available for the series 2/4 but if you can find one or two, they make a really good alternative to the achromats , giving performance pretty close to the apochromats but having compatibility with the W.F.eyepieces.
Re: New member from Pittsburgh
Some pics of my stand, including some closeups of the objectives can be seen here:
http://www.homebuiltastronomy.com/AO4/index.htm
Only my 20x is brass.
http://www.homebuiltastronomy.com/AO4/index.htm
Only my 20x is brass.
-
apochronaut
- Posts: 6314
- Joined: Fri May 15, 2015 12:15 am
Re: New member from Pittsburgh
That helps a lot, Rod. I don't have any of those brushed chrome apos handy, to photograph. In my catalogue, dated May 1961, the illustration still shows the gold plated ones and also includes the 2mm 90X 1.4 N.A. oil immersion as an option. I don't know whether they actually made that objective in the brushed chrome barrels.rnabholz wrote:Some pics of my stand, including some closeups of the objectives can be seen here:
http://www.homebuiltastronomy.com/AO4/index.htm
Only my 20x is brass.
There was both an N.A. 1.3 achromat condenser and a 1.4 N.A. achromat.
Re: New member from Pittsburgh
Actually I traded that stand to the individual who then sold it to Rod!!!
Regretted it ever since. LOL
Regretted it ever since. LOL
Re: New member from Pittsburgh
Thanks again, Rod and Apo!
Re: New member from Pittsburgh
Speaking of AO Infinity Apos, I have two different sets (10X and 45X/40X). One set are infinity Apos with no Cat# but have CB0066 on the 10X and CB1034 on the 45X with correction collar, and I don't see them listed in Neeley's site. Are these the rare ones your are referring to? The other is the Plan Apo Cat# 1321 and 1323.apochronaut wrote: Some microscopes came out with 3 colour coded brushed chrome objectives and a gold plated 20X. The code they used at the time was green/10X, blue/20X, yellow/40X( 43X in this case) and red/100X(90X in this case). About the same time or a little after, they made a 10X .30 apo and a 43X .80 apo for the early infinity corrected microscopes, which look almost identical to the 160mm tube versions. Those are pretty rare. I have only ever see the pair that I own.
Re: New member from Pittsburgh
And I thank you sir.... ;^) She's a sweet little rig.einman wrote:Actually I traded that stand to the individual who then sold it to Rod!!!
Regretted it ever since. LOL