Brightfield Practice
For the lighting method that is considered the most basic, I find it very challenging to image well.
Managing Kohler, condenser settings for depth of focus vs diffraction and spurious color, compromises at every turn.
I finally have come up with what I believe is a workable camera adapter for my AO4, so tonight I set out to test it and my brightfield skills.
AO4 Apostar, 90x Apo, Phototube with 10x Compens in line as a projection lens to a Canon 70D.
-
- Posts: 6328
- Joined: Fri May 15, 2015 12:15 am
Re: Brightfield Practice
Not too shabby, Rod.
Re: Brightfield Practice
Thanks Apo, I'll take it!apochronaut wrote:Not too shabby, Rod.
Re: Brightfield Practice
Well Rod, these look pretty darn fine to me old chap!
Lovely clean and well-exposed set. If these are your first try we're all in for a treat I think.
Whatever set-up you've used I think it's working (in your capable hands) really well.
Keep up the good work Rod.
Lovely clean and well-exposed set. If these are your first try we're all in for a treat I think.
Whatever set-up you've used I think it's working (in your capable hands) really well.
Keep up the good work Rod.
John B
Re: Brightfield Practice
Nice and flat! ;)
Actually they look very nice.
As the default/start-out mode, brightfield is mostly seen as a way-point on the path to more rewarding illumination methods.
It does however on occasion provide a view-point that works very well on its own.
This is a good example of the rewards of taking a moment to really look at the brightfield image before we rush on.
That bodes well for the other illumination techniques as well - so what did you come up with?I finally have come up with what I believe is a workable camera adapter for my AO4 ...
Zeiss Standard WL (somewhat fashion challenged) & Wild M8
Olympus E-P2 (Micro Four Thirds Camera)
Re: Brightfield Practice
Thank you John, glad you like them and I appreciate the feedback!mrsonchus wrote:Well Rod, these look pretty darn fine to me old chap!
Lovely clean and well-exposed set. If these are your first try we're all in for a treat I think.
Whatever set-up you've used I think it's working (in your capable hands) really well.
Keep up the good work Rod.
It seems each stand has its idiosyncrasies, it is always a "journey".
Re: Brightfield Practice
Thank you 75. I think there can be a certain elegance to good brightfield images. My interest has been rekindled a bit with the arrival of the new Apo stand. The clean view at the eyepieces is a new experience for me.75RR wrote:Nice and flat!
Actually they look very nice.
As the default/start-out mode, brightfield is mostly seen as a way-point on the path to more rewarding illumination methods.
It does however on occasion provide a view-point that works very well on its own.
This is a good example of the rewards of taking a moment to really look at the brightfield image before we rush on.
That bodes well for the other illumination techniques as well - so what did you come up with?I finally have come up with what I believe is a workable camera adapter for my AO4 ...
The photo set up is a bit of a tinker toy project. The first attempt was to use components from an AO film camera set up, removing the film body, and using the collar and projection lens. The results were not good. Apo offered the theory that the lens did not provide the correction necessary for the Apo objectives normally addressed by the compens eyepieces.
So the next approach was to put together a set up that would use a compens eyepiece as a projection lens. AO offered another camera adapter back in the day that used a set up like that. The hard part was finding that tube.... To get one I had to buy an Ebay parts stand that happened to have one included.
From there, it was a mix of hardware store parts, photo parts and glue. Here is the kit
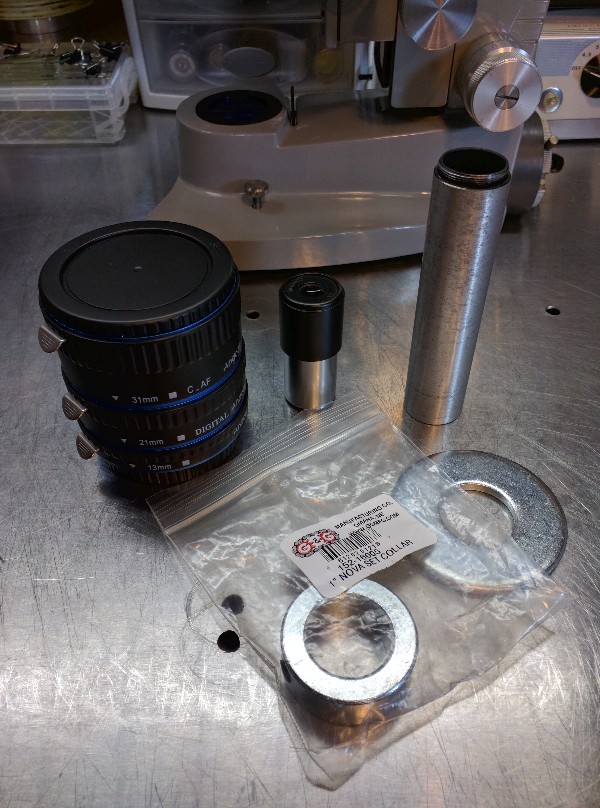
I used a set screw lock collar on the tube to provide adjustability of the camera position. I epoxied a 1" washer to that collar, and epoxied a camera T-mount to the washer.
The compens rides in the tube.
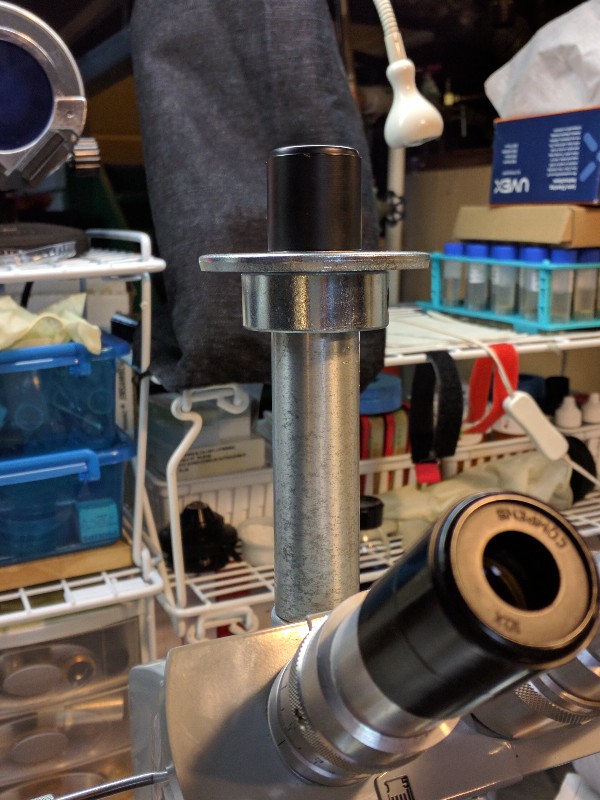
Extension tubes on the camera attach to the t-mount and provide additional flexibility in camera position.
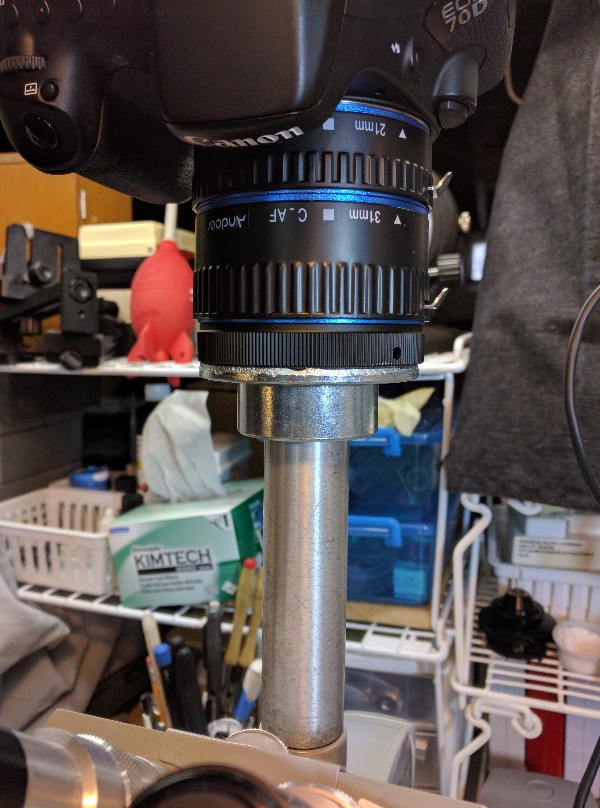
Not pretty, but seems to be working.
Re: Brightfield Practice
Can't disagree - still as long as it works and we can see that it does - that is all that matters.Not pretty, but seems to be working.
Do you fine tune focus to achieve parfocality by turning the set screw lock collar ?
Zeiss Standard WL (somewhat fashion challenged) & Wild M8
Olympus E-P2 (Micro Four Thirds Camera)
Re: Brightfield Practice
No, the lock collar only provides some adjustment of the image size, as it moves the camera position relative to the projection lens.75RR wrote:Can't disagree - still as long as it works and we can see that it does - that is all that matters.Not pretty, but seems to be working.
Do you fine tune focus to achieve parfocality by turning the set screw lock collar ?
I believe to fine tune the parfocality, I will need to either shim the eyepiece in the tube, or shorten the tube. It is close now, and I am able to tweak it by monitoring the image on an external screen, but I would like to dial it in. Please let me know if I have that wrong.
Here is another image from the same set up. One of John B's lovely sections.
- Crater Eddie
- Posts: 1858
- Joined: Wed Nov 12, 2014 4:39 pm
- Location: Illinois USA
Re: Brightfield Practice
I like your solution. Nothing wrong with a bit of basement engineering if it achieves your goal. The proof is in the result.
CE
CE
Olympus BH-2 / BHTU
LOMO BIOLAM L-2-2
LOMO POLAM L-213 / BIOLAM L-211 hybrid
LOMO Multiscope (Biolam)
Cameras: Canon T3i, Olympus E-P1 MFT, Amscope 3mp USB
LOMO BIOLAM L-2-2
LOMO POLAM L-213 / BIOLAM L-211 hybrid
LOMO Multiscope (Biolam)
Cameras: Canon T3i, Olympus E-P1 MFT, Amscope 3mp USB
Re: Brightfield Practice
Nice, coming along well. That's a typical Canon/brightfield image - the colours are spot-on and your exposure looks perfect too! Those cells look familiar....
Great to see your solution developing, really an interesting exercise - thanks for sharing it with us my friend.
John B
Re: Brightfield Practice
WOW - that last image really has a 3-D effect on my monitor!
I love the hardware store bits approach to photomicography too, very nicely done! As I always say, you can have my J-B Weld when you pry my cold dead fingers off the tubes.
Cheers,
Kurt Maurer
League City, Texas
email: ngc704(at)gmail(dot)com
https://www.flickr.com/photos/67904872@ ... 912223623/
Kurt Maurer
League City, Texas
email: ngc704(at)gmail(dot)com
https://www.flickr.com/photos/67904872@ ... 912223623/
Re: Brightfield Practice
I used the method Charles Krebs outlines when using a 'normal' eyepiece as a 'projection' eyepiece:I believe to fine tune the parfocality, I will need to either shim the eyepiece in the tube, or shorten the tube. It is close now, and I am able to tweak it by monitoring the image on an external screen, but I would like to dial it in.
http://krebsmicro.com/pdf/parfocal.pdf
See step 1-B
I used eyepiece shoulder shims cut from PVC electrical wall pipe conduits cut to allow 2.5mm increments.
The initial elevation of about 5mm + provides the 'Real image' needed, additional height is solely to provide the magnification wanted.
By the way, they are impossible to cut straight with a hacksaw.
Camera is held over the phototube on a focusing rail attached to a tripod to allow vertical adjustment and also to limit vibration. I use a black plastic sheet taped into a tube shape to bridge the distance between the eyepiece and the camera to cut out light and dust.
Zeiss Standard WL (somewhat fashion challenged) & Wild M8
Olympus E-P2 (Micro Four Thirds Camera)
Re: Brightfield Practice
Thanks CE.Crater Eddie wrote:I like your solution. Nothing wrong with a bit of basement engineering if it achieves your goal. The proof is in the result.
CE
A bit of tinkering kind of adds to the fun too.
Re: Brightfield Practice
I bet they do look familiar!mrsonchus wrote:Nice, coming along well. That's a typical Canon/brightfield image - the colours are spot-on and your exposure looks perfect too! Those cells look familiar....
Great to see your solution developing, really an interesting exercise - thanks for sharing it with us my friend.
Thanks for the interest.
Rod
Re: Brightfield Practice
Yep, JB Kwik, for us impatient types....KurtM wrote:WOW - that last image really has a 3-D effect on my monitor!
I love the hardware store bits approach to photomicography too, very nicely done! As I always say, you can have my J-B Weld when you pry my cold dead fingers off the tubes.
Always fun to walk into a hardware store, and when the clerk asks if they can help you, reply "Yes, where do you keep your Photomicrography parts?"
Re: Brightfield Practice
Thanks 75, I have that guide saved.75RR wrote:
http://krebsmicro.com/pdf/parfocal.pdf
See step 1-B
I used eyepiece shoulder shims cut from PVC electrical wall pipe conduits cut to allow 2.5mm increments.
The initial elevation of about 5mm + provides the 'Real image' needed, additional height is solely to provide the magnification wanted.
By the way, they are impossible to cut straight with a hacksaw.
Camera is held over the phototube on a focusing rail attached to a tripod to allow vertical adjustment and also to limit vibration. I use a black plastic sheet taped into a tube shape to bridge the distance between the eyepiece and the camera to cut out light and dust.
I was thinking that rubber O Rings might be just the ticket instead of cutting shims, I know that I would also never get them cut straight.
Thanks
Rod
Re: Brightfield Practice
Good, I find it explains things very well.Thanks 75, I have that guide saved.
One of the main points is that parfocality is first achieved with the 'projection' eyepiece (by raising or lowering it in fine increments as it would be normally) - only then is the eyepiece lifted by 'x' amount to get both a 'real image' and the magnification wanted - finally the camera is then placed and hence focused at this exact point.
I was ankle deep in unevenly cut pipe rings before I gave up and had someone with a fine toothed table-saw do it for me. :)I was thinking that rubber O Rings might be just the ticket instead of cutting shims, I know that I would also never get them cut straight.
O Rings should be fine.
Zeiss Standard WL (somewhat fashion challenged) & Wild M8
Olympus E-P2 (Micro Four Thirds Camera)