Zeiss Junior and CMOS/USB Camera

Here you can discuss everything related to taking light micrographs and videos.
Post Reply
Message
Author
User avatar
cuxlander
Posts: 147
Joined: Sat Sep 17, 2016 12:13 pm

Zeiss Junior and CMOS/USB Camera

#1 Post by cuxlander » Mon Oct 03, 2016 11:51 am

Hello,
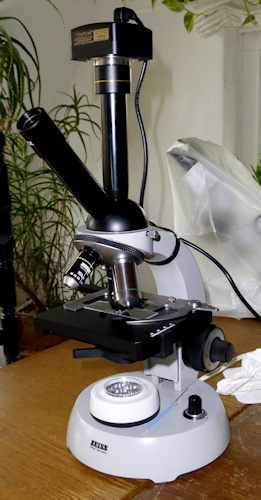
Since a few weeks I own a Zeiss KF2 (Junior) equipped with a Touptek 5,1 mp camera (see my introduction).
While I like the microscope, I was from beginning struggling with false colors and flickering in the camera. The ToupView software offers a lot of setting options. Auto Exposure and White Balance adjustment are hit or miss. A slight change in light or color may extremely change the hue. Flickering could only slightly be overcome by dimming the light.

Two advices helped occasionally but not reliably:
1. set white balance with no object.
2. anti-flicker, works only with auto exposure off, making correct exposure extremely difficult.

I had the feeling that the halogene lamp of the Junior (6V 5W) may be the culprit, so I experimented with various portable LED lamps I have. The following solution considerably improved the quality:
I had put a batterie driven LED nightlamp under the condenser:
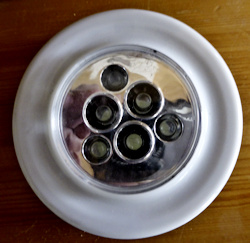
Image
the whole setup looking like this:
Image

It gives a blueish hue in the ocular (probably matter of habit), which in the software can be overcome by white balance.
(A light yellow filter spoiled the hue.)
In the condenser the auxiliary lens has to be swung in, giving an evenly illuminated larger field, normally used only for low-power objectives. The apertures cannot be used as the LEDs show up and glare.

Any suggestions for a more professional solution are welcome.
Kind regards,
Hans
JimT
Posts: 3247
Joined: Fri Oct 24, 2014 1:57 pm

Re: Zeiss Junior and CMOS/USB Camera

#2 Post by JimT » Mon Oct 03, 2016 8:52 pm

Do you have any Photo Shop post processing software; PS, Lightroom, or Elements? They all have the ability to correct white balance.

Also there is a Freeware package called GIMP which probably has the same capabilities.

Sorry, not able to help with the flicker problem.

JimT

User avatar
mrsonchus
Posts: 4175
Joined: Tue Feb 03, 2015 9:42 pm
Location: Cumbria, UK

Re: Zeiss Junior and CMOS/USB Camera

#3 Post by mrsonchus » Mon Oct 03, 2016 9:29 pm

Hi, I think frosted-filter/s would enable you to diffuse the LED images and to control exposure.

At a pinch, grease-proof paper or tracing-paper is OK for diffusion, especially as your LEDs are not enclosed within the 'scope's base.

Good luck, looking nice so far. :)
John B

User avatar
gekko
Posts: 4701
Joined: Sun Oct 12, 2014 7:38 am
Location: Durham, NC, USA.

Re: Zeiss Junior and CMOS/USB Camera

#4 Post by gekko » Mon Oct 03, 2016 11:09 pm

If my memory serves, I think Oliver has offered a solution to a similar question about flickering in another thread (I think it had to do with reducing the frame rate, if I'm not mistaken). But, in my view, it would be better to stick with the original illumination and get everything working properly first, before experimenting with LED, etc. Yes, manual ("custom") white balance is done on a clear part of the slide.

User avatar
zzffnn
Posts: 3204
Joined: Sat Jun 20, 2015 3:57 am
Location: Houston, Texas, USA
Contact:

Re: Zeiss Junior and CMOS/USB Camera

#5 Post by zzffnn » Tue Oct 04, 2016 12:16 am

I second what John B said. You can put frosted glass diffuser directly over LED.

User avatar
cuxlander
Posts: 147
Joined: Sat Sep 17, 2016 12:13 pm

Re: Zeiss Junior and CMOS/USB Camera

#6 Post by cuxlander » Sun Oct 16, 2016 10:46 am

Hello forum,
In the meantime I have partially overcome my problems, often following advices out of the forum, thanks.
  • I have dropped the idea of using battery-driven LEDs.
    A 32 mm frosted glass filter, together with the blue-filter, eliminates uneven illumination and the otherwise weakly visible lamp filament, causing false colours.
    Compulsory anti-flicker with auto exposure off.
    If necessary white balance with no object. Exposure setting only, leave the gain alone. Careful: regulating microscope light intensity spoils the white balance.
    Sensible use of aperture, basically getting better used to the software controls.
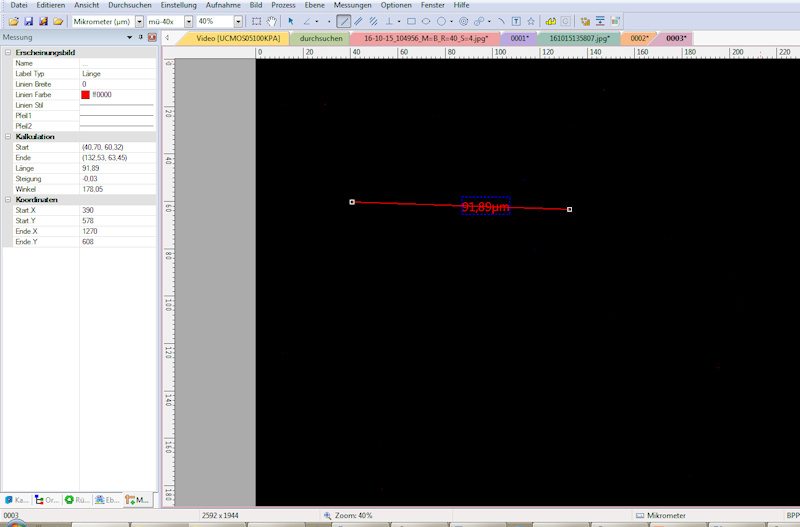
    Subject measuring result in pixels only: Measuring in µm works when I measure straight out of the microscope. If I open a photo from a file it measures Pixels. Pity, no later measuring in ToupView.
    The stacking module works, but I prefer to use Helicon or Picolay, giving me the chance to sort out unsuitable frames and generally try various options.
    Haven't tested stitching and HDR yet.
I am now very satisfied with my pretty little Zeiss KF2-Microscope, the Touptek 5.1 camera and Toupview-software.
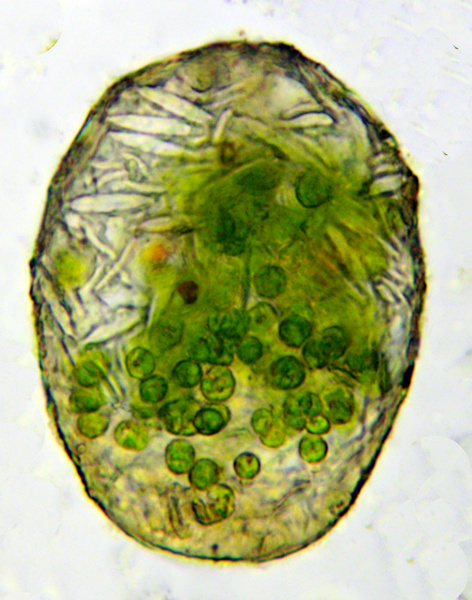
See this 114 µm Heleopera sphagni showing both the diatoms on the surface and the symbiont algae inside:

Image
(40x achromat, stack of 6 levels with Helicon Focus).

Greetings,
Hans
Last edited by cuxlander on Sun Oct 16, 2016 5:26 pm, edited 1 time in total.

User avatar
mrsonchus
Posts: 4175
Joined: Tue Feb 03, 2015 9:42 pm
Location: Cumbria, UK

Re: Zeiss Junior and CMOS/USB Camera

#7 Post by mrsonchus » Sun Oct 16, 2016 11:09 am

Subject measuring result in pixels only: Measuring in µm works when I measure straight out of the microscope. If I open a photo from a file it measures Pixels. Pity, no later measuring in ToupView.


Hi old chap, it's definitely possible and quite easy to measure with ToupView using any image from any camera, see my post here for details,
viewtopic.php?f=27&t=2944&p=34788&hilit=measure#p34788

It's quite easy - I use ToupView to measure images taken with my Canon DSLR.
John B

User avatar
cuxlander
Posts: 147
Joined: Sat Sep 17, 2016 12:13 pm

Re: Zeiss Junior and CMOS/USB Camera

#8 Post by cuxlander » Sun Oct 16, 2016 5:26 pm

Thanks John,

but does not work within my setup. This is an image from my files:

Image

I cannot change the bottom line to read and the measure-line to show Micrometer, which it does, when I measure a direct snap:

Image

Greetings,
Hans

User avatar
mrsonchus
Posts: 4175
Joined: Tue Feb 03, 2015 9:42 pm
Location: Cumbria, UK

Re: Zeiss Junior and CMOS/USB Camera

#9 Post by mrsonchus » Sun Oct 16, 2016 7:01 pm

Aha, with an existing picture just draw the measurement line as usual, it will show pixels.

Before this of course you must take a calibration picture of a calibration slide with your camera (e.g. Canon DSLR) with each objective and then perform calibration on this image (viewed at 100%) with ToupView as usual and save the calibration with a suitable name.
This records how many pixels to the micron (for example) your camera and particular objective are taking.

Then you can load any picture taken with this camera and measure with TV.
Load the picture (doesn't have now to be at 100%) and draw your measuring line/s as usual. They'll come up in pixels.
Then you need to tell TV how many pixels per meter your picture is scaled to.
You may give TV this figure by going to the image-dropdown and selecting resolution - then simply enter the value for the calibration picture saved for the relevant objective. This figure (and the resolutions of all saved calibrations) is listed next to each saved & named calibration when you use the options-magnification dropdown - a list is shown.
I note down these numbers, put the list near my 'scope and simply enter the correct one as I measure images taken from my Canon DSLR.

Here are some pictures that may help,

Here are my set of saved calibration pictures for my Canon DSLR - 1 image for each objective power. These are used for the calibration step.
Image

Here's a picture taken with the Canon DSLR and x20 objective, I've drawn a measurement line as usual and it's in pixels at this stage,
Image

Then open the options-magnification dropdown for a list, here I'm using the 'EOS x20' value previously calibrated and named. I have a list of all these values (resolutions) on a piece of paper to save this step,
Image

From the list you see that the Canon takes pictures with the x20 objective at a resolution of 9782020.45 (forget the .45 - it's overkill). To get the measurement line to change from pixels to microns TView need to know that this is the resolution of the image - so we give it this information via the 'image-resolution' dropdown - simply enter 9782020 and the line will show measurement correctly as desired in microns!

Enter the resolution of the image via the 'image-resolution' dropdown,
Image

and the measurement is correctly displayed,
Image

That's it, use the F2 key tho 'flatten the image's layers' (i.e. the image layer and the measurement layer) and then the image can be saved as the usual 'jpg file.

This method should work with any and all (pre-calibrated) camera images as far as I know.

Good luck. :)

p.s. I could make a screen-recording video of the process (as I did with my ICE video-stitching video) if you need it old chap - no trouble, just let me know.
John B

User avatar
cuxlander
Posts: 147
Joined: Sat Sep 17, 2016 12:13 pm

Re: Zeiss Junior and CMOS/USB Camera

#10 Post by cuxlander » Mon Oct 17, 2016 8:41 am

Thanks a lot, John!
Before I did not discover the "resolution setting".
It is even easier in my program-version:

Image

where I select the magnification name from my magnification list. On "OK" it changes from pixel to Mikrometer.
Great relief,
Greetings,
Hans
.

User avatar
mrsonchus
Posts: 4175
Joined: Tue Feb 03, 2015 9:42 pm
Location: Cumbria, UK

Re: Zeiss Junior and CMOS/USB Camera

#11 Post by mrsonchus » Mon Oct 17, 2016 9:46 am

cuxlander wrote:Thanks a lot, John!
Before I did not discover the "resolution setting".
It is even easier in my program-version:

Image

where I select the magnification name from my magnification list. On "OK" it changes from pixel to Mikrometer.
Great relief,
Greetings,
Hans
.
That's great Hans. You may need to make sure that you've selected pixels per meter in the box pictured rather than per centimeter - at least that's what I set it to - it may be different for yours....

Really pleased you've got the blighter working - ToupView is such a powerful program - I constantly discover new capabilities every time I use it. It's also a lightning-fast image-stacker!

Good luck old chap. :)
John B

Post Reply