Connecting a DSLR camera to a microscope

Here you can discuss everything related to taking light micrographs and videos.
Post Reply
Message
Author
User avatar
Oliver
Posts: 187
Joined: Sat Oct 11, 2014 12:57 pm
Location: Austria
Contact:

Connecting a DSLR camera to a microscope

#1 Post by Oliver » Sat Oct 25, 2014 11:01 pm

I would like to invite all forum members to share their methods of connecting a DSLR to the microscope. What adapter are you using? What projection ocular? Any advice or tips?

There seems to be much uncertainty about connecting a Digital Single Lens Reflex (DSLR) camera to a microscope. The advantage of DSLRs is that they produce a high image quality and many also allow you to record HD videos. The disadvantage seems to be that there is no standard solution (compared to dedicated USB microscope cameras that simply can be used instead of an eyepiece).

Here is the system that I am using:

Image
Form left to right: T2 camera adapter ring (for Canon DSLR), OM adapter tube (Olympus), NFK 2.5X LD projection ocular, PM-ADF microscope adapter (23.5 mm)

Image
Just for clarification: The USB microscope camera is inserted into the tube, but the situation is different when connecting the DSLR.

Image
The PM-ADF adapter is connected outside of the tube. The NFK projection ocular goes into the tube (just like the USB microscope camera optics).

Image
The parts assembled and connected to the Canon EOS 600D camera.

Image
The whole assembly is now on the trinocular head.

Oliver
Image Oliver Kim - http://www.microbehunter.com - Microscopes: Olympus CH40 - Olympus CH-A - Breukhoven BMS student microscope - Euromex stereo - uSCOPE MXII

User avatar
75RR
Posts: 8207
Joined: Sun Oct 12, 2014 2:34 am
Location: Estepona, Spain

Re: Connecting a DSLR camera to a microscope

#2 Post by 75RR » Sun Oct 26, 2014 12:15 am

Good idea. I am at the "how best to connect my camera with a trinocular" stage.
Looking forward to subsequent posts on this.
Zeiss Standard WL (somewhat fashion challenged) & Wild M8
Olympus E-P2 (Micro Four Thirds Camera)

The QCC
Posts: 397
Joined: Sat Oct 11, 2014 10:13 pm

Connecting a DSLR camera to a microscope

#3 Post by The QCC » Sun Oct 26, 2014 4:02 pm

My setup is quite similar. I have experimented with a few different methods.
The latest and almost the best consists of a Canon lens adapter with a female T thread, extension tubes, a Labomed 10x ocular and a 23mm photo port adapter.
I tried the above setup with a Nikon 2.5x projection eyepiece, but the length of the extension tubes was so great as to be unstable. The Nikon eyepiece is just physically too long.
A Meiji 2.5x eyepiece is only 50mm long and may work. That is the next experiment..

Image

The photo port has approximately 5mm of height/focus adjustment.

Image

The Labomed CxL has a very thick eyepiece tube of 28mm and the standard 23mm adapters only fit over a 25mm tube so a kludge adapter was required. I used a 1.25" telescope adapter.
Image

The easiest way to connect a DSLR to a microscope is the dedicated adapter that fits into the photo port.
Image

If you are really lucky and your DSLR has a small sensor, you can use the direct adapter. This option probably only works as an interim solution.
Image

User avatar
gekko
Posts: 4701
Joined: Sun Oct 12, 2014 7:38 am
Location: Durham, NC, USA.

Re: Connecting a DSLR camera to a microscope

#4 Post by gekko » Sun Oct 26, 2014 6:52 pm

I'll try to describe the way I connect my camera to the microscope, and also add some information that I learned along the way. I hope that I have not made too many errors, misstatements, or omissions, and if you notice any, please do point them out for the benefit of all.

There are two commonly used methods (A and B, described below) to connect a camera to a "compound" microscope.

A. Projection method: using a projection lens in the microscope and a camera body (a DSLR or a "mirrorless" camera with no camera lens attached).

1. I use an Olympus mirrorless camera body on a Nikon microscope fitted with a CF CL projection lens. The microscope is fitted with CF optics, where the correction for chromatic aberration is all taken care of in the objectives, such that compensating eyepieces are not (should not be) used. As far as I know, all (most?) other microscopes of the era (1970's and 1980's) with finite tubelength) require compensating eyepieces. I don't know enough about the modern Chinese finite tube length microscopes, nor about infinite tubelength microscopes, although my impression is that in the infinity systems, the tube-lens takes care of the necessary aberration correction. Please correct or add more definitive information if you can. Olympus projection lenses for 160-mm tubelength are designated FK and NFK (for details see http://www.alanwood.net/photography/oly ... ieces.html). Nikon projection lenses are desginated CF PL. The old 170-mm tubelength Leitz have "microprojection lenses" for objectives of low power, and "PERIPLAN microprojection lenses" for high power. I don't know about Zeiss or other brands.

2. It follows from the above that the projection lens (sometimes referred to as photo lens or relay lens, although I'm not sure about the exact meaning of those terms) for use with Nikon CF objectives must not incorporate correction for chromatic aberration, whereas those used with other finite tubelength microscopes must have correction that the objectives call for, hence they should be, ideally, made specifically for use with those objectives. Alternatively, a low power matching eyepiece of the same brand as the objectives can be used as a projection lens by raising it about 3-5 mm in the eye- or photo-tube.

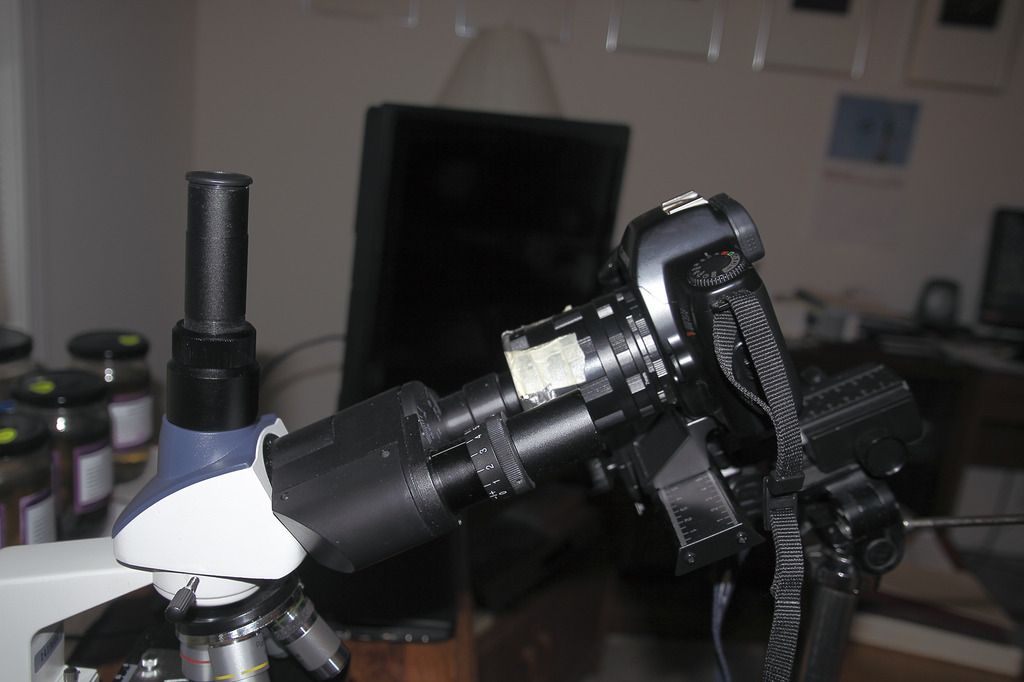
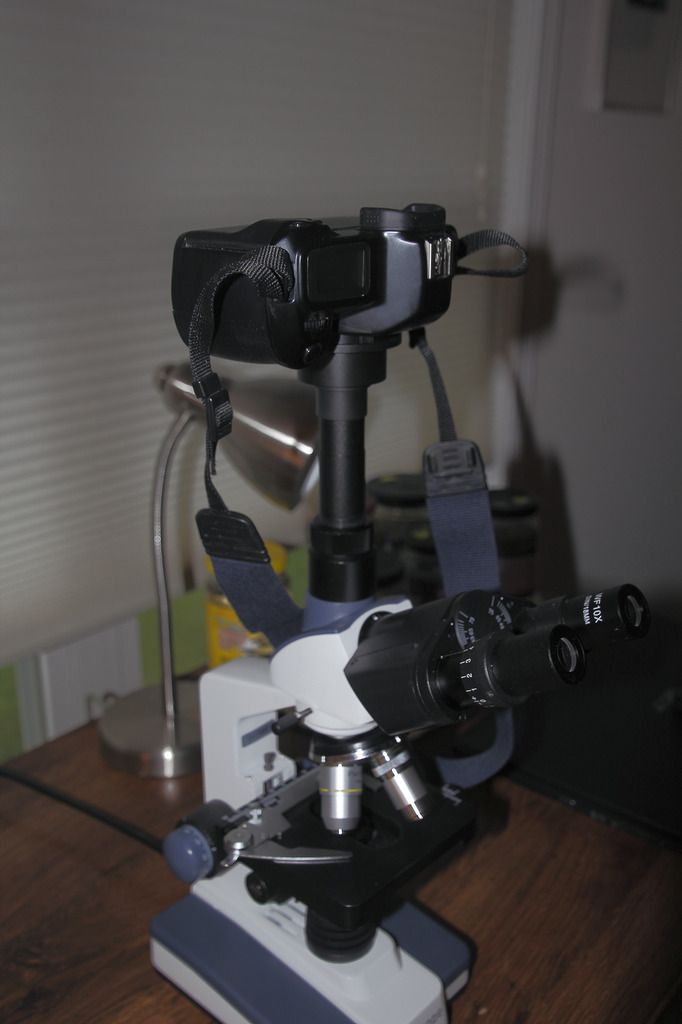
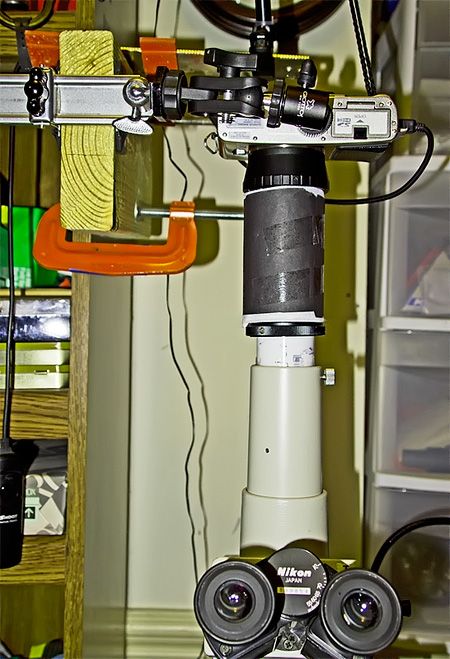
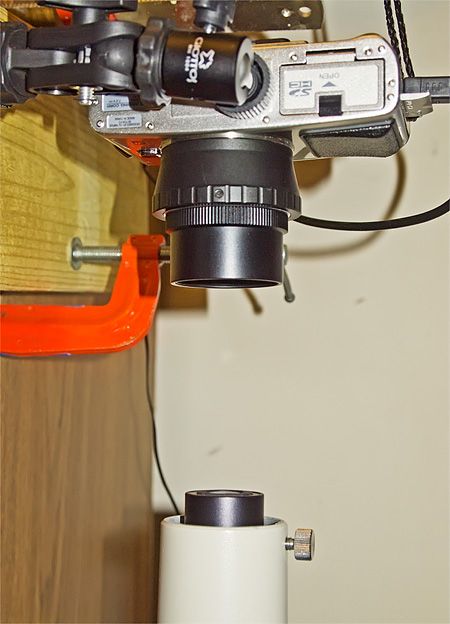
3. Images of my setup:


ImageImage
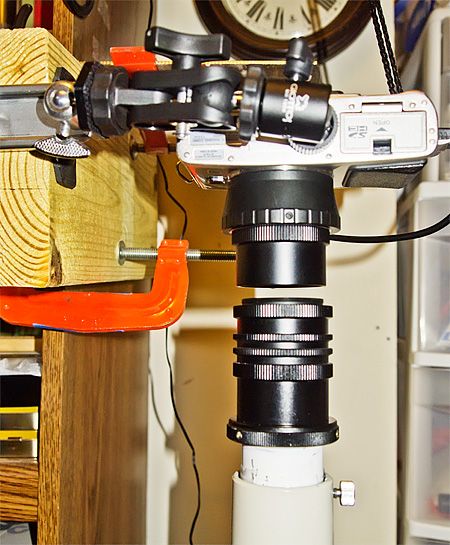
Left: The Olympus E-P1 micro four thirds camera and Nikon microscope assembly showing improvised camera "adapter".
Right: Camera fitted with the top half of the adapter, consisting of a camera-to-M42 screw-mount lens adapter and one section of an M42 extension tube. The picture also shows the projection lens in the phototube of the microscope's trinocular head.

ImageImage
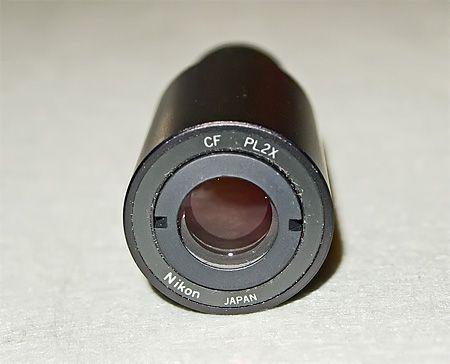
Left: Nikon CF PL 2x projection lens
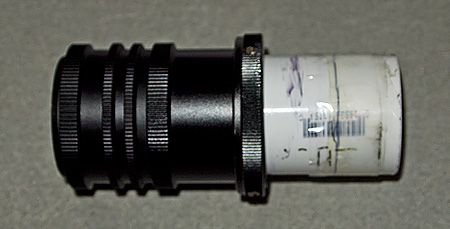
Right: Set of M42 extension tubes and PVC plumbing tube attached with glue, forming the bottom half of the adapter. The inside of the PVC tube is painted matte black.

ImageImage
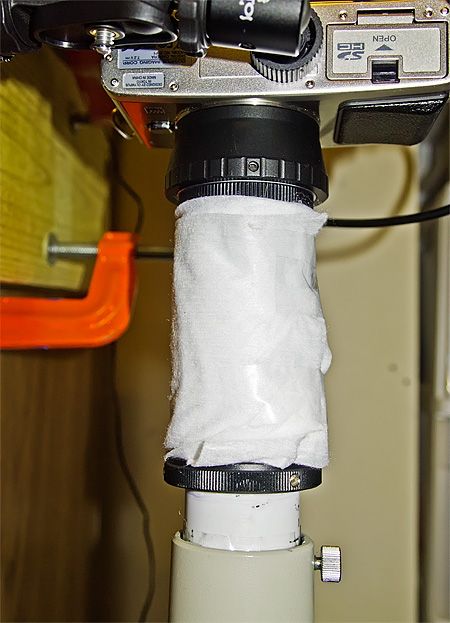
Left: The complete camera "adapter" in place, showing the gap that prevents transmission of the shutter vibration to the microscope.
Right: The gap between the top and bottom parts of the adapter is covered loosely with cloth to help prevent dust from getting on the projection lens and camera sensor. To prevent light from leaking onto the sensor, the cloth is then wrapped with opaque black paper as shown in the first picture.

Image
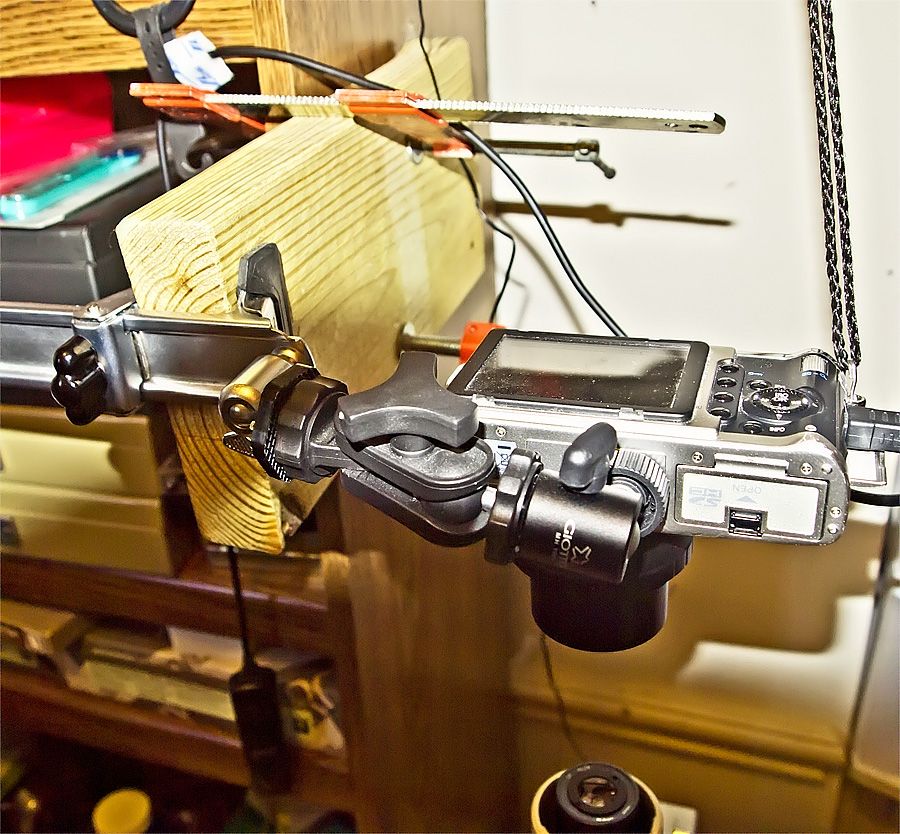
This attempts to show the way the camera is attached to the bookshelf behind and to the left of the microscope.

B. Camera with camera lens attached (this could be a DSLR or a point-&-shoot camera). This is the so-called 'afocal' method where the camera with lens "looks" through the usual microscope eyepiece (a projection lens is not used). Here the main considerations are the sizes and locations of the exit pupil of the eyepiece and entrance pupil of the camera lens needed to prevent vignetting (some zoom lenses have the entrance pupil deep inside the lens and vignetting may be unavoidable).

Parfocality: Since microscope objectives, unlike camera lenses, are designed to work at a specific, fixed distance from the object (they have a designated "working distance", the distance between the tip of the objective and the top surface of the cover glass) it is very important that the objective be used at its designed working distance. This distance is that obtained when focusing the microscope normally by looking through the eyepiece(s). It follows that the camera (whether using method A or B above) must "see" the object under the objective to be in focus when the microscope is focused using the eyepieces. It will not do to focus using the eyepieces, then refocus to get the camera image sharply focused as this will result in increased spherical aberration since the objective is not being used at its designed working distance. A very small amount of refocusing using the fine focus control (a few micrometers) if necessary may be acceptable. In setting up the camera, it is best to test for parfocality between eyepiece and camera using the lowest power objective (because this will have the smallest depth of focus).

Physical arrangement of camera to microscope. One important consideration is vibration transmitted to the microscope from the shutter and mirror of the DSLR. Some cameras have a "silent mode" or electronic shutter to eliminate shutter vibrations. If vibration is a problem, eliminating a direct physical connection between camera and microscope should solve the problem (I had to do that in my setup as I tried to show above).

Tethered operation. A camera with live-view that allows "tethered" operation, such that the image can be viewed directly on a computer monitor is a very distinct advantage (I think it would be good to consider both an electronic shutter and the ability to operate tethered when buying a new DSLR for use with a microscope).

Please consult the following links that contain very helpful, comprehensive, and authoritative information on the subject:
http://krebsmicro.com/photomic1/photomic1.html
http://www.krebsmicro.com/pdf/trinoc_a3.pdf
http://www.krebsmicro.com/Canon_EFSC/
http://micropix.home.comcast.net/~micro ... index.html
http://www.krebsmicro.com/microsetup2/index.html

The QCC
Posts: 397
Joined: Sat Oct 11, 2014 10:13 pm

Re: Connecting a DSLR camera to a microscope

#5 Post by The QCC » Sat Nov 01, 2014 9:30 pm

Gekko:
What is the length of your tube connecting the Nikon PL eyepiece to the camera?

I also have a PL 2.5x eyepiece and the length of tube required to fill a full frame sensor is 170mm.
This length borders on the ridiculous.

User avatar
gekko
Posts: 4701
Joined: Sun Oct 12, 2014 7:38 am
Location: Durham, NC, USA.

Re: Connecting a DSLR camera to a microscope

#6 Post by gekko » Sat Nov 01, 2014 11:53 pm

The QCC wrote:Gekko:
What is the length of your tube connecting the Nikon PL eyepiece to the camera?

I also have a PL 2.5x eyepiece and the length of tube required to fill a full frame sensor is 170mm.
This length borders on the ridiculous.
If I may comment: I don't think it is correct to try to fill the frame of the camera sensor (of whatever size) by adjusting the length of the tube. I think one should (a) focus on an object on a slide with a low power objective (4x if available, or 10x) by looking through the eyepiece, then (b) without changing the microscope focus, adjust the length of the tube (that is, the height of the camera above the projection lens) to get the image in focus such that the setup is parfocal between eyepiece(s) and camera sensor. Let the field of view seen by the sensor fall where it may. The way to change the field of view is to use a different power projection lens rather than change the camera-to-microscope distance.
Having said that, I measured the length of the tube between the top of the projection lens and the plane of the camera sensor on my setup (I could do so only approximately) and it is about the same as yours: about 160 mm. My impression is that this is typical-- why do you think that this borders on the ridiculus?

The QCC
Posts: 397
Joined: Sat Oct 11, 2014 10:13 pm

Re: Connecting a DSLR camera to a microscope

#7 Post by The QCC » Sun Nov 02, 2014 12:23 am

I do not use the eyepieces of the viewing head. I do all of my viewing on the computer display using the Live View function of the Canon camera and EOS Utilities..

Why do I think it is ridiculous? I probably should rephrase it as "It looks ridiculous".
It is my impression from what I have read that a 2-2.5x photo eyepiece should fill a full frame sensor. Also I have a Meiji 2.5x photo eyepiece and the extension tube length is 130mm to fill the full frame sensor.

There is quite a difference in physical size of the two photo eyepieces. The Nikon Pl 2.5x is 74mm in length and the Meiji MA512 is 50mm. That may or may not make a difference in the tube length.

As my use of the microscope is strictly for capturing images for gallery size prints, filling the 21MP sensor is very important.

User avatar
gekko
Posts: 4701
Joined: Sun Oct 12, 2014 7:38 am
Location: Durham, NC, USA.

Re: Connecting a DSLR camera to a microscope

#8 Post by gekko » Sun Nov 02, 2014 12:58 am

I think you are right that the 2.5 projection lens should fill the sensor of a full-frame camera. But what I said still holds: in other words it is, I think, critical that the tube length we are talking about be adjusted by (in your case) putting in the standard eyepiece that belongs to the microscope and using that to focus by eye using the 4x objective, then, without changing the focus, adjust the tube length (height of camera above scope) to get the camera image in focus at the same time. I don't think that the field of view (or size of image on the sensor) will be far from what you expect, that is appropriate for a full frame sensor, but the image quality will be optimal. I explained the reasoning in my original post: microscope objectives are corrected for optical aberrations for a fixed objective-to-slide distance (termed the working distance of the objective). Any significant departure from that will result in an increase in spherical aberration and will affect image quality adversely. The differences between the camera-to-microscope distance required for the Meiji and Nikon lenses I think are just the way they are designed (a shorter focal length lens will form an image closer to the lens). I would try both (each at its optimal distance) and use the one that gives me the better image.
Edit: Because you want to make gallery size prints, I think you want to get the best image quality possible, and you certainly don't want to introduce spherical aberration by using your objectives at other than their intended working distance. When you focus the microscope by eye using its original eyepiece and using the correct cover glass, you will satisfy that condition.

The QCC
Posts: 397
Joined: Sat Oct 11, 2014 10:13 pm

Re: Connecting a DSLR camera to a microscope

#9 Post by The QCC » Sun Nov 02, 2014 2:53 am

Gekko:
You may be technically correct, but I set my microscope up to have the 2x obj fill the frame of the camera with a well focused image. If the 2x fills the frame, so do the other obj.
As for being parfocal, the system focuses within +- .2mm (two turns of the fine focus wheel) for all obj.
This is fine for my purposes.

I have not observed any spherical aberration with either the Nikon, Meiji, Labomed eyepieces or the Honyu 2(2x) camera adapter. The Honyu and Labomed both exhibit some Chromatic Aberration that is easily corrected in Lightroom.

Which eyepiece/adapter is better? The Nikon and Meiji have very nice flat images, but lack the vibrancy of the Labomed. The Honyu 2(2x) fills the full frame uniformly from corner to corner, but is a tad soft near the edges.

Thin section mineral slides are generally large specimens and I rarely use the 20x or 40x obj. for taking photos destined for large prints. I look for eye catching patterns for prints and textures for 3D displacement maps.

I will post some sample images thumbnail images that use mineral slide photos in the photos forum.

adolfainsley8
Posts: 1
Joined: Mon Apr 25, 2016 11:20 am

Re: Connecting a DSLR camera to a microscope

#10 Post by adolfainsley8 » Mon Apr 25, 2016 11:23 am

There seems to be much uncertainty about connecting a Digital Single Lens Reflex (DSLR) camera to a microscope. The advantage of DSLRs is that they produce a high image quality and many also allow you to record HD videos. The disadvantage seems to be that there is no standard solution (compared to dedicated USB microscope cameras that simply can be used instead of an eyepiece????

JimT
Posts: 3247
Joined: Fri Oct 24, 2014 1:57 pm

Re: Connecting a DSLR camera to a microscope

#11 Post by JimT » Mon Apr 25, 2016 2:20 pm

My initial approach with a binocular set up was a set of extension tubes, a wooden "plug" which fit inside and was taped to the end tube that I had drilled a hole into to fit over the eyepiece. The whole set up was mounted on a tripod that was brought up to the scope. My DSLR is a Canon which allows for remote shooting.

Since upgrading to a trinocular set up I purchased the Amscope Canon adapter and now use that.

Old way:

Image

New way:

Image

Oktagon
Posts: 180
Joined: Thu Apr 07, 2016 12:52 am

Re: Connecting a DSLR camera to a microscope

#12 Post by Oktagon » Fri Apr 29, 2016 4:05 am

This is my setup. I'm fairly satisfied with results.
Attachments
Universal2.jpeg
Universal2.jpeg (63.41 KiB) Viewed 18762 times

Post Reply