Parfocal diatom test

Here you can post pictures and videos to show others.
Post Reply
Message
Author
User avatar
McConkey
Posts: 338
Joined: Fri Feb 19, 2016 4:33 am
Location: Alberta, Canada

Parfocal diatom test

#1 Post by McConkey » Thu Sep 08, 2016 2:43 am

Following some advice over on the "camera vs eyepiece" discussion i've managed to finally get my camera/eyepieces parfocal and almost the same FOV. I think the image quality i'm getting via my camera has improved because of this.

I have to crop a small amount but overall i'm happy with the results.

I essentially ended up heading to Home depot and grabbing some pvc electrical piping reducers
https://www.homedepot.ca/en/home/p.sche ... 01063.html

The smallest size fit spot on with my trinoc head and the next size up fit spot on with my camera. A little bit of measuring and cutting (camera needed to be 51mm above the trinoc head to be parfocal), threw in some washers for a more accurate focus, stuck it all together and hey presto! A new phototube.

AO20, 40x .80 planapo, Oblique Illumination, 3 image stack
camera example.jpg
camera example.jpg (432.92 KiB) Viewed 7610 times
Diamtom forum.jpg
Diamtom forum.jpg (208.92 KiB) Viewed 7610 times
Yes, i know DIATOM is spelled incorrectly in the file name above :P
Karl
AO21 with Canon M3

User avatar
rnabholz
Posts: 3086
Joined: Thu Jan 08, 2015 10:11 pm
Location: Iowa USA
Contact:

Re: Parfocal diatom test

#2 Post by rnabholz » Thu Sep 08, 2016 3:37 am

Order Form

Qty. Item
1. McC Super Deluxe Camera Adapter

Ship to: Rod Nabholz
In the Basement, Behind the Furnace
Iowa USA

Please rush delivery ;^)


I would settle for a bit more info on all of the parts and measurements in the event you don't want go into business.

Very cool, thanks

User avatar
KurtM
Posts: 1753
Joined: Tue Jun 09, 2015 12:08 am
Location: League City, Texas
Contact:

Re: Parfocal diatom test

#3 Post by KurtM » Thu Sep 08, 2016 4:06 am

Nice work on the DIY phototube. Even better job on the image - it's lovely, one of the nicest BF shots ever! 8-)
Cheers,
Kurt Maurer
League City, Texas
email: ngc704(at)gmail(dot)com
https://www.flickr.com/photos/67904872@ ... 912223623/

User avatar
mrsonchus
Posts: 4175
Joined: Tue Feb 03, 2015 9:42 pm
Location: Cumbria, UK

Re: Parfocal diatom test

#4 Post by mrsonchus » Thu Sep 08, 2016 5:22 am

A lovely job, proof clearly seen in your superb picture. Can you confirm that there's nothing between the camera and the head, i.e. that you have no optics inside the adapter?

I'm off to make one ASAP - thanks for the post! :D :)
John B

User avatar
c-krebs
Posts: 201
Joined: Sat Jun 18, 2016 7:22 pm

Re: Parfocal diatom test

#5 Post by c-krebs » Thu Sep 08, 2016 7:10 am

Karl,
Yes it looks good. I'm pretty sure that as you work more with this set-up you will indeed see overall better image quality. (BTW...a 40/0.80 is exactly the kind of objective where you really want to avoid significant focus change between viewing eyepieces and camera. What objective is that?)
McConkey wrote:I have to crop a small amount but overall i'm happy with the results.
Are you cropping because of vignetting, or poor image quality toward the edges (or both)? With direct projection like this onto a Canon APS-C sensor you are trying to capture a 27mm diameter image in the camera, which is almost always larger than an objective can produce with good quality out to the corners. (The exception would be some of the newer "super wide-field" objectives which can handle it.) Ideally it would be nice to have a quality 1.4X-1.6X magnification in there, but there are no microscope solutions I am aware of that do this at anything near a reasonable cost. Cropping a little would be, IMO, far better than using the 2.8X you mentioned in the other thread. If you have the opportunity you might want to try a 1.4X "tele-converter" on the camera as mentioned toward the end of that other thread. While a little "unconventional", this might well maximize your camera sensor usage (no need to crop)... it would not get you into "over-magnification" and it should eliminate any vignetting and utilize, in camera, about 19-20mm (diagonally on sensor) of the image your objective forms.

User avatar
McConkey
Posts: 338
Joined: Fri Feb 19, 2016 4:33 am
Location: Alberta, Canada

Re: Parfocal diatom test

#6 Post by McConkey » Thu Sep 08, 2016 9:56 am

Rod - aha too funny! I'm just about to head into work but when i'm home later tonight i'll get all the details and throw up some assembly images!

Kurt - Greatly appreciate the kind comments! The image is really a collaboration, it wouldn't have been possible without all the help, advice and constructive efforts of forum members! All i did was listen!

mrsonchus - Thanks! I can confirm 100% that there is no optics inside the head!

Charles - Thank you very much! The objective is an American Optical cat. #1323 planapo. The washers really helped in getting the tiny adjustments needed to get parfocal. Its spot on! The crop is only due to slight vignetting in all 4 corners. Image quality is excellent and flat all the way to the edges with no distortion! The other thread you mentioned has been a great help and a wealth of informtation. I would completely agree that the 2.8x is far too much. The image quality is much better without it. I will keep an eye out for any 1.4x tele-converters that i can throw inside the tube but for now i'm more than happy to crop in PP!
Karl
AO21 with Canon M3

User avatar
rnabholz
Posts: 3086
Joined: Thu Jan 08, 2015 10:11 pm
Location: Iowa USA
Contact:

Re: Parfocal diatom test

#7 Post by rnabholz » Thu Sep 08, 2016 12:58 pm

McConkey wrote:Rod - aha too funny! I'm just about to head into work but when i'm home later tonight i'll get all the details and throw up some assembly images!
Outstanding! Very much appreciate any info you can provide.

Thank you!

User avatar
gekko
Posts: 4701
Joined: Sun Oct 12, 2014 7:38 am
Location: Durham, NC, USA.

Re: Parfocal diatom test

#8 Post by gekko » Thu Sep 08, 2016 1:11 pm

Nice work.

User avatar
75RR
Posts: 8207
Joined: Sun Oct 12, 2014 2:34 am
Location: Estepona, Spain

Re: Parfocal diatom test

#9 Post by 75RR » Thu Sep 08, 2016 1:18 pm

Indeed - good work and nice image.
Was going to suggest a thread for fine tuning but as you have it spot on with the washers best to leave well enough alone!
Zeiss Standard WL (somewhat fashion challenged) & Wild M8
Olympus E-P2 (Micro Four Thirds Camera)

JimT
Posts: 3247
Joined: Fri Oct 24, 2014 1:57 pm

Re: Parfocal diatom test

#10 Post by JimT » Thu Sep 08, 2016 3:14 pm

Very nice diatom image. Did you paint the inside of the tubes with flat black paint?

User avatar
c-krebs
Posts: 201
Joined: Sat Jun 18, 2016 7:22 pm

Re: Parfocal diatom test

#11 Post by c-krebs » Thu Sep 08, 2016 6:23 pm

McConkey wrote:I will keep an eye out for any 1.4x tele-converters that i can throw inside the tube but for now i'm more than happy to crop in PP!
I wouldn't mess with the tube itself at this point (except as JimT suggested... be sure there are no internal reflections or bright surfaces). It just appeared that you have a male Canon mount at the top of your adapter, so attaching a Canon EOS mount converter would be straightforward, and not require any changes (if it ain't broke don't fix it!) If you had, or could borrow a 1.4X tele-converter it would be very interesting to see how it would, or would not help.
McConkey wrote:mage quality is excellent and flat all the way to the edges with no distortion!
That's great... sounds like you have a very good objective there. You might find that with a "lesser" objective you may need to crop more than you do with the 40X.

Charles
Posts: 1424
Joined: Mon Mar 02, 2015 11:55 pm

Re: Parfocal diatom test

#12 Post by Charles » Thu Sep 08, 2016 11:41 pm

Really nice construction and photo.

So you are the one who got that AO PlanApo 40X. Did you get the 10X PlanApo too?

apochronaut
Posts: 6314
Joined: Fri May 15, 2015 12:15 am

Re: Parfocal diatom test

#13 Post by apochronaut » Fri Sep 09, 2016 2:49 am

Fantastic stuff, Karl. I'm very glad this is all working out for you. The 1323 seems a pretty forgiving objective,eh? tight in comparison to the .66's but oh so much cleaner!

User avatar
McConkey
Posts: 338
Joined: Fri Feb 19, 2016 4:33 am
Location: Alberta, Canada

Re: Parfocal diatom test

#14 Post by McConkey » Fri Sep 09, 2016 4:07 am

Thank you all for the kind comments! It's nice when everything falls into place for once and you get a smooth imaging session!

JimT - I was going to paint the inside black yes! I didn't notice any reflection or glare so i figure'd i'd just leave it be (one less thing to make a mess). As you and Charles have both mentioned it, perhaps i'll just give it a quick spray to eliminate any chance. It would be interesting to see the comparison between a grey and black inner tube. I'm a very big believer in what Charles said...If it aint broke don't fix it!

Charles - Yesssssss! I did get the 10x planapo too. Absolutely stunning objectives. I'm not going to lie....i feel exceptionally lucky and i've already promised certain people that the objectives will not be taken for granted!

Apo - Tighter and cleaner doesn't even come close to describing these objectives aha. It's an incredible difference going from phase to planapo!!

Rod - As requested here a bit more detail on the tubes.

Here are the specific part numbers for the 2 tubes. They were purchased from Home Depot up here in Canada so they might not be the same stateside or across the pond.
Part number information
IMG_5652.JPG (477.53 KiB) Viewed 7526 times

Here are the inside measurements of both tubes. There is a small stopper lip on the inside of each tube which stops the smaller sizes from sliding all the way through.
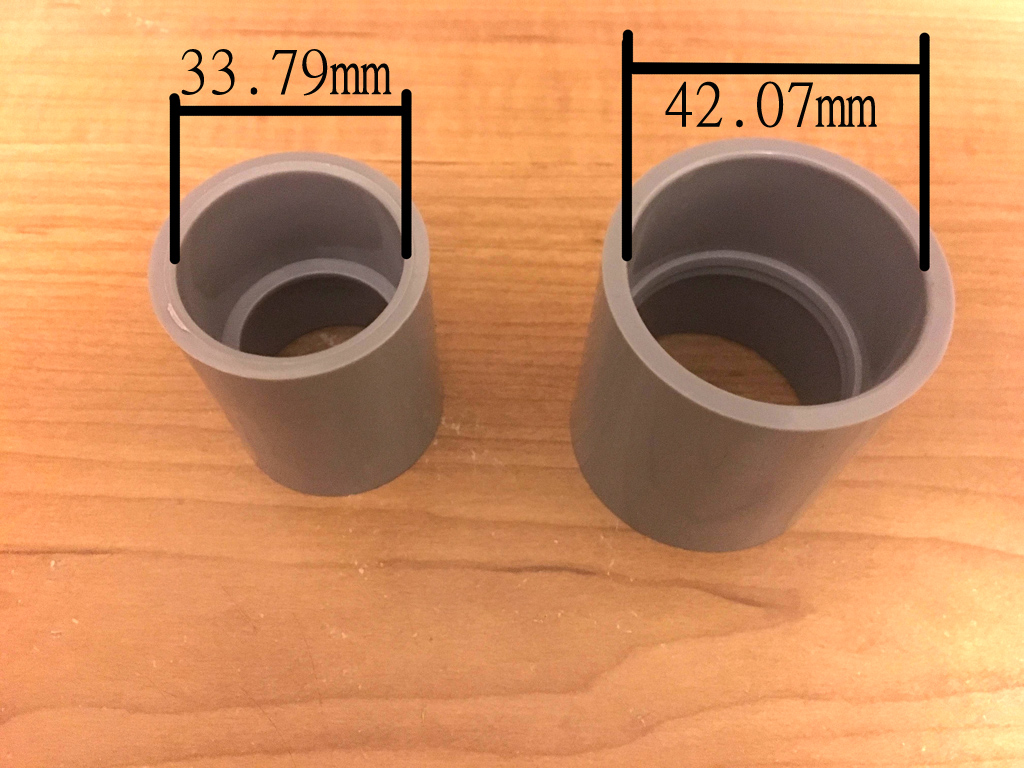
Inside dimensions.
Inside dimensions.
IMG_5645.JPG (382.52 KiB) Viewed 7526 times
When they're put together straight from purchase they're a little bit too long for my specific setup. For my AO20 and Canon T3i i need about 51mm from the top of the trinoc head to the from of my EOS adapter on my camera for the T3i to be parfocal.
Combined length before cutting.
IMG_5646.JPG (472.19 KiB) Viewed 7526 times
The smaller bottom piece also needs to be cut because the port on my trinoc head isn't quite long enough to reach the inside stopper of the tube. Cutting 15mm off the bottom of the smaller tube is enough so that it'll fit snug on the trinoc head. The top tube needs to be cut to about 48mm. I placed cardboard washers inbetween the top tube and canon EOS adapter to get the camera and eyepiece parfocal. I normally would have used good old fashion metal washers but i didn't have any that fit and the cardboard was much thinner which allowed for very small increments in focus until it was exactly parfocal.
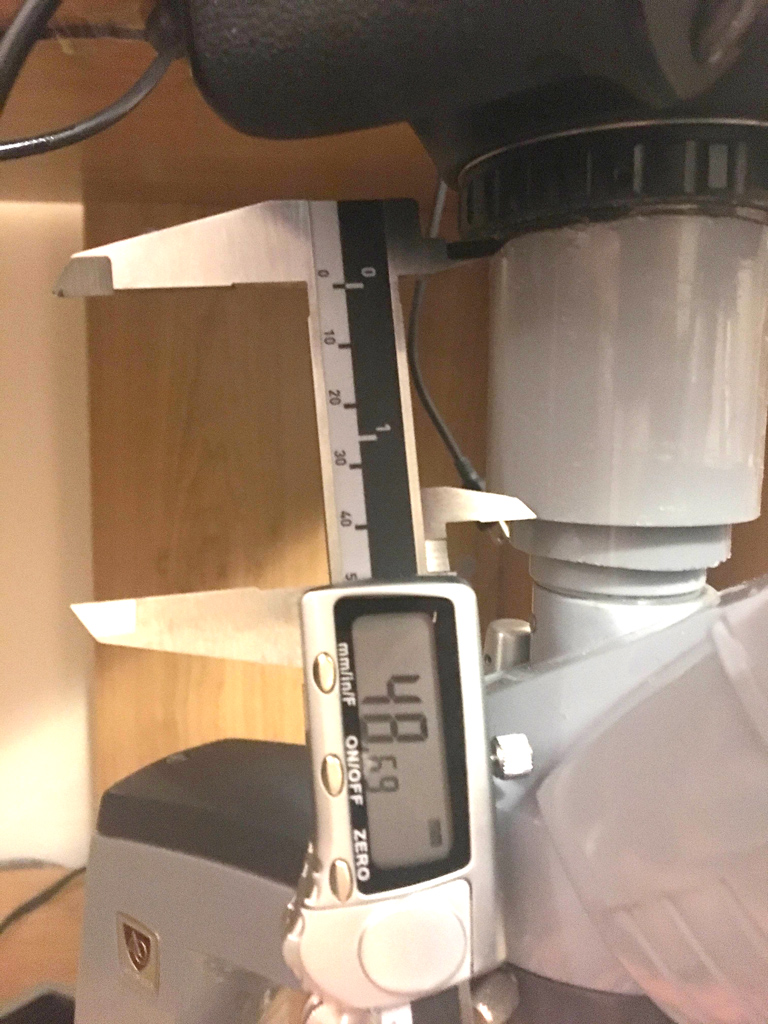
Length to be cut.
Length to be cut.
IMG_5651.JPG (404.72 KiB) Viewed 7526 times
I hope this little breakdown helps explain what i did a little better! Please feel free to ask any other questions!!
Karl
AO21 with Canon M3

User avatar
rnabholz
Posts: 3086
Joined: Thu Jan 08, 2015 10:11 pm
Location: Iowa USA
Contact:

Re: Parfocal diatom test

#15 Post by rnabholz » Fri Sep 09, 2016 3:05 pm

Thank you very much McC, a great help.

So the connection to the camera is a slip fit into a T-mount?

User avatar
McConkey
Posts: 338
Joined: Fri Feb 19, 2016 4:33 am
Location: Alberta, Canada

Re: Parfocal diatom test

#16 Post by McConkey » Fri Sep 09, 2016 5:41 pm

rnabholz wrote:...So the connection to the camera is a slip fit into a T-mount?
Ah, I should have specified! My bad! The grey tube is just slightly larger than the opening on the t-mount for the EOS adapter....Industrial strength super glue was my friend during this setup. I have a few of those t-mounts lying around so I wasn't too worried about perminantly having one attached to a grey pvc tube. I also superglued the 2 grey pvc tubes together to reduce any unwanted movement. The weight of the whole setup keeps it nice and snug on the Trinoc head but again, I threw a bit of superglue in there just incase vibrations from the camera caused any micro movements.

I'm heading out in an hour or so to the river behind my house to go slime hunting and hopefully get some images posted later this evening!
Karl
AO21 with Canon M3

User avatar
KurtM
Posts: 1753
Joined: Tue Jun 09, 2015 12:08 am
Location: League City, Texas
Contact:

Re: Parfocal diatom test

#17 Post by KurtM » Sat Sep 10, 2016 12:28 am

Unless you're pretty familiar with adhesives, I'm wondering how good a choice "super glue" is for the T-mount to PVC join. I'm thinking a fillet of JB Weld would put that baby to bed for all eternity. Also thinking it's like $1K sitting up top. But then, I know not what "industrial strength super glue" is, having experience limited to consumer grade cyanoacrylates.

How does it plug in to the photo port in the trinoc head again?
Cheers,
Kurt Maurer
League City, Texas
email: ngc704(at)gmail(dot)com
https://www.flickr.com/photos/67904872@ ... 912223623/

User avatar
McConkey
Posts: 338
Joined: Fri Feb 19, 2016 4:33 am
Location: Alberta, Canada

Re: Parfocal diatom test

#18 Post by McConkey » Sat Sep 10, 2016 1:44 am

KurtM wrote:Unless you're pretty familiar with adhesives, I'm wondering how good a choice "super glue" is for the T-mount to PVC join. I'm thinking a fillet of JB Weld would put that baby to bed for all eternity. Also thinking it's like $1K sitting up top. But then, I know not what "industrial strength super glue" is, having experience limited to consumer grade cyanoacrylates.

How does it plug in to the photo port in the trinoc head again?
I used Gorilla Glue for the adhesive...perhaps industrial strength was a bit of an overstatement :P It forms a very solid bond, i'm able to unplug and move cables, take out the camera card and throw my dust cover over my scope without any worry of the setup moving or falling apart. I think my house is held together with JB Weld so that might be overkill for the scope! :lol:

The inner ring of the pvc reducer fits perfectly with the small tube of the trinoc head, its a snug fit but it sits ontop of the trinoc head nicely. Another very small application of Gorilla Glue was used for additional stability. You'll also notice black paper inside the trinoc tube, this is just to eliminate a small amount of internal reflection which i think was caused by light entering where there is a small cutout in the trinoc tube. If i had cut the pvc tube a few mm longer it would 100% cover this little "U" shaped hole. Folding a piece of black paper seemed like an easier solution than re-cutting another piece of pvc pipe.

The setup looks a little rough around the edges but for $2.50 i get a parfocal setup, eyepiece FOV and a small but noticeable increase in image quality!
IMG_5660.JPG
IMG_5660.JPG (337.2 KiB) Viewed 7477 times
Karl
AO21 with Canon M3

User avatar
rnabholz
Posts: 3086
Joined: Thu Jan 08, 2015 10:11 pm
Location: Iowa USA
Contact:

Re: Parfocal diatom test

#19 Post by rnabholz » Sat Sep 10, 2016 2:33 am

Thanks for the additional info.

If I may impose a bit more on you for one more measurement please?

To allow for the possible slight differences in the thickness of the various t mounts out there, what is the distance from the top of the trinoc port to the front of the lens mount flange on the camera body? Is that the 51mm you referred to earlier?

I gathered the materials and hope to give it a go soon.

Thanks again.

Rod

Rodney
Posts: 748
Joined: Thu Feb 19, 2015 2:52 am
Location: Southern Georgia, USA

Re: Parfocal diatom test

#20 Post by Rodney » Sat Sep 10, 2016 2:36 am

I built an adapter sort of like that a while back from home depot electrical pipe connectors to fit my DSLR but to go over the eyepiece.
Rodney
Attachments
DSLR Camera Adapter 014.jpg
DSLR Camera Adapter 014.jpg (203.26 KiB) Viewed 7471 times

User avatar
McConkey
Posts: 338
Joined: Fri Feb 19, 2016 4:33 am
Location: Alberta, Canada

Re: Parfocal diatom test

#21 Post by McConkey » Sat Sep 10, 2016 3:04 am

Rodney - Great minds think alike eh!! I had considered doing the same thing for the eyepieces but with the trinoc head i figure'd why loose an eyepiece to imaging. Great stuff though!
rnabholz wrote:...To allow for the possible slight differences in the thickness of the various t mounts out there, what is the distance from the top of the trinoc port to the front of the lens mount flange on the camera body? Is that the 51mm you referred to earlier?...
The 51mm referred to earlier was from the top of the trinoc port to the front of the t-mount. My T-mount is 11mm thick, from top of the trinoc head to the front of the camera body it's 63mm....the washers add about 1mm.

I'm really interested and looking forward to seeing your results and how it all comes together!

For another reference here is an unedited, uncropped, straight from camera example of the FOV with 10x objective. The image is purely for FOV example...not to win any awards :P There are a few places out of focus near the edges but that is due to depth of field and sample thickness...not coma. Flat field across the entire FOV.
_MG_6603.JPG
_MG_6603.JPG (465.12 KiB) Viewed 7468 times
Karl
AO21 with Canon M3

Rodney
Posts: 748
Joined: Thu Feb 19, 2015 2:52 am
Location: Southern Georgia, USA

Re: Parfocal diatom test

#22 Post by Rodney » Sat Sep 10, 2016 3:40 am

Just my opinion over the years, speaking of glues, super glue has a lot of uses but you have no time to move tight parts around, you either have it right or try another fit with new parts. I tried the ape glue but hate it, it will sort of work and you do have time to move parts around, but I find that ape glue does not make a good uniform seal all around when dried. PVC glue will work but you have no time to move parts around when stuck.
I use goop glue because it is slow setting and really holds well and is clear after a few hours and it looks good when dried.
Rodney

User avatar
c-krebs
Posts: 201
Joined: Sat Jun 18, 2016 7:22 pm

Re: Parfocal diatom test

#23 Post by c-krebs » Sat Sep 10, 2016 7:30 am

This has turned into a very interesting thread.

I like that Karl posted an example shot showing the direct FOV with a simple, empty tube that places the sensor right at the intermediate image location. I took that image and added some more info. If you were to add optics to the trinocular tube that magnified this view further before it reached the camera sensor you would get the indicated sections to "fill the frame". Looking at this, it becomes really obvious how much of the objectives intermediate image you are discarding if you magnify too much, as with the 2.8X magnification (the lower mag offered in one of the stock AO camera adapters). You can see why I have mentioned 1.4X as a desirable option in this regard. (But if it is not possible to come up with a quality lower magnification solution cropping the image in post seems like a viable solution.)

Image

User avatar
McConkey
Posts: 338
Joined: Fri Feb 19, 2016 4:33 am
Location: Alberta, Canada

Re: Parfocal diatom test

#24 Post by McConkey » Sat Sep 10, 2016 2:29 pm

Rodney - You bring up a very good point. There is little room for error when using fast drying super glues. You have to be spot on and confident you have everything lined up and in the right position before you commit to placing the glue down. Thanks for the suggestion of a slower drying adhesive!

Charles - Great information you added for the FOV! Thank you! I gaurentee that'll be a big help for lots of people (myself included). It's also good to keep in mind that with the 2.8x (not sure if this applies to the other magnifications) the FOV was not flat. The edges of the images suffered from coma and that distortion decreases the FOV even more. Not to mention it's not even close to being parfocal so I'm sure there's some loss in resolution too.
Karl
AO21 with Canon M3

Post Reply