Improving Top-Stage Lighting Using a Smaller Aperture on the Lamp
-
- Posts: 3355
- Joined: Sun Mar 22, 2020 10:06 am
- Location: Winnipeg, Manitoba, Canada
Improving Top-Stage Lighting Using a Smaller Aperture on the Lamp
I use top lighting for dark field images because I don't have a real filter holder. I've been experimenting with making a pseudo diaphragm for my top stage light. The question is, does a small aperture make my top-stage illumination sharper in dark field. I cut a 2 mm hole in a piece of aluminum foil and mounted this aperture on my top stage lamp to compare the image with that from the full light. I had to compensate for illumination levels using software. It does seem that controlling the aperture of the top stage light does make a difference.
Fiber--small aperture vs large aperture
compound eye of a small fly--small aperture vs large aperture
Fiber--small aperture vs large aperture
compound eye of a small fly--small aperture vs large aperture
-
- Posts: 2790
- Joined: Sat Mar 03, 2018 9:09 pm
Re: Improving Top-Stage Lighting Using a Smaller Aperture on the Lamp
Maybe it's just on my end, but the pictures look to have had some heavy compression done to them at some point along the way.
-
- Posts: 3355
- Joined: Sun Mar 22, 2020 10:06 am
- Location: Winnipeg, Manitoba, Canada
Re: Improving Top-Stage Lighting Using a Smaller Aperture on the Lamp
They are jpegs. I processed them with Paintshop Pro.
-
- Posts: 2790
- Joined: Sat Mar 03, 2018 9:09 pm
Re: Improving Top-Stage Lighting Using a Smaller Aperture on the Lamp
It kind of looks like they got reduced to gif-level compression somewhere along the line.
-
- Posts: 761
- Joined: Thu Aug 23, 2018 10:12 pm
- Location: Lund, Sweden
Re: Improving Top-Stage Lighting Using a Smaller Aperture on the Lamp
I couldn't help but noticing in some of your earlier posts where you posted pictures of your scope, that your pictures looked heavily altered:
viewtopic.php?f=14&t=3606&p=77886#p77886
viewtopic.php?f=28&t=9046&p=77820#p77820
Since your micro-photos also have a similar 'style', and I assume these are taken with different cameras, you might want to look into your workflow to see where this comes from.
viewtopic.php?f=14&t=3606&p=77886#p77886
viewtopic.php?f=28&t=9046&p=77820#p77820
Since your micro-photos also have a similar 'style', and I assume these are taken with different cameras, you might want to look into your workflow to see where this comes from.
-
- Posts: 3355
- Joined: Sun Mar 22, 2020 10:06 am
- Location: Winnipeg, Manitoba, Canada
Re: Improving Top-Stage Lighting Using a Smaller Aperture on the Lamp
I have a rudimentary microscope, the Amscope M150. I don't have a rear condenser or diaphragm. I take pictures with my Omax camera which makes 640X480 pixel images. I apologize but I am trying to play with the big boys and make some kind of contribution.
Re: Improving Top-Stage Lighting Using a Smaller Aperture on the Lamp
Your narrow-beam images are definitely sharper, I think simply from the more point-source lighting providing more shadows, and thus a crisper relief-effect; whereas with a broader source, the shadows are eliminated from getting illuminated from many different points, and things are washed out.
Re: Improving Top-Stage Lighting Using a Smaller Aperture on the Lamp
Hi Don
No need to apologize you do what you can with what you have got. Well done.
Alan
No need to apologize you do what you can with what you have got. Well done.
Alan
Re: Improving Top-Stage Lighting Using a Smaller Aperture on the Lamp
Hi Don,
don't worry, the guys here just want to help. It looks as if there might be a simple way to improve the quality of your images. Exposure, image editing and image compression can have a strong effect on the output. Generally microscope photos don't need a lot of pixels, so while 640x480 are not a lot it might be possible to get better images from it.
Some general hints:
- use as much light as the microscope can offer
- get the exposure right
- don't overdo image editing
- use very little compression (high quality jpeg-setting)
Bob
-
- Posts: 2790
- Joined: Sat Mar 03, 2018 9:09 pm
Re: Improving Top-Stage Lighting Using a Smaller Aperture on the Lamp
I wonder if there is a setting on the camera misset or a problem in export. I have a cheap (ish, 50 bucks on amazon) c mount camera and it does need a lot of light, but while it won't produce world class photos it doesn't have this level of artifacting.
Nothing to do with needing to spend more I think--probably just another round of testing things until they snap into place. It also might be the camera is malfunctioning which could be a bummer, but probably not.
-
- Posts: 3355
- Joined: Sun Mar 22, 2020 10:06 am
- Location: Winnipeg, Manitoba, Canada
Re: Improving Top-Stage Lighting Using a Smaller Aperture on the Lamp
Thanks guys. The camera is fine. It's me. I am an amateur photographer. A lot of people in my camera club hate the way I use processing, even in regular photos. I'll get some right and some wrong. Thanks for your support.
.
I do like to play around and try all kinds of strange and silly devices to see if I can make everything more to my liking. I hope you guys don't mind my showing them.
.
I do like to play around and try all kinds of strange and silly devices to see if I can make everything more to my liking. I hope you guys don't mind my showing them.
Re: Improving Top-Stage Lighting Using a Smaller Aperture on the Lamp
A couple questions:
What is the light source?
What objective are you using?
( Very Roughly) How much working distance do you figure you have? (Distance between tip of objective and the subject)
Coverglass over subject or no coverglass? (Really does not matter with the 4X or 10X. Not having a coverglass could be an issue with the 40X)
With a little more information we could probably be more helpful.
Re: Improving Top-Stage Lighting Using a Smaller Aperture on the Lamp
If you do require help with your setup we would need to see plain unaltered images. I think 'Art' benefits from a good starting point.I am an amateur photographer. A lot of people in my camera club hate the way I use processing, even in regular photos.
Zeiss Standard WL (somewhat fashion challenged) & Wild M8
Olympus E-P2 (Micro Four Thirds Camera)
-
- Posts: 3355
- Joined: Sun Mar 22, 2020 10:06 am
- Location: Winnipeg, Manitoba, Canada
Re: Improving Top-Stage Lighting Using a Smaller Aperture on the Lamp
When I bought the microscope I had no idea of the importance of dark field. I also didn't know the limitations of the microscope I bought. I'm an 80 year-old beginner. I am working to create a microscope that can overcome its limits. I just ordered an iris diaphragm I intend to mount over the light source. Then I will create a filter holder and mount it instead of the rotating diaphragm disk that came with this model. Everything is makeshift with me. I haven't got good tools. But I am really impressed with the value of playing with adjusting the light to improve sharpness, contrast, and to provide shadow.
.
I use a gooseneck lamp I bought in Ikea two years ago. I have been making "snoops" out of aluminum foil to make smaller apertures for it. I ordered some light conducting cable (about 2 mm diameter) that I will attach to the lamp so I can bring light directly onto the stage of the microscope (especially for the high power). It's an eternal work in progress but I am having a lot of fun.
.
Thanks for much for your advice and interest.
.
I use a gooseneck lamp I bought in Ikea two years ago. I have been making "snoops" out of aluminum foil to make smaller apertures for it. I ordered some light conducting cable (about 2 mm diameter) that I will attach to the lamp so I can bring light directly onto the stage of the microscope (especially for the high power). It's an eternal work in progress but I am having a lot of fun.
.
Thanks for much for your advice and interest.
Re: Improving Top-Stage Lighting Using a Smaller Aperture on the Lamp
In a very recent post by Charles Krebs, diffuse illumination around the objective, which I think can be realised with relatively simple and available means, was presented - along with stunning images.
-
- Posts: 3355
- Joined: Sun Mar 22, 2020 10:06 am
- Location: Winnipeg, Manitoba, Canada
Re: Improving Top-Stage Lighting Using a Smaller Aperture on the Lamp
Thanks Hobbyst. I'll look for it.
Re: Improving Top-Stage Lighting Using a Smaller Aperture on the Lamp
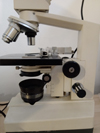
Hello, DonDonSchaeffer wrote: ↑Mon May 04, 2020 10:29 amI use a gooseneck lamp I bought in Ikea two years ago. I have been making "snoops" out of aluminum foil to make smaller apertures for it. I ordered some light conducting cable (about 2 mm diameter) that I will attach to the lamp so I can bring light directly onto the stage of the microscope (especially for the high power). It's an eternal work in progress but I am having a lot of fun.
I greatly admire your experimentation, but I think you will ultimately be disappointed with the “snoops” for the IKEA lamp ... As you approach a pinhole, diffraction becomes increasingly significant and you will see the beam expanding.
It’s probably time to start playing with lenses.
Also bear in mind that a fibre optic has a natural ‘exit angle’ of 40° or more [included angle], depending on the material used.
Keep experimenting !!
MichaelG.
.
Edit: Here’s a quick test I did a while ago:
The light exiting a circular Fibre Optic light guide with a square-on polished end will be a diverging cone with an included angle of [typically] 68 degrees. ... This is also the acceptance angle at the input end [assuming, in both cases, that the other medium is Air].
The light guide in the two pictures below is a 1mm diameter multi-fibre bundle, in a 2mm plastic sheath; and the ferrule is just under 3mm diameter. The bundle is Epoxy-potted and finely polished [they were made by Schott; so the quality is pretty good].
The light input for these pictures is a Green LASER pointer. [ just to make the beam easily visible ]
.
First; the exit angle:
. .
Now, the spot size, at a distance of 10mm
. .
As you will see; this is not a 1mm spot.
Last edited by MichaelG. on Mon May 04, 2020 5:21 pm, edited 1 time in total.
Too many 'projects'
-
- Posts: 3355
- Joined: Sun Mar 22, 2020 10:06 am
- Location: Winnipeg, Manitoba, Canada
Re: Improving Top-Stage Lighting Using a Smaller Aperture on the Lamp
All I can say is we will see what happens. The smallest hole in my "snoop"is about 3 mm. The largest hole 8 mm. The light or my fiber optic cable will be white light from the Ikea lamp.Thank you very much for the technical view.
Last edited by DonSchaeffer on Tue May 05, 2020 3:54 pm, edited 1 time in total.
Re: Improving Top-Stage Lighting Using a Smaller Aperture on the Lamp
Don,
The Ikea JANSJÖ light you have is very popular one for macro/micro work. But I think the idea of using a small aperture on it is not the way to go.
You should be able to get pretty good "top-light illuminated" darkfield with the 4X and 10X with that light. It's going to be more difficult with the 40X due to the shorter working distance. So I would experiment first with the 4x and 10x, then move on to the 40X.
If you want darkfield using a top-light be sure that the area beneath the slide is as much of a "black-hole" as you can make it (from the objectives point of view). If you have a below stage aperture turret, set it to the largest hole and place a piece of black cloth or paper on the table under the opening. Don't let any light spill from the lamp onto this black background.
I would use the light without any restrictions (no small aperture covering it). Place it close to the subject at a low angle (almost from the side). For many subjects you will want some light fill coming in from the opposite side of the light.This can be as simple as a strip of white paper forming a semi-circle around the subject side that is opposite the light. This will reflect some light back onto the deeply shadowed side of the subject.
Give this a try. And I agree with some of the other thoughts posted here. Better exposures ad less image processing should help.
-
- Posts: 3355
- Joined: Sun Mar 22, 2020 10:06 am
- Location: Winnipeg, Manitoba, Canada
Re: Improving Top-Stage Lighting Using a Smaller Aperture on the Lamp
Thanks CKrebs.
The truth is I sometimes want to mix below stage light with top stage light. I call it twilight.
-
- Posts: 2790
- Joined: Sat Mar 03, 2018 9:09 pm
Re: Improving Top-Stage Lighting Using a Smaller Aperture on the Lamp
Just to have one more try at this, this is one of your photos from the first post with the levels all mixed up to make the artifacts more visible (as their direct visibility will vary a lot depending on your monitor's contrast):
The camera really shouldn't be doing this. These cameras do seem to struggle with low light levels, and that might be the issue here though I am not sure.
Re: Improving Top-Stage Lighting Using a Smaller Aperture on the Lamp
Absolutely! You can do all sorts of background colors/patterns, or additional "rim" lighting from below. But I think the first thing to do is establish your top lighting first. When satisfied and comfortable with that, add in any additional elements you want from below. If initially you try to have too much going on, it will be more difficult to determine what works and doesn't work.DonSchaeffer wrote: ↑Tue May 05, 2020 3:46 pmThe truth is I sometimes want to mix below stage light with top stage light. I call it twilight.
Something appears to be "off" with the camera images.
If this means you need to greatly "lighten: a dark image after the picture is taken, it could be part of the problem. The exposure should be good straight out of the camera. Somewhere in your camera operating software ("Toupview) there should be a "Camera Sidebar" or something that allows you to set exposure time and gain. It will also have an "auto" setting. I would;d try turning it off "Auto" and try to set a proper exposure by using the "time" slider (keeping the gain slider to the left). If you can't get it "bright" enough with just the "time" slider, then you can try increasing the "gain". If you find that you need to increase the "gain" slider by a large amount it would be better to try to add more light on your subject.I had to compensate for illumination levels using software
-
- Posts: 3355
- Joined: Sun Mar 22, 2020 10:06 am
- Location: Winnipeg, Manitoba, Canada
Re: Improving Top-Stage Lighting Using a Smaller Aperture on the Lamp
The truth is I ordered a better model microscope which ought to come in a week or two. It has a proper condenser and a filter holder. The world will be a whole new place.