A Slice of Ambition

Here you can discuss sample and specimen preparation issues.
Post Reply
Message
Author
User avatar
mrsonchus
Posts: 4175
Joined: Tue Feb 03, 2015 9:42 pm
Location: Cumbria, UK

A Slice of Ambition

#1 Post by mrsonchus » Mon Aug 10, 2015 8:14 pm

Hi all, some good news - I've been practicing with my Shandon microtome ('The Beast') again tonight and the use of the metal moulds - I've been mixing and testing mould-release agents, but that's not why I'm here....
I have some unused lily pollen left over from some stain-trials a while back - they were stained with Fuchsine (pink) in the staining tests.
Anyway I dusted some dried and totally untreated pollen into the moulds just for my own curiosity really, and this time - yes, I've definitely got some sections, at 10µ and 20µ, through the actual pollen grains, not doubt in my mind this time... I can't believe it's happened but I'll post some pictures later - I've got to eat and watch football now!

Interestingly I needed to put a 2-deg angle to the blade adjuster to accommodate the 20µ setting, at the 'usual' zero-deg setting for a low-profile replaceable blade (good up to about 15µ) the sections tended to slightly curl backwards towards the blade (not a full-on roll but a slight 'bend') which is bound to stress them during stretching on a water-bath as they straighten (flatten) and expand on the surface of the warm water...

Back later with details.... :D I love my Shandon!
John B

billbillt
Posts: 2895
Joined: Mon Nov 10, 2014 10:01 pm

Re: A Slice of Ambition

#2 Post by billbillt » Mon Aug 10, 2015 10:14 pm

Hi John,
Glad to hear the pollen experiment worked out... I am looking forward to photos... I imagine the reason for having to adjust to 2 degrees is to give more clearance to the cutting edge... I think it becomes more necessary as the sample gets thinner...
BillT

User avatar
mrsonchus
Posts: 4175
Joined: Tue Feb 03, 2015 9:42 pm
Location: Cumbria, UK

Re: A Slice of Ambition

#3 Post by mrsonchus » Mon Aug 10, 2015 11:03 pm

billbillt wrote:Hi John,
Glad to hear the pollen experiment worked out... I am looking forward to photos... I imagine the reason for having to adjust to 2 degrees is to give more clearance to the cutting edge... I think it becomes more necessary as the sample gets thinner...
BillT
Hi Bill, the std angle for a low-profile replaceable blade (that's the angle the blade makes, 0 deg being parallel to the cut face of the block) is set at 0 deg in the blade holder, the 'extra 2 deg' is needed when I go above say 15µ to in this case 20µ...

Yes, the pollen has actually sectioned! I've been lucky enough to section many grains across the long-axis of the grain, thus also crossing the 'colpus' (a slit-like opening or groove in these lily grains where a pollen tube will emerge and follow a chemical pathway through the stigma and it's 'stalk' ultimately entering an egg in the plant's ovary and fertilizing it) and it's shape and depth are clearly visible - I've even been able to measure the depth of the colpi on some grains, this is all visible with the sections still in the wax! I can't wait to dewax, stain and mount these sections - I never thought it would be possible.

Here are a few pictures of the sectioned grains still in the wax, together with some pollen grains (whole) of the same pollen from the same plant - I used left-over pollen for these sectioning attempts - the orientation of the sections should be discernible from the pictures too.

Here's the pollen un-stained and mounted whole a few months back now....
Unstained pollen showing whole grains
ws_pollen_grain_1.jpg (133.88 KiB) Viewed 6556 times
Stained with Safranin, the colpus is visible
ws_pollen_grain_2.jpg (85.65 KiB) Viewed 6556 times
Here are some 10µ sections still in the wax....
Colpus has been sectioned and it's depth is visible..
ws_pollen_section_2.jpg (152.65 KiB) Viewed 6556 times
A pollen-grain with it's top off!
ws_pollen_section_3.jpg (187.1 KiB) Viewed 6556 times
Sectioned colpus of a different grain
ws_pollen_section_1.jpg (196.54 KiB) Viewed 6556 times
Sooo the mighty Shandon has really come up trumps this time - is there nothing this beauty can't handle! :D :D
Having a great time! :)

Back tomorrow with a story about a Daffodil-pedicel paraffin-block that I had discarded because I couldn't get it to section with the rocking microtome.. Mounted it, fed it to the Shandon and... you guessed it! More about this adventure tomorrow, must get some sleep now, we're going to our village agricultural show tomorrow (if it stays fine..) :)
John B

billbillt
Posts: 2895
Joined: Mon Nov 10, 2014 10:01 pm

Re: A Slice of Ambition

#4 Post by billbillt » Tue Aug 11, 2015 3:00 pm

Hi John,
I was under the belief that older items were better than new ones... No more... You new Shandon has proved that belief to be wrong..... All of your pics here are nothing less than wonderful... Keep up the interesting work!...
BillT

User avatar
mrsonchus
Posts: 4175
Joined: Tue Feb 03, 2015 9:42 pm
Location: Cumbria, UK

Re: A Slice of Ambition

#5 Post by mrsonchus » Tue Aug 11, 2015 5:18 pm

billbillt wrote:Hi John,
I was under the belief that older items were better than new ones... No more... You new Shandon has proved that belief to be wrong..... All of your pics here are nothing less than wonderful... Keep up the interesting work!...
BillT
Hi Bill, thank you. Ah...... the Shandon is brand-new in condition, but not I suspect in design and manufacture!
I'm with you on this one, I still think older manufacturing is best, although sitting in a 1970s car when it's leaking in the rain is a tad worrying! :D

Oh yes, a new essential gadget arrived for me this afternoon!
This is my new drying cabinet for slides, fan-assisted and far flatter response-curve than the beefy oven I use for wax infiltration... This will not overheat my slides in the wax, as has recently happened much to my horror!
ws_dehydrator_front_view.jpg
ws_dehydrator_front_view.jpg (70.91 KiB) Viewed 6533 times
My new slide-dryer
My new slide-dryer
ws_dehydrator_controls.jpg (33.74 KiB) Viewed 6533 times
ws_dcehydrator_top_view.jpg
ws_dcehydrator_top_view.jpg (98.35 KiB) Viewed 6533 times
This should dry my slides in a far more reliable and gentle manner.....
Yes, I know what your thinking, 'what on Earth is it?' - its a 'food dehydrator' :oops:
John B

billbillt
Posts: 2895
Joined: Mon Nov 10, 2014 10:01 pm

Re: A Slice of Ambition

#6 Post by billbillt » Tue Aug 11, 2015 8:06 pm

Hi John,
That should give you much better control over your drying process...

BillT

User avatar
mrsonchus
Posts: 4175
Joined: Tue Feb 03, 2015 9:42 pm
Location: Cumbria, UK

Re: A Slice of Ambition

#7 Post by mrsonchus » Tue Aug 11, 2015 8:40 pm

billbillt wrote:Hi John,
That should give you much better control over your drying process...

BillT
Hi Bill, I've dried slides today in it at 40-deg and I've started using the positively-charged Leica 'sticky' slides that I bought online for just £6 for 2 (unopened and still in the wrappers) boxes of 72 slides in each! They have performed, together with the dryer and the Shandon, brilliantly - I've dewaxed several slides after this usually far too short time and they've all come through perfectly! I've even been able to stain a 10µ slide with 2 sections on it with Fast-green FCF, and mount it permanently in an alcohol-miscible mountant!
May have time to post the first ever finished 'Shandon slides' later, but certainly tomorrow! :D
I'm having a fantastic rate of success now, all these factors have come together to give the basis (it's early days) of a very good work-flow - I'm really quite excited! :D
Thanks for your continued encouragement and interest Bill. :D

p.s even the pollen sections came through dewaxing perfectly - I can't believe these sections are sticking to the slides so extraordinarily well!
John B

User avatar
gekko
Posts: 4701
Joined: Sun Oct 12, 2014 7:38 am
Location: Durham, NC, USA.

Re: A Slice of Ambition

#8 Post by gekko » Tue Aug 11, 2015 8:57 pm

mrsonchus wrote: I've been lucky enough to section many grains across the long-axis of the grain.
I don't call that luck; it is more like skill. Exceptionally good images of the pollen: clear, sharp, and beautiful.

billbillt
Posts: 2895
Joined: Mon Nov 10, 2014 10:01 pm

Re: A Slice of Ambition

#9 Post by billbillt » Tue Aug 11, 2015 9:55 pm

I certainly agree with gekko... You have developed a great amount of skill... A person makes their own luck!...
BillT

User avatar
mrsonchus
Posts: 4175
Joined: Tue Feb 03, 2015 9:42 pm
Location: Cumbria, UK

Re: A Slice of Ambition

#10 Post by mrsonchus » Wed Aug 12, 2015 12:46 am

Hi Bill & Gekko, you are very generous and I thank you both for your support and encouragement. It's great to know others are interested in the mysteries of plants - they never cease to delight & amaze me.
The pollen results really came out of the blue for me, the technique is so simple, basically I dropped pollen (well dried but no other processing whatsoever) into the bottom of the moulds I was testing to make the 'classic Tissue-Tek shaped blocks' seen in all the online videos shot in labs.
The grains stayed at the bottom of the mould after pouring the wax (i.e. against the cut-face to be, of the blocks) and were there waiting for the microtome - amazingly they were sufficiently supported by the wax, although it was only encasing and had not of course infiltrated the interior of the untreated pollen, to stay-put and allow the blade to section them! A dreamy result for sure. :D
The different sizes and the perfection of their geometry (the moulds) makes them very good and virtually a 'slot into the microtome and start sectioning' solution - I love using them, I'm a total convert - they're a far cry from the 2-part split moulds made from overflow-pipe stops that I use for my hand microtome! :D

Here are a few pictures of a rather tragic wax-block's sections - this block was discarded because it is over-processed and very dry and brittle....

Stretching sections on water's surface at about 40 deg C;
Sections in the bath..
ws_stretching_sections.jpg (138.18 KiB) Viewed 6512 times
A 5µ section showing quite fine detail;
ws_5micron_in_OH.jpg
ws_5micron_in_OH.jpg (258.42 KiB) Viewed 6512 times
Not bad considering;
Sitting on a slide covered in OH
ws_fast_green_2.jpg (275.65 KiB) Viewed 6512 times
ws_fast_green.jpg
ws_fast_green.jpg (266.37 KiB) Viewed 6512 times
Here's a pretty good 15µ section in OH;
ws_15_micron_section_in_OH.jpg
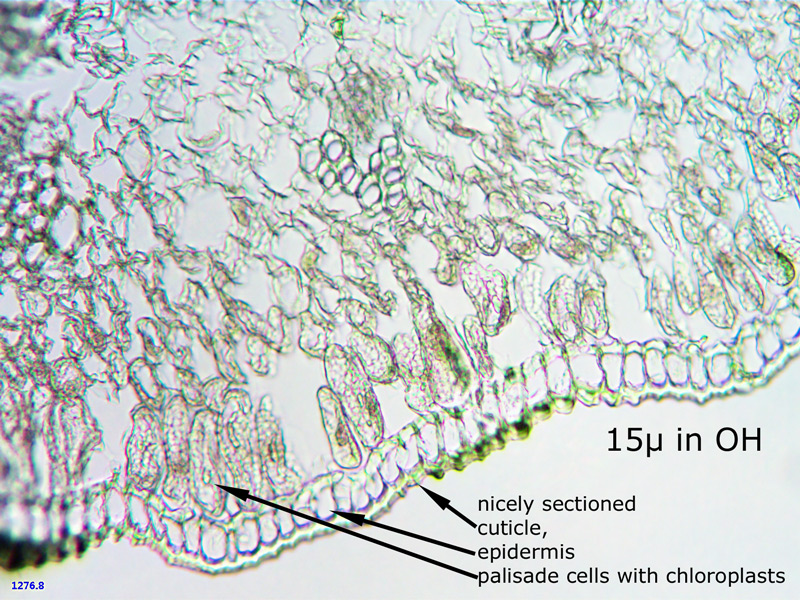
ws_15_micron_section_in_OH.jpg (301.42 KiB) Viewed 6512 times
Good for practicing and testing though - I used Fast Green (cellosolve preparation) simply because it saved me the need to move the sections from OH to water for aqueous staining then back to alcohol to dehydrate and ultimately back to Histoclear in preparation for mounting into a resin mountant. Instead I was able to take a 'shortcut to a slide' by going straight from alcohol (which follows dewaxing as a dehydration) to the cellosolve-formulation of Fast green, which stains well in about 10 seconds if the specimen in covered with alcohol first. After rinsing the excess stain with alcohol for about 15 seconds the slide was ready for mounting in an alcohol-miscible mountant (not resin - resin is miscible with Histoclear, the wax solvent) and cover-slipping!
The fast green is a good stain for cell contents as well as other structures, it has made the condition of the cytoplasm (not the nuclei) visible as an aid to assessment of the section, which is pretty good for a tatty old block. Some stomata have been sectioned nicely without damage, as have the vascular bundles - a major improvement this far! :D

I'll soon have some new material through processing, I'm going to try to achieve a more targeted result now that I have such good equipment to help me - it's time perhaps to move forward from tissue selected because it makes a good practice subject - my next round of tissue processing will be more difficult and hopefully precise (but I'll still include some good practice pieces as a fall-back!)

Back soon with an update - loads to do, loads to enjoy! :D :D

Thanks again for your kindness. :)
John B

User avatar
mrsonchus
Posts: 4175
Joined: Tue Feb 03, 2015 9:42 pm
Location: Cumbria, UK

Re: A Slice of Ambition

#11 Post by mrsonchus » Tue Aug 18, 2015 11:51 pm

Hi all, I've had a busy day - my 'new batch' of tissue is just coming out of infiltration (tissues thoroughly saturated with wax) and I've been able to cast several quick blocks including new 'Sowthistle' (Sonchus asper) stem and root sections.. :)
I studied Sow-thistles and their comparative morphology (sounds impressive - but really I was learning to tell a S.asper from a S.eleraceus etc.. :oops: ) last year and a little this year (although this year I've spent most of my free time learning how to carry out the full histological process & to get my equipment & workflow sorted out) and now have the facilities to be able to make permanent sections of them for microscopic study! :D

The sectioning (with the beautiful and sublime Shandon :D ) went extremely well and I've been able to produce perfectly intact sections through a range of 15-->5µ - a very exciting and rewarding result for me :D .

I've stretched the sections (on water bath) and mounted them onto the newly acquired Leica positively-charged slides that have started to enable sections to stick very well indeed in readiness for the torments of dewaxing, staining and mounting....

I didn't have time to take photo's tonight but should be able to post some later - the tissue & cell integrity is a joy to behold! :D The nightmares about shredded, scratched and holed sections are finally over - thanks to the extremely lucky appearance of the mighty Shandon! So - I'll post a few pictures of the sections before I move them into drying with some details of the histological process that has brought them from the garden to the drying-cabinet! I'll keep it short though - I promise.... :)

Look out for the post, I'll put it up in a new thread, this ones getting a bit unwieldy I think..

Next up will be some differential-staining tests, with the goal of staining vascular and epidermal-tissues with say Safranin, whilst staining cellular contents (cytoplasm only I suspect - may need a third stain for nuclei) with perhaps Fast green, not sure about cell-walls yet, but this is really only the beginning of my staining studies in earnest, it hasn't really been feasible until the consistent production of intact sections had been reached - thanks to, you guessed it, the mighty Shandon! :D :D

Interesting times ahead, pretty soon I'll be able to start targeting the tissues I would like to look at in detail and perhaps begin to exit what up to now has been a rather protracted phase of 'learning the basics' - histology doesn't foster short-cuts In my experience! Having a really great time :D - back soon with 'the next phase'...
John B

User avatar
vasselle
Posts: 2763
Joined: Sat Oct 25, 2014 5:32 pm
Location: France

Re: A Slice of Ambition

#12 Post by vasselle » Sat Aug 22, 2015 4:53 pm

Bonjour.
Sujet génial et bien expliqué.
Merci pour le partage.
Cordialement seb
Microscope Leitz Laborlux k
Boitier EOS 1200D + EOS 1100D

billbillt
Posts: 2895
Joined: Mon Nov 10, 2014 10:01 pm

Re: A Slice of Ambition

#13 Post by billbillt » Sat Aug 22, 2015 5:38 pm

looking forward to the next phase!...

BillT

Post Reply