Page 2 of 3
Re: Darkfield stop sizing
Posted: Thu Feb 18, 2021 3:31 am
by hans
crb5 wrote: ↑Wed Feb 17, 2021 8:22 pm
To get back to the first point, it seems the calculations of stop diameters to match different NA objectives might need an adjustment for the field-of-view. For 40x 0.65NA objective the field-of-view is small relative to the calculated stop diameter, but it becomes significant for lower power, lower NA objectives.
Anything specific in mind as far as how exactly field-of-view would factor in? I was thinking it should not matter too much, for the same reason the condenser iris does not affect illuminated field diameter normally. (Assuming the DF stop is placed close to the condenser iris.)
Yeah the large jumps are also confusing. I was suspecting they might be related to changes in the configuration of the illumination system (like swing-in lens below the condenser or flip-down top lens) and mainly trying to understand the 10-40X numbers since those are normally all illuminated with the same basic configuration.
Re: Darkfield stop sizing
Posted: Mon Mar 01, 2021 3:56 pm
by LouiseScot
LouiseScot wrote: ↑Wed Feb 17, 2021 3:55 pm
On closer inspection of my Swift 380T - well, taking off the condenser! I found that the factory-fitted brightfield one appears to be just an 'industry standard' 37mm condenser. It has this helical up-down fitting but the condenser itself is just held in place by an M2 screw. The latter goes through the knurled plastic ring and holds the condenser in place when tightened. I've ordered an M3 10mm thumb screw to replace it. I'll just have to re-tap the hole. I should then be able to swap over with a darkfield condenser when needed. Hopefully that will work ok - fingers crossed! I've ordered an AmScope dry darkfield condenser from 'AmScope UK' which I don't think is actually in the UK - they price in Euros and ship from the Netherlands. It should be about £95 - or whatever Euros 108.99 works out at. Of course, there are still holdups between the EU and UK so I'll have to be patient! I'm quite excited - I've wanted to do some darkfield for a long time. I won't know until I try as to whether the 1W LED will be bright enough. If not, I might have to attempt an upgrade...

Louise
I finally had the AMScope df condenser delivered today! Really slow from the Netherlands via Germany (via UPS)

Anyway, getting it was the good news... It does fit the Swift holder, but... It won't go quite high enough :'( Boo hoo!
So I'm having to make an alternative holder after all. It's simple enough and is printing out right now. If all goes well (my 3d prints always tend to be slightly too big or too small - tut!), I will do another post once I've had a chance to try it out

Louise
Re: Darkfield stop sizing
Posted: Mon Mar 01, 2021 4:44 pm
by Horseflesh
Looking forward to more updates Louise!
Re: Darkfield stop sizing
Posted: Mon Mar 01, 2021 5:19 pm
by LouiseScot
Horseflesh wrote: ↑Mon Mar 01, 2021 4:44 pm
Looking forward to more updates Louise!
Well it all fits together nicely
Updates to follow
Louise
Re: Darkfield stop sizing
Posted: Mon Mar 01, 2021 9:13 pm
by LouiseScot
Unfortunately I had a technical hitch... The central hole in the adapter, where the condenser pushes through, was offset slightly from the corresponding hole in the microscope stage. That meant the darkfield condenser still wouldn't push through far enough. I decided the best way round that would be to shift the three screw holes on the adapter and reprint. Then, would you believe, my printer stopped printing! Arrgghh! However, it's up and running again (I changed the nozzle). V2 of the condenser holder is currently printing out. I'm not 100% sure if the new screw holes are in
exactly the right place now, but I'll find out a bit later
Louise
Re: Darkfield stop sizing
Posted: Mon Mar 01, 2021 9:18 pm
by Horseflesh
The anticipation is killing me, haha!
Re: Darkfield stop sizing
Posted: Mon Mar 01, 2021 9:22 pm
by LouiseScot
Horseflesh wrote: ↑Mon Mar 01, 2021 9:18 pm
The anticipation is killing me, haha!
Me too! My 3D printing is always a bit hit and miss. Mostly miss, ha ha
Re: Darkfield stop sizing
Posted: Mon Mar 01, 2021 9:36 pm
by SilverWolf
Horseflesh wrote: ↑Mon Mar 01, 2021 9:18 pm
The anticipation is killing me, haha!
lol, your not alone.

LouiseScot wrote: ↑Mon Mar 01, 2021 9:22 pm
Me too! My 3D printing is always a bit hit and miss. Mostly miss, ha ha
Good on you Louise for giving it a go, I'm certain a lot of us Swift owners will be interested in the outcome. My son has started doing a lot of 3D printing (new toy for him) and making parts for me to fix old machines and tools, seems he gets a lot of failed tries but has been getting better. Though we also had some issues with warping with ABS so he's printing up the parts to build an enclosure for it using a $5 IKEA table.
Anyways, I'm excited also

Re: Darkfield stop sizing
Posted: Mon Mar 01, 2021 9:46 pm
by LouiseScot
Relax guys! Either it will work, or it won't. I can certainly attach the df condenser. It does stop all the central light. If the only problem was that I couldn't get the condenser lens close enough with v1, that should be sorted once I get v2 to fit. Not sure if I'll get to properly try it out tonight. It's coming up to 88% printed so should be done in about 10 mins.
Louise
Re: Darkfield stop sizing
Posted: Mon Mar 01, 2021 9:53 pm
by LouiseScot
SilverWolf wrote: ↑Mon Mar 01, 2021 9:36 pm
Horseflesh wrote: ↑Mon Mar 01, 2021 9:18 pm
The anticipation is killing me, haha!
lol, your not alone.
LouiseScot wrote: ↑Mon Mar 01, 2021 9:22 pm
Me too! My 3D printing is always a bit hit and miss. Mostly miss, ha ha
Good on you Louise for giving it a go, I'm certain a lot of us Swift owners will be interested in the outcome. My son has started doing a lot of 3D printing (new toy for him) and making parts for me to fix old machines and tools, seems he gets a lot of failed tries but has been getting better. Though we also had some issues with warping with ABS so he's printing up the parts to build an enclosure for it using a $5 IKEA table.
Anyways, I'm excited also
3D printing is an art and a science - or maybe an 'engineering' :p My Ender 3 Pro cost me less than the Swift 380T and it's had a lot of use. Long learning curve and needs fiddling with too. I bought mine in Autumn 2019 because I wanted to use it to build an astronomy spectrometer. It's great for making lots of things but M42 x 0.75mm astro threads are a pain to get right with my cheap printer. Still, every home should have one!
Louise
ps over 96% now - nearly there!
Re: Darkfield stop sizing
Posted: Mon Mar 01, 2021 10:51 pm
by LouiseScot
Well, fits properly now. I'm not sure if the LED is bright enough but it might be ok for some things. I'm a bit puzzled by the power supply inside the unit. It says it supplies 1W, but 2-5V @ 1000mA which is a lot more than an actual 1W LED would use. Anyway, I have a plan to upgrade it, if necessary.
Anyway, the DF needs some adjusting, I think, and I'm a bit tired to do any more tonight. I had a quick look at some salt on a slide and that seemed quite bright against a dark background at 20x and 40x, so that looks promising. I'll try and take some more meaningful images tomorrow. I have a feeling I actually really need a separate DF scope
and a BF one...
Anyway here are some pics of the DF condenser and adapter (mostly v1 though v2 is very similar
)
The AMScope dry DF condenser and the v1 holder:

- DF+holder.jpg (28.66 KiB) Viewed 7740 times
v1 from underneath:

- v1_underneath.jpg (36.92 KiB) Viewed 7740 times
v1holder with DF condenser:
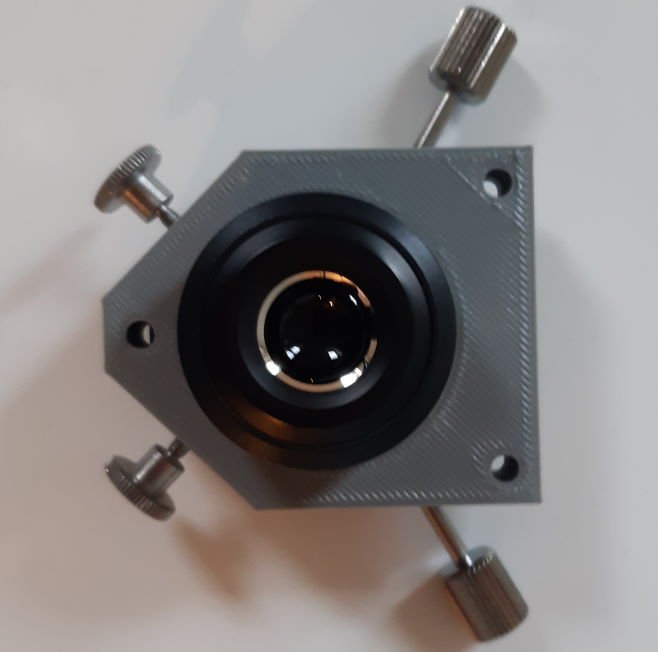
- v1DFinHolder.jpg (28.87 KiB) Viewed 7740 times
v2 - view from front on scope:

- v2OnScopeFront.jpg (49 KiB) Viewed 7740 times
As you can see, the holder is very simple. The condenser is quite a tight fit and almost doesn't need the thumb screws though they should be there for security. I will try the holder with the original condenser tomorrow.
Louise
Re: Darkfield stop sizing
Posted: Mon Mar 01, 2021 10:54 pm
by LouiseScot
Not sure why the other photos don't show... Maybe I've posted too many pics
Never mind, the underneath pic shows everything
Louise
Oh, they suddenly appeared

Re: Darkfield stop sizing
Posted: Mon Mar 01, 2021 11:21 pm
by Hobbyst46
Neat engineering, bravo!
Re: Darkfield stop sizing
Posted: Mon Mar 01, 2021 11:30 pm
by LouiseScot
Hobbyst46 wrote: ↑Mon Mar 01, 2021 11:21 pm
Neat engineering, bravo!
Thanks
, though I've yet to prove it properly and give it a workout. It's just a simple holder. Still, I'm optimistic - it was always going to work in my head!
Louise
Re: Darkfield stop sizing
Posted: Mon Mar 01, 2021 11:34 pm
by Horseflesh
Very nice work. Get some rest, you have an early day for us tomorrow.
Thanks for sharing!
Re: Darkfield stop sizing
Posted: Mon Mar 01, 2021 11:39 pm
by LouiseScot
Horseflesh wrote: ↑Mon Mar 01, 2021 11:34 pm
Very nice work. Get some rest, you have an early day for us tomorrow.
Thanks for sharing!
Ha ha, you're welcome. It's just a small piece of plastic (pla) with some holes in it
Re: Darkfield stop sizing
Posted: Tue Mar 02, 2021 12:53 pm
by LouiseScot
I think I can declare success! It all seems to be working as expected. There are a few little things... You have to remove the 'beehive' illuminator housing to change condensers. It's not a biggie, it just unscrews. You have to adjust the positioning of the holder. In fact, I had to do that with the original when I first got it. With the new 3d printed one, I found it's best to get the hole centered by adjusting it with the BF condenser poking through. That way you can be sure it will go in and out smoothly. Then tightening the screws with the BF still there. Now that the BF is capable of poking much further through the hole I've marked what I think would be the highest position with a some white insulating tape. Although I've made the holder with 2 thumbscrews (symmetrical
) it probably only needs one. The condensers aren't heavy. Just to mention, when working on the microscope unplug it, remove eyepieces and any slide you might have on the stage
Here is top view of v2:

- v2_holder.jpg (18.32 KiB) Viewed 7701 times
As you can see I elongated the narrow end to accommodate the screw hole shift though I could have moved the 37mm hole.
With the BF in situ:

- BF_front_insitu.jpg (33.65 KiB) Viewed 7701 times
Here is the salt!
10x

- DF_10x_Salt_0001.jpg (39.54 KiB) Viewed 7701 times
20x

- DF_20x_Salt_0002.jpg (32.96 KiB) Viewed 7701 times
40x

- DF_40x_Salt_0003.jpg (35.58 KiB) Viewed 7701 times
Sorry, salt is very boring, but hey, proof of concept
I actually have to figure out how you properly use a DF setup. I mean, everything is dark until something catches the light! There must be a way of finding subjects without having to keep swapping out condensers? I'll have to think about that one - unless someone can enlighten me? :p
If anyone is interested and also wants to have a go, the holder is attached with 3 x m3 x 16mm allen key bolts. The thumb screws are m3 x 10mm. The two distal holes in the holder are 40mm apart. The front hole is 50mm from the horizontal line that joins the 2 distal holes. I made the holes 5mm in diameter. Or if anyone wants the .stl or Fusion 360 design file, let me know.
Louise
Re: Darkfield stop sizing
Posted: Tue Mar 02, 2021 2:43 pm
by LouiseScot
Some algae/diatoms from the jar. All at 40x:

- IMG_0009_50pc.jpg (30.76 KiB) Viewed 7697 times

- IMG_0008_50pc.jpg (28.72 KiB) Viewed 7697 times
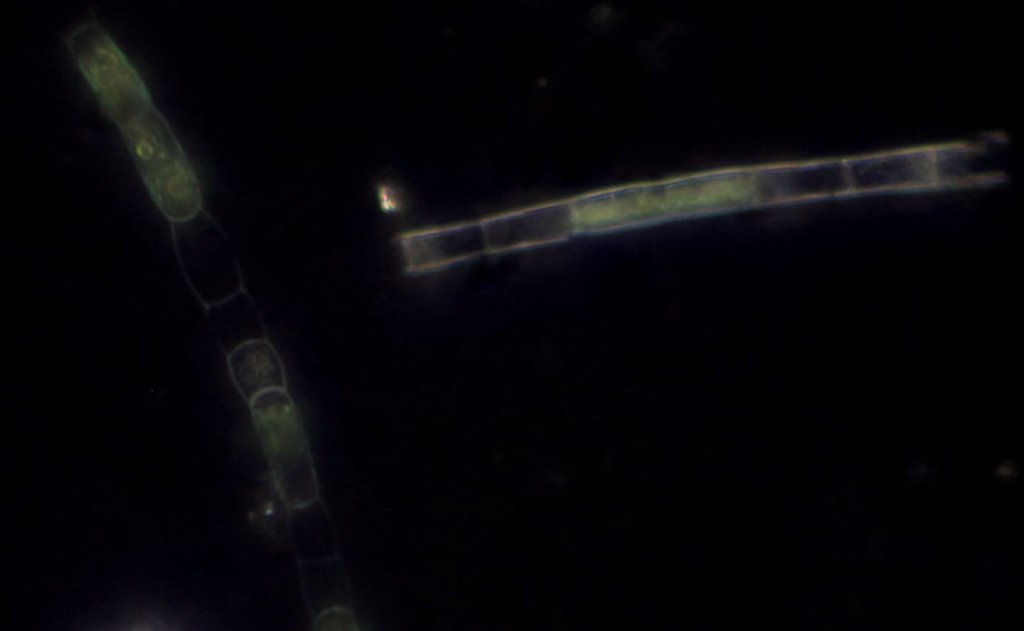
- IMG_0007_50pc.jpg (30.4 KiB) Viewed 7697 times
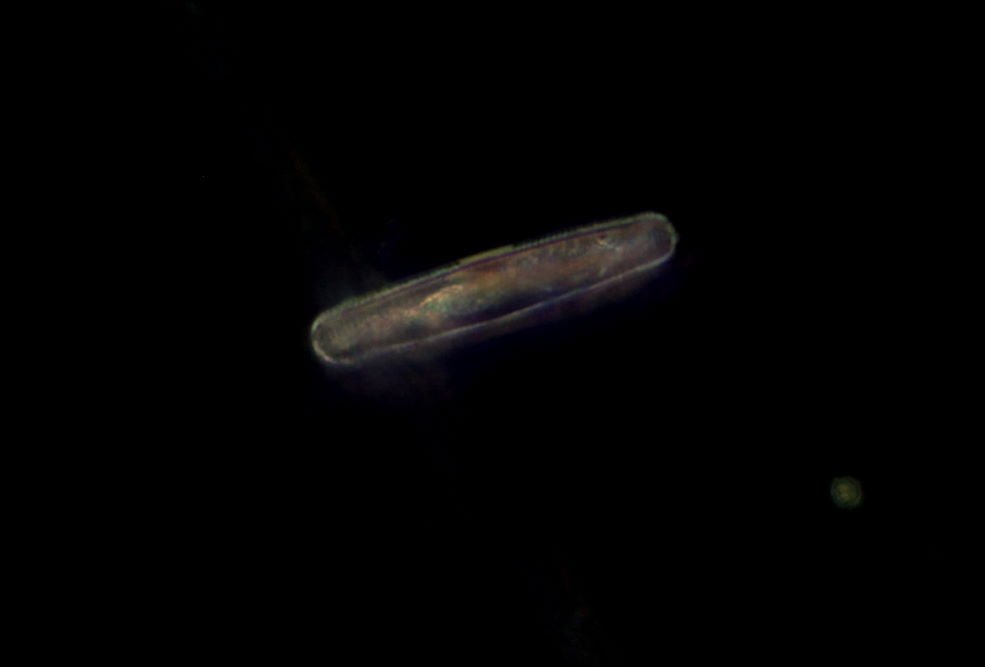
- IMG_0006_50pc.jpg (19 KiB) Viewed 7697 times

- IMG_0005_50pc.jpg (20.14 KiB) Viewed 7697 times
I couldn't see any protists, apart from some small ones darting around
. Not sure if that's because there weren't any, or just because of the illumination. The diatoms came out quite well, I thought. I'll have to try some other samples from the jars
Focusing was harder than bright field or oblique. Camera exposures needed to be longer though maybe I should have upped the ISO a bit. I'm not sure what effect a brighter LED would have since on the current max there was a noticeable haze effect. However, I haven't yet tried out the field diaphragm but, again, not sure if that would help.
For some things a laser pen looks like it could be used to locate objects of interest in the 'dark'. A near horizontal bright green pen certainly made the salt glow! Early days. I probably should read up on DF technique now that I basically have it working.
Louise
Re: Darkfield stop sizing
Posted: Tue Mar 02, 2021 4:39 pm
by PeteM
To jump into the fray here . . .
The rules of thumb seem to be that once you get to 40x, a proper darkfield condenser is really best to get sufficient and sufficiently even light. And once you try to go beyond 40x it helps to oil a darkfield condenser to the slide and have an objective (60x, 100x) with a stop or iris so you can reduce its numerical aperture to below that of the condenser. Many pro scope ranges will offer two different darkfield condensers. One meant for medium-high numerical apertures and one meant for high numerical apertures that is intended to be immersion-oiled to the slide and from the cover slip to the objective.
I suspect the main thing owners of the Swift 380 series might want in a step up is a field iris and the ability to do Kohler illumination? Worth noting if others really want to do fiddly illumination methods and are either contemplating a new import scope or wondering what a next step up might be should they already own one?
As for retrofitting a darkfield condenser to the Swift scopes, I've had good luck buying used darkfield condensers of random and sometimes older makes (Lomo, older Olympus, AO, etc.) and re-purposing them for other scopes. This requires either an ability to machine up or 3D print an adapter to match the condenser to its intended mount and get it high/low enough to come very near the top surface of the stage. I've also mounted just the darkfield condenser top to a cheap Abbe condenser bottom of the target scope. For example, I acquired darkfield screw-in tops for an Olympus BX infinity microscope but not the condenser frame to hold it. Chop off the top of a cheap Olympus BH condenser (same dovetail attachment) and mount the darkfield bits on top - and both work perfectly.
It might be useful if more of the Swift 380 owners attempted this sort of modification and let others know if it works, even without Kohler illumination available? Louise - your experiments look promising.
Might also add that I've set an iris directly over the field lens of some older/cheaper microscopes to get a bit more control of light. Cheap ones are available.
Re: Darkfield stop sizing
Posted: Tue Mar 02, 2021 5:38 pm
by Hobbyst46
Good progress, Louise.
Stronger illumination might prove good. Yet, first, I would try and oil the DF condenser to the slide, even for the 40X. Then, upon lifting the condenser, contact of the oil drop with the slide glows and DF is almost there.
For centration I do the same - center a BF condenser, then replace by the DF one.
When using a laser pointer near the scope, I take care to avoid unplanned reflections of the beam, for safety.
Re: Darkfield stop sizing
Posted: Tue Mar 02, 2021 5:57 pm
by LouiseScot
Hobbyst46 wrote: ↑Tue Mar 02, 2021 5:38 pm
Good progress, Louise.
Stronger illumination might prove good. Yet, first, I would try and oil the DF condenser to the slide, even for the 40X. Then, upon lifting the condenser, contact of the oil drop with the slide glows and DF is almost there.
For centration I do the same - center a BF condenser, then replace by the DF one.
When using a laser pointer near the scope, I take care to avoid unplanned reflections of the beam, for safety.
Thanks
Yeah, as I said, at max brightness the subjects seem to start developing halos so maybe that could get worse with even brighter illumination? To the naked eye, the kit LED is extremely bright already. I might experiment - I bought some 3W star LEDs to try tho I'm not sure of the actual LED wattage of the one fitted. The Swift is sold as a 1W LED but it seems possibly brighter than that. Also Not sure about putting oil on a non-oil condenser but, again, it might be worth a try. Would make the procedure more messy tho - I like to just 'grab it, do it'! It shouldn't need any gross re-centring now. There are fine adjustment knobs on the DF condenser itself, if needed.
Louise
Re: Darkfield stop sizing
Posted: Tue Mar 02, 2021 6:04 pm
by LouiseScot
PeteM wrote: ↑Tue Mar 02, 2021 4:39 pm
To jump into the fray here . . .
It might be useful if more of the Swift 380 owners attempted this sort of modification and let others know if it works, even without Kohler illumination available? Louise - your experiments look promising.
Might also add that I've set an iris directly over the field lens of some older/cheaper microscopes to get a bit more control of light. Cheap ones are available.
I do have a field iris diaphragm but not used it here since I couldn't see any reason - the swift illuminator already has a 'frosted' lens so light is quite even from it. The DF condenser itself doesn't have an iris. Plus the DF illumination itself doesn't exactly come straight from the light source anyway. Maybe I'm missing something?
Louise
Re: Darkfield stop sizing
Posted: Tue Mar 02, 2021 7:23 pm
by PeteM
With some microscopes lacking a field diaphragm to keep the costs low, it's possible to put an iris right over the field aperture and get a sort of Kohler effect. How good depends on the scope's illumination system. This can have two advantages. First, if it can provide Kohler illumination in some scopes - letting you set your condenser to the right height and field aperture. Second, it can reduce stray illumination coming into a condenser.
Re: Darkfield stop sizing
Posted: Tue Mar 02, 2021 7:35 pm
by Hobbyst46
LouiseScot wrote: ↑Tue Mar 02, 2021 5:57 pm
Hobbyst46 wrote: ↑Tue Mar 02, 2021 5:38 pm
Good progress, Louise.
Stronger illumination might prove good. Yet, first, I would try and oil the DF condenser to the slide, even for the 40X. Then, upon lifting the condenser, contact of the oil drop with the slide glows and DF is almost there.
For centration I do the same - center a BF condenser, then replace by the DF one.
When using a laser pointer near the scope, I take care to avoid unplanned reflections of the beam, for safety.
Also Not sure about putting oil on a non-oil condenser but, again, it might be worth a try. Would make the procedure more messy tho - I like to just 'grab it, do it'!
Louise
Sorry, my apologies, I did not realize that it is a DRY condenser ! thought it is an OIL DF condenser. So now I am not sure - if oil penetrates into that condenser, what happens. I take my words back.
Re: Darkfield stop sizing
Posted: Tue Mar 02, 2021 7:49 pm
by LouiseScot
PeteM wrote: ↑Tue Mar 02, 2021 7:23 pm
With some microscopes lacking a field diaphragm to keep the costs low, it's possible to put an iris right over the field aperture and get a sort of Kohler effect. How good depends on the scope's illumination system. This can have two advantages. First, if it can provide Kohler illumination in some scopes - letting you set your condenser to the right height and field aperture. Second, it can reduce stray illumination coming into a condenser.
Yeah, as I said I have a field diaphragm but can't see any advantage in using it with the DF condenser.
Louise
Re: Darkfield stop sizing
Posted: Tue Mar 02, 2021 9:59 pm
by LouiseScot
Hobbyst46 wrote: ↑Tue Mar 02, 2021 7:35 pm
LouiseScot wrote: ↑Tue Mar 02, 2021 5:57 pm
Hobbyst46 wrote: ↑Tue Mar 02, 2021 5:38 pm
Good progress, Louise.
Stronger illumination might prove good. Yet, first, I would try and oil the DF condenser to the slide, even for the 40X. Then, upon lifting the condenser, contact of the oil drop with the slide glows and DF is almost there.
For centration I do the same - center a BF condenser, then replace by the DF one.
When using a laser pointer near the scope, I take care to avoid unplanned reflections of the beam, for safety.
Also Not sure about putting oil on a non-oil condenser but, again, it might be worth a try. Would make the procedure more messy tho - I like to just 'grab it, do it'!
Louise
Sorry, my apologies, I did not realize that it is a DRY condenser ! thought it is an OIL DF condenser. So now I am not sure - if oil penetrates into that condenser, what happens. I take my words back.
No worries! It might be ok to put a drop of oil on but I suppose it's not really designed for it. Might it be helpful anyway? I've no idea!
Louise
Re: Darkfield stop sizing
Posted: Tue Mar 02, 2021 11:59 pm
by LouiseScot
Just did a quick comparison between the 380T 1W LED and an external 5W mains LED lamp (4000K, GU10). The latter is brighter and seemed to give a better result - directed via a small mirror. It's a diatom strew at 40x. I had to do some contrast enhancement with the 380T LED as there was a hazy, not-so-black background. The 5W image is as is. Both images reduced to 20% of original size.
1W:

- IMG_0012_Strew_1W20pc.jpg (80.28 KiB) Viewed 7622 times
5W:

- IMG_0010Strew5W_20pc.jpg (83.05 KiB) Viewed 7622 times
I think a 10W LED would be good though I don't have one. Might get a couple off Ebay to try.
Louise
Re: Darkfield stop sizing
Posted: Wed Mar 03, 2021 10:30 am
by Hobbyst46
Great, Louise ! looks like a 3-5W LED will suffice. With the appropriate heat sinks of course.
Re: Darkfield stop sizing
Posted: Wed Mar 03, 2021 10:53 am
by LouiseScot
Hobbyst46 wrote: ↑Wed Mar 03, 2021 10:30 am
Great, Louise ! looks like a 3-5W LED will suffice. With the appropriate heat sinks of course.
I ordered a Cree XM-L2 (up to 10W?) and I have a psu and heatsink ready for it. I already have some 3W LEDs to try first. I'll have a go with one of them later
Louise
Re: Darkfield stop sizing
Posted: Wed Mar 03, 2021 1:25 pm
by LouiseScot
Here is illumination by a overrun 3W LED with 4.7R current limiting resistor
First one - running at 6.3V

- IMG_0013_3W_6-33V_4.7R_20pc.jpg (71.05 KiB) Viewed 7575 times
Second - running at 10V

- IMG_0014_3W_10V_4_7R20pc.jpg (79.56 KiB) Viewed 7575 times
Not much difference, really. But there is something making a reflection which is worse at higher intensity. I'm not sure what's causing it. Overrunning the 3W LED gives a brighter light but also generates a fair bit of heat and probably shortens the LED's life.
Louise