Newbie learns to take images, dtsh edition
-
DonSchaeffer
- Posts: 3460
- Joined: Sun Mar 22, 2020 10:06 am
- Location: Winnipeg, Manitoba, Canada
Re: Newbie learns to take images, dtsh edition
I'm impressed with your patient precision. Beautiful images. Not slap-dash like mine.
Re: Newbie learns to take images, dtsh edition
Thanks for the kind words Don. I'm not sure "precision" applies to what I've done, but I'm trying and I think improving little by little.DonSchaeffer wrote: ↑Wed Sep 29, 2021 7:48 amI'm impressed with your patient precision. Beautiful images. Not slap-dash like mine.
Re: Newbie learns to take images, dtsh edition
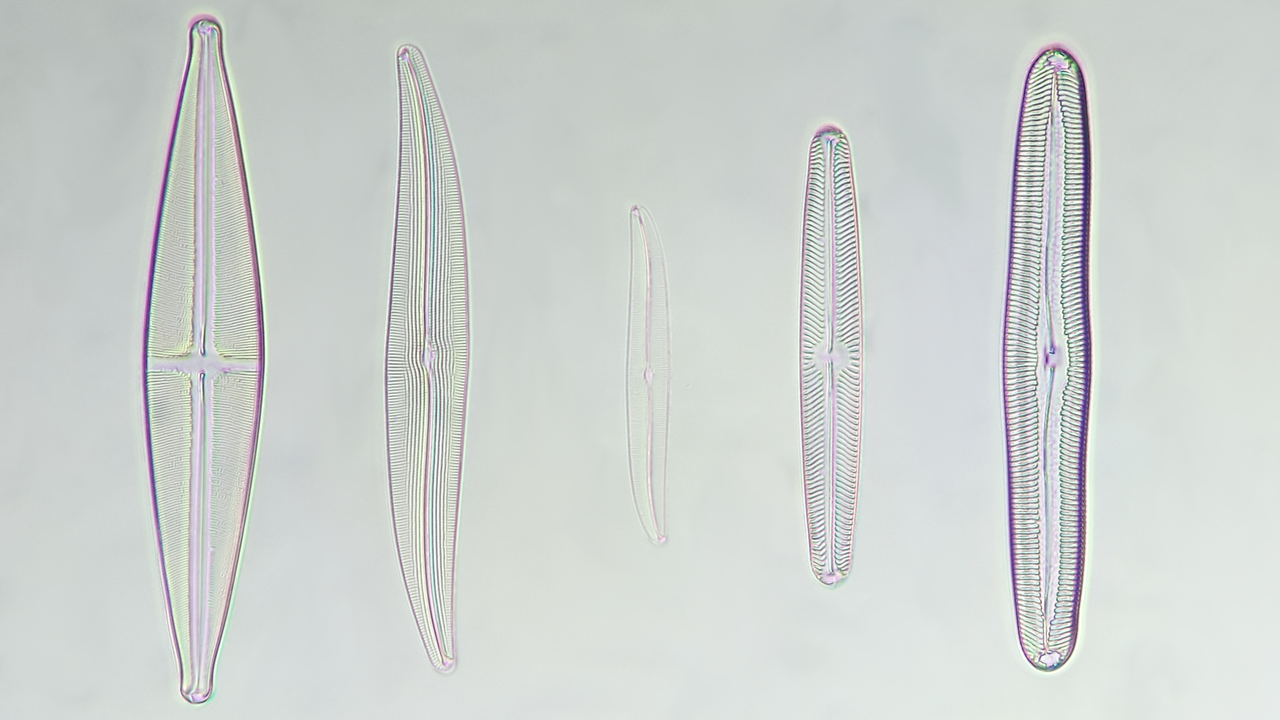
I tried again with the same setup as before. I forgot to mention is, but the AO Cat 1116 45x is an achromat, but it's not plan. This time I imaged it with a green filter, stacked, and converted to greyscale.
I have a 40x Cat 1309 plan achromat, but I haven't managed to go pick it up yet.

I have a 40x Cat 1309 plan achromat, but I haven't managed to go pick it up yet.
Re: Newbie learns to take images, dtsh edition
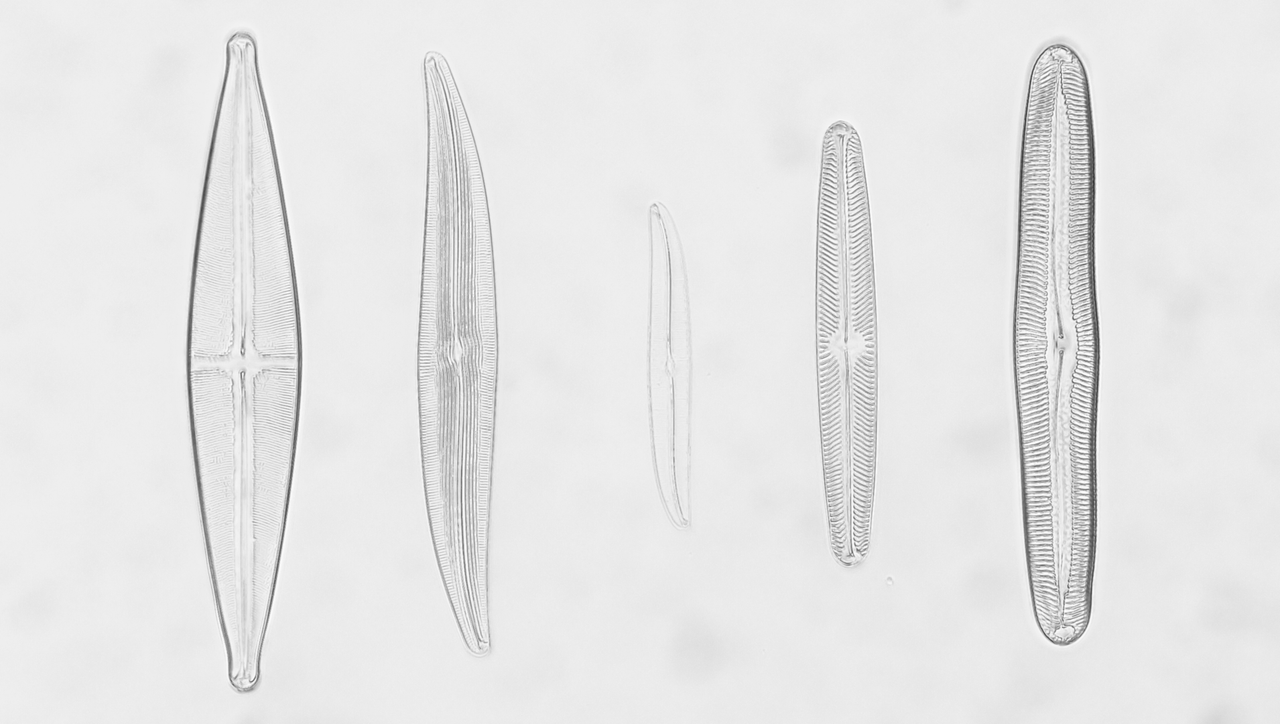
Another attempt of the diatom test slide, this one was taken with the condenser stopped down a bit and with a Cat 1023 40x plan achromat objective instead of the 45x achromat.

Re: Newbie learns to take images, dtsh edition
.
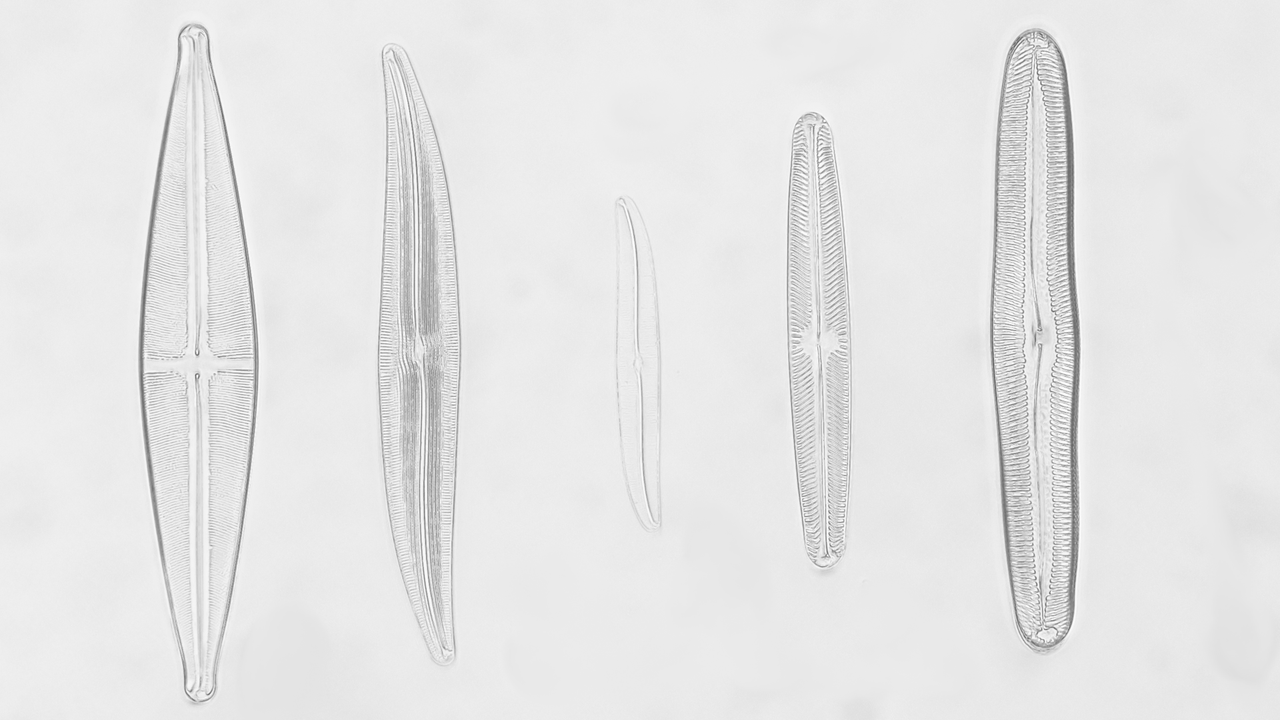
Nice work - you might want to try a green filter with the camera set to mono - see how that turns out.
Nice work - you might want to try a green filter with the camera set to mono - see how that turns out.
Zeiss Standard WL (somewhat fashion challenged) & Wild M8
Olympus E-P2 (Micro Four Thirds Camera)
Olympus E-P2 (Micro Four Thirds Camera)
Re: Newbie learns to take images, dtsh edition
Thanks. I had done that with an earlier image and intended to repeat as I know it'll help with the chromatic aberation I just didn't this time; perhaps the next attempt.
Re: Newbie learns to take images, dtsh edition
Thanks 75RR, you motivated me to try again with the green filter; all other things being equal. Even the stage was still in the same position. It does look cleaner.


Re: Newbie learns to take images, dtsh edition
dtsh-interesting post-never seen images from AO scopes-the achromats have a nice subtle contrast and colour to them-and a sort of “soft sharp” which is nice on the eyes-the image of the “orifice” is interesting-the subtle contrast sort of makes you look harder at all the detail-do you have any photos of AO phase objectives-I wonder if anyone has done a marathon comparison of all the 26 types of phase they apparently made..
Regards ross
Regards ross
Re: Newbie learns to take images, dtsh edition
Thanks, I do have some images from the two 34mm phase objectives I have, a 10x Cat.1224 dark phase and a 45x Cat.1238 dark phase, both on my AO One-Fifty Phase. Since I only have the two from the 34mm line, I am unable to do an apples to apples comparison. The only other phase I have is on my 410, where I have 10x Cat.1742, 20x without a Cat.#, 40x Cat.1744, and 100x Cat.1745 (all dark phase).Rossf wrote: ↑Thu Oct 21, 2021 7:27 pmdtsh-interesting post-never seen images from AO scopes-the achromats have a nice subtle contrast and colour to them-and a sort of “soft sharp” which is nice on the eyes-the image of the “orifice” is interesting-the subtle contrast sort of makes you look harder at all the detail-do you have any photos of AO phase objectives-I wonder if anyone has done a marathon comparison of all the 26 types of phase they apparently made..
Regards ross
I made a thread for the One-Fifty Phase (which was supposed to travel with me and be left at the destination, but my trip was cancelled). There are some images in that thread viewtopic.php?f=24&t=12867
I'm somewhat embarassed to say that the quite nice 410 gets used rarely these days. The phase is really nice for viewing living microorganisms as it reveals ones that I can't even see in brightfield, but I have been examining insects much more frequently so it is rarely even turned on.
Perhaps I should compare the 40x Plan Fluor (no cat #) and 40x Neoplan 1757 for the 410 with the diatom test slide. I'm not entirely sure why, but my attempts to use the camera on the 410 with phase have been quite underwhelming. Visually, it looks OK, but the images are terrible (I blame my DIY trinocular for a good part of that).
Re: Newbie learns to take images, dtsh edition
And here are two quick attempts with the Leica 410.
The two objectives are both 40x, one is a Plan Fuor with no Cat.# and the other is a Neoplan 1757.
The green filter was used for both and the resulting image converted to greyscale.
First up is the Neoplan 1757. https://postimg.cc/XB5MDM6x
Next is the Plan Fuor, which I think performed noticeably better. https://postimg.cc/Z0WJyg2W
I should probably pickup another 410 stand one of these days to use the brightfield objectives.
Re: Newbie learns to take images, dtsh edition
An attempt using the 100x Cat 1311 on the AO 10.
This is Gyrosigma attenuatum, second from the left of the 5 diatoms on the slide.
I think I could have gotten more contrast with closing the iris on the condenser.
This is Gyrosigma attenuatum, second from the left of the 5 diatoms on the slide.
- Gyrosigma_attenuatum 20211109.jpg (20.35 KiB) Viewed 7205 times
Re: Newbie learns to take images, dtsh edition
.
Copied your image and pasted it into Photoshop - see below
Note that all digital images need Post-processing - does not have to be Photoshop - there are many cheaper and even free alternatives but it does need to be done.
Your image is what is called 'washed out'
Just a little Post-processing helps ... don't sweat the background, it is the subject that counts.
Agree it always seems a shame to lose NA by closing down the iris on the condenser, but it is a must, particularly in Brightfield.
Copied your image and pasted it into Photoshop - see below
Note that all digital images need Post-processing - does not have to be Photoshop - there are many cheaper and even free alternatives but it does need to be done.
Your image is what is called 'washed out'
Just a little Post-processing helps ... don't sweat the background, it is the subject that counts.
- Attachments
-
- #2.jpg (95.08 KiB) Viewed 7187 times
Zeiss Standard WL (somewhat fashion challenged) & Wild M8
Olympus E-P2 (Micro Four Thirds Camera)
Olympus E-P2 (Micro Four Thirds Camera)
Re: Newbie learns to take images, dtsh edition
Thanks for that tip, it is greatly appreciated.I loaded it into gimp and am playing with the light levels and I can see significant improvement. When I have time after work I'll see how much better I can make it.75RR wrote: ↑Wed Nov 10, 2021 7:22 amCopied your image and pasted it into Photoshop - see below
Note that all digital images need Post-processing - does not have to be Photoshop - there are many cheaper and even free alternatives but it does need to be done.
Your image is what is called 'washed out'
Just a little Post-processing helps ... don't sweat the background, it is the subject that counts.
Re: Newbie learns to take images, dtsh edition
A break from the diatoms. As the temperature drops, the only active mosquitoes appear to be the ones that found shelter indoors.
Poorly mounted in PVA-G, is a gravid female.
80 images stacked.
AO10, 20/.50 Cat.1022
Poorly mounted in PVA-G, is a gravid female.
80 images stacked.
AO10, 20/.50 Cat.1022
Re: Newbie learns to take images, dtsh edition
.
Very nice!
Very nice!
Zeiss Standard WL (somewhat fashion challenged) & Wild M8
Olympus E-P2 (Micro Four Thirds Camera)
Olympus E-P2 (Micro Four Thirds Camera)
Re: Newbie learns to take images, dtsh edition
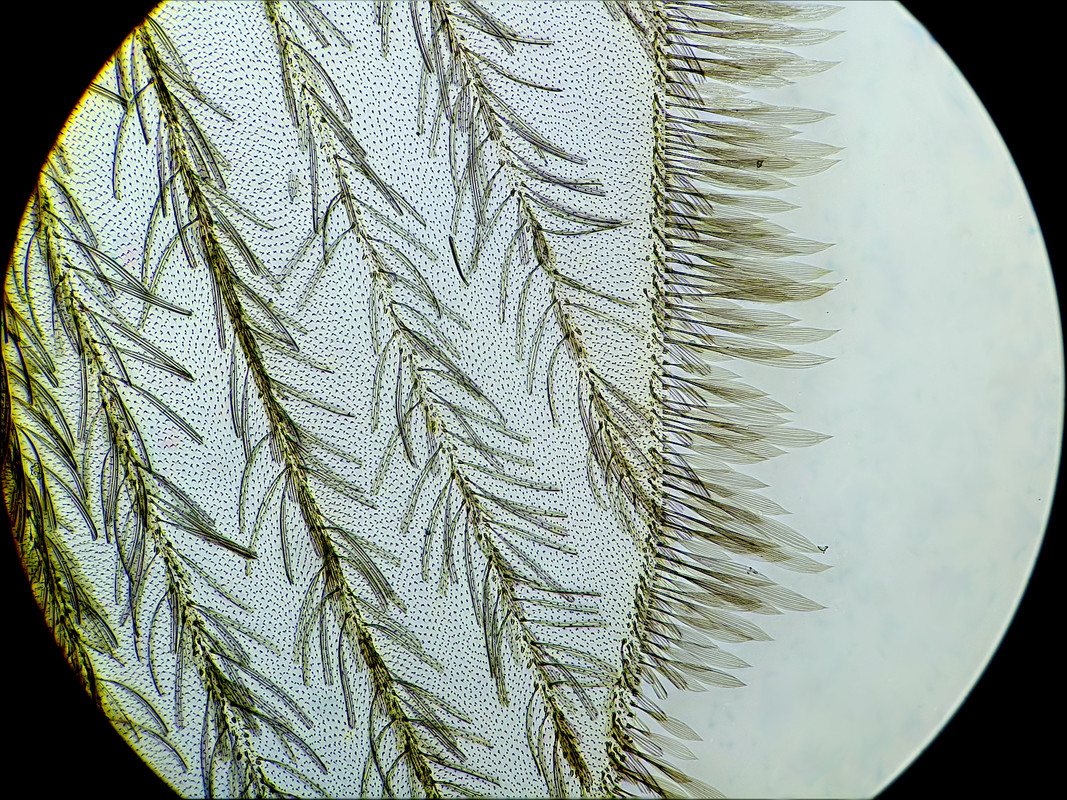
Here's a crop of a Chrysops wing that I felt turned out rather well. AO 100x Cat.1079 on an AO10 with 20 watt halogen Cat.1031 illuminator, stacked.
- 100x_Chrysops_crop.jpg (115.33 KiB) Viewed 6740 times
-
DrPhoxinus
- Posts: 316
- Joined: Mon Jan 28, 2019 5:17 pm
- Location: Rochester Hills, MI
Re: Newbie learns to take images, dtsh edition
That picture is inspiring.
How many pictures in the stack?
How many pictures in the stack?
Re: Newbie learns to take images, dtsh edition
24, taken with my usual camera setup of a raspberry pi HQ camera module with a C-mount lens, afocal.DrPhoxinus wrote: ↑Sat Jan 15, 2022 1:12 amThat picture is inspiring.
How many pictures in the stack?
Thank you for the kind words.
Re: Newbie learns to take images, dtsh edition
Some nice pics 
The:
80 images stacked.
AO10, 20/.50 Cat.1022
...Seems really good
Have you found a new/special way to sharpen the images ????
The:
80 images stacked.
AO10, 20/.50 Cat.1022
...Seems really good
Have you found a new/special way to sharpen the images ????
Re: Newbie learns to take images, dtsh edition
It's not new or special, except to say that I'm now using a sharpen operation all the time as it's built in to my process instead of being something I either didn't do because I was ignorant of it or didn't do because I tended to forget to do it. Image processing is new to me. I have a small python script I use to operate the camera on the raspberry pi for capturing and saving images using the picamera library; in it I make a call to the python3 PIL library (Python Image Library) and make a pass through a sharpness function before saving the image to disk. It slows the process down quite a bit, but at least this way I don't forget to do it. The alignment and stacking is all done with the hugin tools, but that's done on a separate machine as it would take a long time if run on a Raspberry Pi.
If it saves anyone else some hassles, the general process on the other computer is I pass the images from the Pi (saved as PNG) and pass them through mogrify to convert them to TIF (I need to learn how to just save them as TIF, but too many projects)
Code: Select all
mogrify -format tif *.png
Code: Select all
align_image_stack --use-given-order -t 8 -c 128 -a ais_ image*.tif
Code: Select all
enfuse -o result.tif -l 8 --exposure-weight=0 --saturation-weight=0 --entropy-weight=0 --contrast-weight=1 --hard-mask ais_*.tif
I'm not claiming these are good/reasonable flags and values to use, just that this is what I'm using to get these results. I'm certain there's a lot of room for improvement, but projects....
Re: Newbie learns to take images, dtsh edition
Changing things up a bit, same camera setup of RPi HQ camera but the scope here is the American Optical Series 35 with a 160mm non-plan 43x/NA0.66 achromat, 38 images in the stack, 1um spacing.
I'm getting some artifacts still but this is my first real attempt to try these with non-plan objectives.
My usual mosquito wing as a target.
There's some visible difference in contrast between the same subject on the AO10 and the AO35, that could be due to a lot of possible factors, coatings (43x on the 35 doesn't have them), artifacts of the processing due to the objectives being non-plan, or most likely my lack of experience.
I'm getting some artifacts still but this is my first real attempt to try these with non-plan objectives.
My usual mosquito wing as a target.
- AO35_45x_mosquuito_wing.jpg (157.51 KiB) Viewed 6614 times
-
DrPhoxinus
- Posts: 316
- Joined: Mon Jan 28, 2019 5:17 pm
- Location: Rochester Hills, MI
Re: Newbie learns to take images, dtsh edition
So are you shooting through the eyepiece on the Series 35
or one from the Series 10?
or one from the Series 10?
Re: Newbie learns to take images, dtsh edition
This particular eyepiece is an AO 10x Cat.146 which should be the appropriate eyepiece for the 160mm series of objectives.DrPhoxinus wrote: ↑Sat Jan 22, 2022 4:43 pmSo are you shooting through the eyepiece on the Series 35
or one from the Series 10?
I have a few eyepieces, mostly AO; the 146 originally came with my Cycloptic, but it has the B&L UWF eyepieces in it....
My intent is to image with it a bit more and see if I can improve on things, but for a first attempt I'm not too disappointed. I am still playing with various software flags I don't need with the 10's plan objectives and I think I have it tuned just a little better as the artifacts seem slightly reduced in the latest attempts of reprocessing the original images.
I believe I have a coated 20x 160mm AO objective in my box somewhere and I might try to do a side-by-side comparison. Also, I see it's been a while since I tried imaging the wing with the 10's 40x or 45x so may try that too.
I keep saying but not doing, that I want to fish out the servo hat for the RPi and automate the focus as that would speed the process significantly having the RPi being able to time the shots after moving the focus.
Another possible source of poor contrast is the light coming in to the 35; it's not a great setup and there is no field iris at the moment. I had an iris I'd salvaged, but I sent it off a lttle while ago so now I'm going to need to come up with something.
Re: Newbie learns to take images, dtsh edition
Another image from the Series 35 microscope, this one is another Chrysops wing, the objective is a 20x/0.50NA. The eyepiece used was the one that came with the 35, simply labelled with W10X and a single "S". The eyepiece doesn't look like any other AO eyepieces so likely is not. This one is a major deviation from many of my earlier attempts as I've coupled a stepper motor to the 35's fine focus and automated the process of taking images, applying a sharpness function, and the incremental focus control. The Raspberry Pi's capabilities limit it in the speed at which it can process, so each image takes roughly 45 seconds to capture, process, adjust focus, and be ready to capture again. This is a stack of 80 images from the non-plan 20x objective. For a first proof of concept, I'm pretty pleased. There were a few failures and reiterations of my makeshift motor mount. Since this microscope doesn't have the protections against driving an objective into a slide, I have chosen to make the stepper back off the fine focus so that each consecutive image pulls away rather than advance toward the slide. Further processing and stacking happen on a separate computer, I can't imagine how long that would likely take on the RPi.
Eventually this will be implemented on the Series 10, but I am enjoying the opportunity to explore how well it functions with the older, achromats that aren't plan. I suspect the result on the 10 will be much better.
Eventually this will be implemented on the Series 10, but I am enjoying the opportunity to explore how well it functions with the older, achromats that aren't plan. I suspect the result on the 10 will be much better.
- Series35_20x_Chrysops.jpg (137.67 KiB) Viewed 6450 times
-
DrPhoxinus
- Posts: 316
- Joined: Mon Jan 28, 2019 5:17 pm
- Location: Rochester Hills, MI
Re: Newbie learns to take images, dtsh edition
Very Interesting.
Can you post a picture of the stepper motor on the Series 35?
Can you post a picture of the stepper motor on the Series 35?
Re: Newbie learns to take images, dtsh edition
Please don't judge me too harshly by the state of my desk or the fact that there's cardboard jammed in there.DrPhoxinus wrote: ↑Tue Feb 01, 2022 7:50 pmVery Interesting.
Can you post a picture of the stepper motor on the Series 35?
The gear over the fine focus was split in two and there are 2 screws which when tightened are below the surface of the gear to hold it clamped on.
Initially I had tried a 3D printed mount for the stepper, but it gets hot enough that it had to be modified.
It's a tad gross, but it was a fast test to see how well it would work without causing any permanent changes to the scope itself. This is my first project to attempt using stepper motors, so it was an adventure in learning which was not difficult. You can't see how it mounts to the scope, but it just clamps on with a couple of 2mm bolts to hold the parts together with nothing other than friction to hold it there.
- Series35_stepper.jpg (103.7 KiB) Viewed 6441 times
For reference, here's a single image from the lot.
- Series35_single_frame.jpg (97.97 KiB) Viewed 6441 times
Re: Newbie learns to take images, dtsh edition
A CAD view of the 3D printed mount, not pretty, but works.
Were I to do it again, I think I would have put the drive gear over the knob. Where it is there isn't a lot of clearance before the belt starts interfering with the mount and mounted to the shaft, the gear is enough in the way to make using the knob less practical anyhow. It's still possible to manually focus when the script isn't running.
- Series35_mount_diagram.jpg (36.79 KiB) Viewed 6429 times
Were I to do it again, I think I would have put the drive gear over the knob. Where it is there isn't a lot of clearance before the belt starts interfering with the mount and mounted to the shaft, the gear is enough in the way to make using the knob less practical anyhow. It's still possible to manually focus when the script isn't running.
-
BramHuntingNematodes
- Posts: 1547
- Joined: Tue Jan 21, 2020 1:29 am
- Location: Georgia, USA
Re: Newbie learns to take images, dtsh edition
It's pretty cool. This is the kind of application 3-d printing is good for, as opposed to trying to make a scope from scratch with filament.
1942 Bausch and Lomb Series T Dynoptic, Custom Illumination
-
Microscopy_is_fun
- Posts: 130
- Joined: Sun Nov 21, 2021 6:11 pm
Re: Newbie learns to take images, dtsh edition
A very nice and elegant application for using 3D-printing in microscopy!
Re: Newbie learns to take images, dtsh edition
Since the AO Cycloptic comes up in discussion from time to time, I thought it might be useful for people considering one to get an idea of what to expect.
The setup is my usual Raspberry Pi HQ camera, unknow C-mount lens, AO Cat.146 eyepiece in the trinocular port. These are largely unprocessed and not a lot of time was put into focus.
First things first, a standard. Not a great one, but it should serve.
The setup is my usual Raspberry Pi HQ camera, unknow C-mount lens, AO Cat.146 eyepiece in the trinocular port. These are largely unprocessed and not a lot of time was put into focus.
First things first, a standard. Not a great one, but it should serve.
- Cycloptic_7x_146.jpg (92.24 KiB) Viewed 6332 times
Last edited by dtsh on Tue Feb 08, 2022 1:26 am, edited 1 time in total.