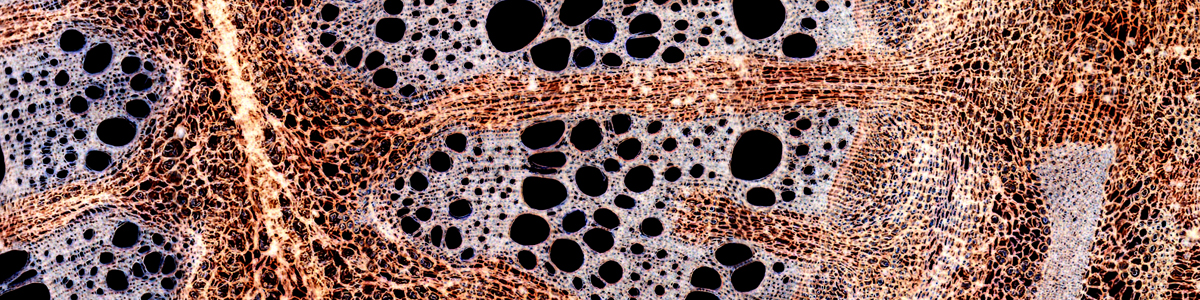

Micrographs are frequently low in contrast. Some specimens (such as bacteria) are generally quite difficult to see because they are either transparent or because they are not very colored in the first place. The contrast also drops significantly when one opens the condenser aperture diaphragm to observe at the maximum resolution that the objective is able to deliver. In these cases, the resulting micrograph can lack impact and simply does not look as crisp and attractive as one would like to have it appear. Contrast enhancement makes the dark areas appear darker and the bright areas brighter. The maximum contrast is achieved when the darkest part of the image becomes black and the brightest part (which is usually the background) becomes white.
Practically all image editing programs offer the possibility for contrast enhancement, but not all of them allow for sufficient fine-tuning. Some programs only have a simple slider for adjusting the contrast. This slider can be dragged from “high” to “low”, quite similar to the contrast adjustment on televisions. If pulled too much into the “high” direction, there is the possibility that colors are cut off at the extreme end and that this results in an information loss. The only possibility to check is to greatly increase the contrast, to save the picture (using a new name) and then to re-open the picture. Reducing the contrast again should produce the original image. If this does not work, then image information was lost in the highlights and in the shadow areas.
Better programs (such as Photoshop and GIMP, among others) have a more refined way of adjusting contrast. The “levels” dialog box displays a so-called histogram. This histogram displays the proportion of different brightness values found in the image. Beneath the histogram, one can find three small handles which can be used to adjust the contrast of the image. Click and drag the left handle towards the center in order to make the dark parts of the image, the shadows, darker. The right handle is used to adjust the brightness of the highlights. A central slider is used to adjust the brightness of the mid-tones. Such a levels dialog has several advantages over a single slider. First, it allows you to adjust the contrast asymmetrically. Maybe you want to make the background brighter without adjusting the mid-tones and shadows. In this case you only manipulate the left slider. Second, the histogram provides valuable information about the brightness distribution of the pixels. It is therefore possible to estimate how much color information was lost by the contrast correction.
Adjusting the contrast
To adjust the contrast, I would recommend the following approach. Pull the left slider towards the center until it touches the first peak of the histogram. I will refer to this peak as the “black” peak. The darkest part of the image is now completely black. Move the right slider towards the center until it too just touches the first peak of the histogram on the right side. This is our “white” peak. You have now maximized the contrast without (significant) loss of image information. Last, move the central slider left and right to adjust the mid tones. Move it to the left to make the mid tones darker and to the right to make them brighter. There is some experimentation necessary here and much is a question of taste. Moving the central slider does not result in a cut-off of color values, so you do not have to worry about information loss.
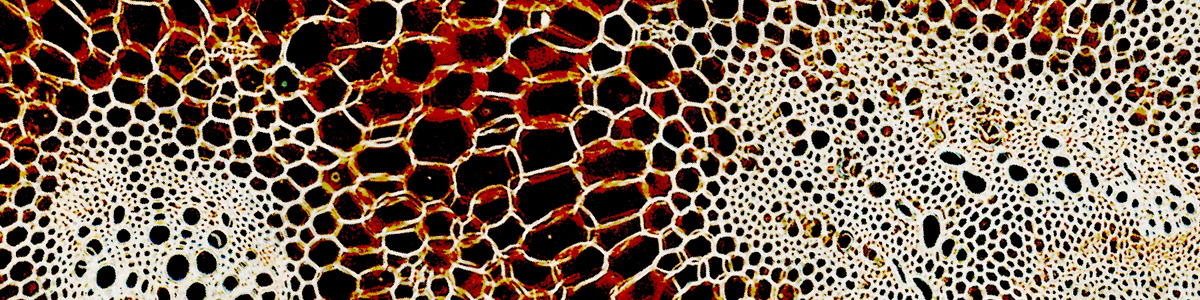
Sometimes a loss of image information is desirable, however. Darkfield images, for example, look best if the background is completely black. Digital cameras will rarely produce images with a completely back background, unless the picture is significantly underexposed. Moving the left slider only to the beginning of the “black” peak will not make the background completely black, because some pixels of the background might be only in a very dark grey. In this case it is best to move the slider well into the “black” peak to also make these pixels black. In brightfield images, the background is often in a light yellow and bright specks of dust are sometimes visible. Moving the right lever well into the “white” peak will make these bright specks of dust disappear in the white background.
The “lazy microscopist’s” solution would be to use automatic levels adjustment. The software will then determine the optimum position of the levers automatically, by considering the brightness distribution of the pixels in the histogram. Depending on the program, the automatic levels option might adjust the contrast for the three primary colors red, green and blue separately, however. The manual mode described before groups all three color channels together. The separate adjustment of the primary colors will automatically also introduce a white balance. The yellow background of the micrograph will then not only become a bright yellow, but will be turned into white. This can result in a significant color shift of the whole image, which might or might not be intended.